The Advertisements feature of Polygon Central allows the configuration of communication and marketing pieces which can be applied to: • Mobile apps • Legacy mobile app • Web Ordering (OLO3) • Kiosk • Customer Displays (and Status Screens)
How to Access
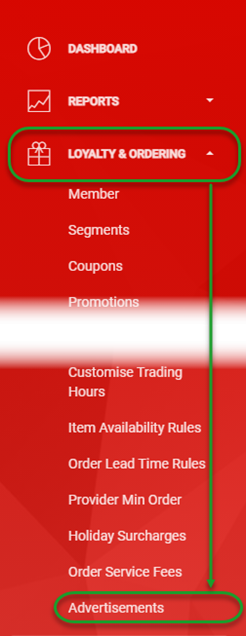
- Login to Polygon Central
- Choose Loyalty & Ordering in the menu
- Now choose Advertisements.
Access to Advertisements – View
Access to Advertisements – Edit
Media Upload – View
Media Upload - Edit
Navigating the Advertisements List
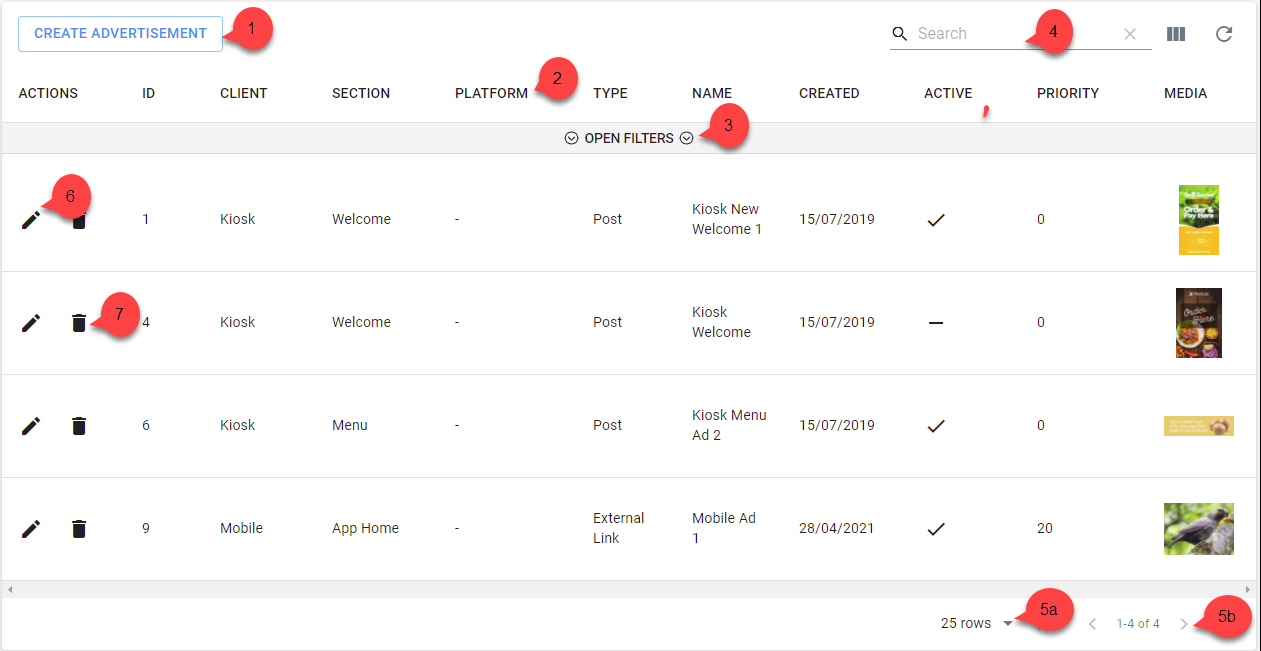
- Use the Create Advertisement button to set up an advertisement.
- Click on any column heading to sort by any column, an arrow will indicate if the current sort is ascending or descending . Click on the column heading again to reverse the sort order.
- Click on Open Filters to open the filter bar (toggles to Close Filters):
- Use the Search field to search for an advertisement by name.
- Visible Records:
a) Increase the number of rows displayed on one page.
b) Navigate multiple pages of advertisement records. - Use the edit icon to open an advertisement and view or modify the details. You can also click anywhere on the advertisement to open.
Note: only fields that are not ‘greyed out’ may be edited. - Use the bin icon to delete an advertisement from the system
Filtering the Advertisements List
With the filter bar open, options to filter the advertisements are available. Filtering may be on:
- ID (data entry field)
- Client (chosen from drop-down options)
- Section (chosen from drop-down options)
- Platform (chosen from drop-down options)
- Type (chosen from drop-down options)
- Name (data entry field)
- Active Status (indicator toggles between active, inactive and all statuses when clicked)
Note: The Open Filters option toggles to Close Filters once clicked.

Adding an Advertisement
To add a new advertisement:
- Use the Create Advertisement button
- Complete the advertisement form. The details below will assist you.
- Use the Submit button to save the advertisement when finished.

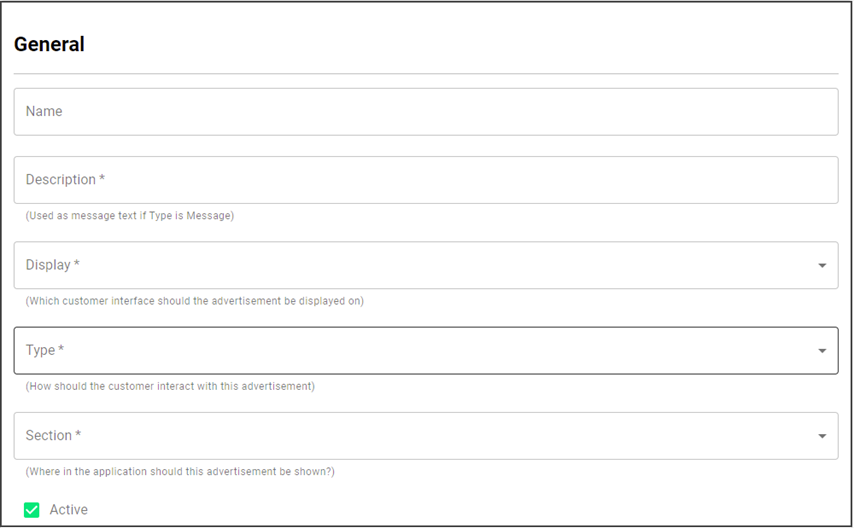
General
Complete these fields in the General section. Fields marked with * are mandatory fields and must be entered for the advertisement to be saved successfully.
Note: Only the fields relevant to the selection made for Display will be available. For example, the Platform field is not presented if Kiosk is chosen for Display as the selection of either Android or iOS does not apply.
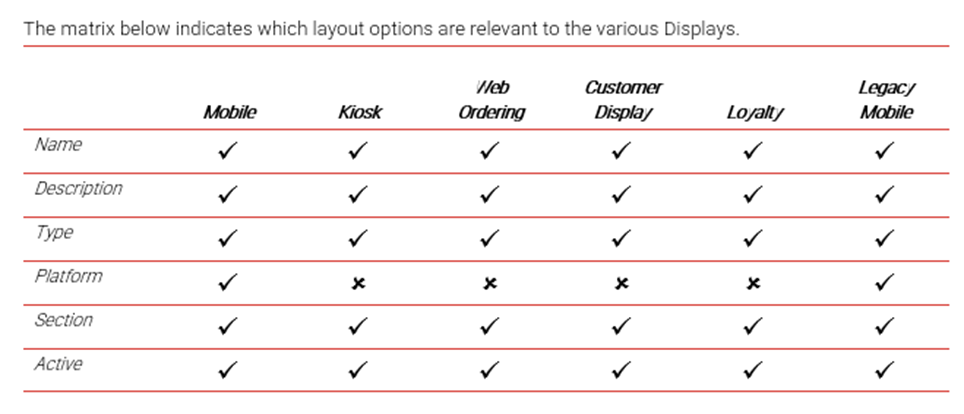
The matrix below indicates which layout options are relevant to the various Displays.
Name
The Name field is for internal use only and is not displayed on any external device. This is purely for you to give the advertisement a title.
Description
The Description field is visible only if the Type is message. The text entered here will be displayed on the home screen as a banner message.
Display
Choose the customer interface to which this advertisement is to be applied from the drop-down list.
Note: at the time of publication these are the only valid options:
- Mobile
- Kiosk
- Web Ordering (OLO3)
- Customer Display (and Status Screens)
- Legacy Mobile
Note: please speak with your Redcat contact if you are unsure if your app falls into the mobile, or legacy mobile category.
Future options will include:
- Loyalty
Type
Select the required Type from the drop-down list. This determines how your customer will interact with this advertisement.
Note: Advertisements for kiosk and customer display can only be of the Type = Post.
- Post:
Will display an image, gif or video only - Message:
Will display text from the Description field in banner format - Screen Link:
Displays an image, gif or video that when touched will take your customer to another page within the app. This can also take your customer directly to a specified coupon if desired. - External Link:
Displays an image, gif or video that will launch the device default browser and load a specified URL when touched. - Internal Link:
Displays an image, gif or video that will launch a browser within the app and load a specified URL when touched.
Platform
Determine if this advertisement is relevant regardless of the device platform. If so, do not make a selection in this field.
If the advertisement is relevant only for customers using a specific platform, choose accordingly:
- Android or
- iOS.
Section
Choosing a Section will determine where in your selected Display the advertisement will be visible.
Choices are:
- Home (kiosk only)
- Welcome (kiosk only)
- Menu (kiosk only)
- Menu Overlay (web ordering and kiosk only)
- Kiosk Mixins (kiosk only)
- Mixins (mobile and legacy mobile app)
- App Home (mobile app)
- Order Status Screen Full (order status screen only)
- Order Status Screen Bottom (order status screen only)
- Sale Type
- Advertisement Pane (Customer Facing Displays)
- Login (kiosk only)
Note: Mixins are a specialised option and may not apply to all kiosks or apps.
Active
The active status of this advertisement can be toggled on or off using the Active checkbox.
Layout
Complete these fields in the Layout section. Fields marked with * are mandatory fields and must be entered for the advertisement to be saved successfully.
Note: Only the fields relevant to the selection made for Type will be available. For example, the Link URL field is not presented if Post is chosen for Type as Post is an image-only option.

The matrix below indicates which layout options are relevant to the various Types.
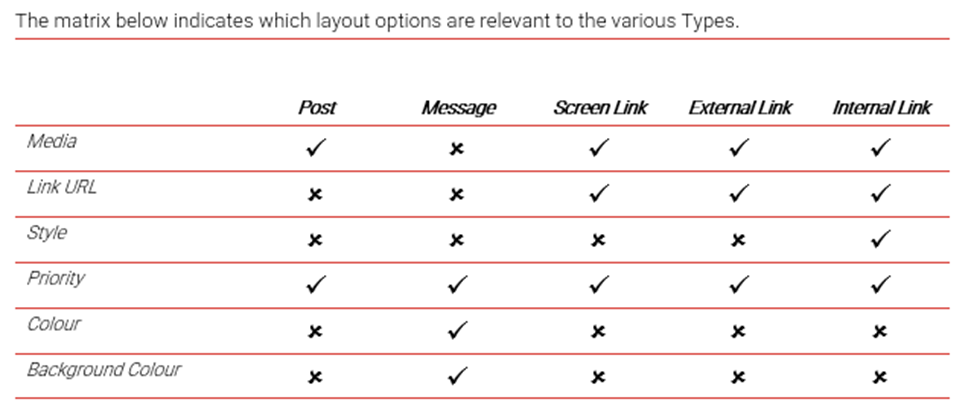
Media
Use the Choose File button to upload the required media file.
Acceptable media file types are:
- .gif
- .bmp
- .jpg
- .jpeg
- .png
- .webp
- .svg
- .webm
- .mp4
- .mpeg
For apps, images will be automatically resized to fit the device display ensuring that the original image ratio is maintained.
The maximum file size limit shown will be the configured maximum for your Polygon Central - this is generally 5MB. Please be aware that images/videos are encoded during the upload and this process will increase the file size - a 4.9MB image may increase to 5.2MB and fail to upload.
It is possible to increase the maximum file size limit up to 15MB (provisioning will be required to do this) although it is not recommended due to app responsiveness (think of the overhead to render images and the impact on your customers’ mobile data plan!).
Images for Kiosk (welcome screen, home/login ad banner and menu ad banner) need to comply with image dimensions specified in separate documentation: Polygon Kiosk Onboarding and Graphic Requirements Guide.
Images for Customer Display (for Status Screens) need to comply with image dimensions specified in separate documentation: Polygon Central – Status Screens.
***Note: Status Screen Full advertisements are hard coded to display for 4 seconds in the cycle of order status screen panes and any value entered here must not exceed 4 seconds.
Link URL
Enter the destination URL required. Both http:// and https:// URL paths are acceptable.
If the Type is Screen Link, enter the name of the app screen that you want to take the customer to.
Options are:
- Home (you are already here)
- Card
- Offers
- Locations
- Order
- More
To link to a specific coupon, the entry format is:
- Offers?programId=[coupon ID]
Note: Screen link options are case sensitive and must be entered with the capital letter. When linking to a specific coupon it should be entered exactly as above including the capital I in Id.
Style
This is used if extra CSS styling is to be applied for an internal link.
It can be used to apply a negative margin to the link to hide the header so that the webpage header is not visible to your customer.
You will need to discuss this with your Redcat contact, or a member of the development team if you want to implement this.
Priority
The priority assigned to an advertisement will determine the order of the item in the list.
Advertisements with the highest priority will be displayed at the top of the listing, while advertisements with the lowest priority will be displayed at the bottom.
The default priority when creating an advertisement is zero (0).
Colour
This is the colour that will be used for Message text.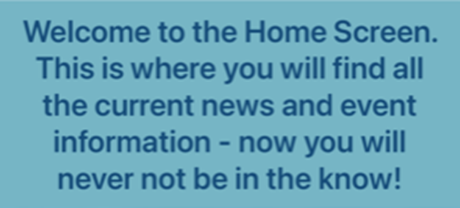
If no colour is specified, the app default colour will be used.
- If specifying a colour, please enter the Colour HEX code.
Background Colour
This is the colour that will be used as the background for the Message banner. If no colour is specified, the app default colour will be used.
- If specifying a colour, please enter the Colour HEX code.
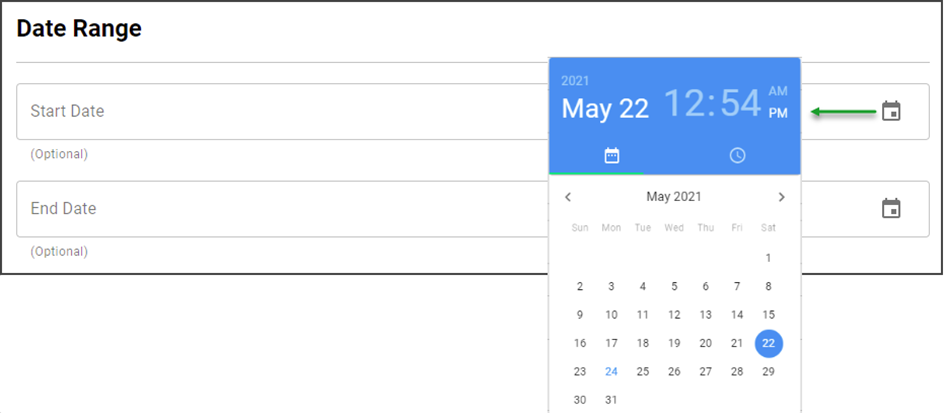
Date Range
If you only want an advertisement to show for customers for a specified date range, you may enter optional Start Date (date & time) and End Date (date & time) data.
The advertisement will run from the start date/time until the end date/time.
You can enter directly in the field using the format DD/MM/YYYY hh:mm a or use the calendar tool at the right end of the field to choose the desired date – please ensure that you also mark the desired time.
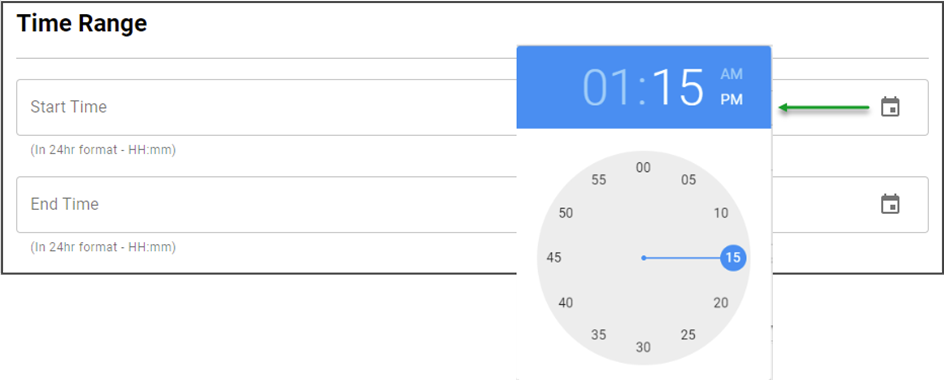
Time Range
If you only want an advertisement to show for customers during particular times of the day, you may enter optional Start Time and End Time data.
The advertisement will run only during the time period specified. For example, you may only want advertisements regarding your happy hour specials to display between 3pm (15:00) and 5pm (17:00).
You can enter directly in the field using 24 hr format HH:mm, or use the time tool at the right end of the field to choose the desired time.
Version Range
It is possible to filter the advertisement so that it is only visible in specific version of the app.
If you want to implement this, it is recommended that you discuss first with your Redcat contact to determine the relevant versions.
Other Rules
Complete these fields in the Other Rules section.
Note: Only the fields relevant to the selection made for Display will be available. For example, the Member Groups, Segments and Coupon fields are irrelevant to Status Screens.
Days of the Week
If you want to target the advertisement to show only on specific days of the week (for example, only on Monday, Wednesday, and Friday) use the drop-down to select the desired days.
This is a multi-select field – highlight all the days that apply, then click OFF the field to apply.
Member Groups
If you want to target the advertisement only to members of specific groups, choose the relevant member groups from the drop-down list.
Groups will be applied to the field once they are highlighted. To assign more than one group proceed to select a second and subsequent group. Groups will be incrementally added to the field when selected.
Coupons Programs
If you want the advertisement to be displayed only for members who are assigned a specific coupon(s), select the relevant coupons from the drop-down list.
Coupons will be applied to the field once they are highlighted. To assign more than one coupon proceed to select a second and subsequent coupon from the list. Coupons will be incrementally added to the field when selected.
Member Segments
If you want to target the advertisement only to members of specific segments, choose the relevant member segments from the drop-down list.
Segments will be applied to the field once they are highlighted. To assign more than one segment proceed to select a second and subsequent segment. Segments will be incrementally added to the field when selected.


Article Change Log
| Date | Record of Changes | Author |
|
April 2023 |
Updated to reference requirements for customer-facing displays. |
S Black |
|
July 2024 |
Updated to include matrix for Other Rules section and including Location mapping (*specifying Location mapping is ignored for Order Status Screens). Updated to include requirement that the duration for Order Status Screen Full Page advertisements cannot exceed 4 seconds. |
S Black |
|
March 2025 |
Updated to reflect changes (dynamic display of configured limit) of the maximum file size limit in the media upload section. |
S Black |