Quickly Creating 'like' Composite Items
Summary
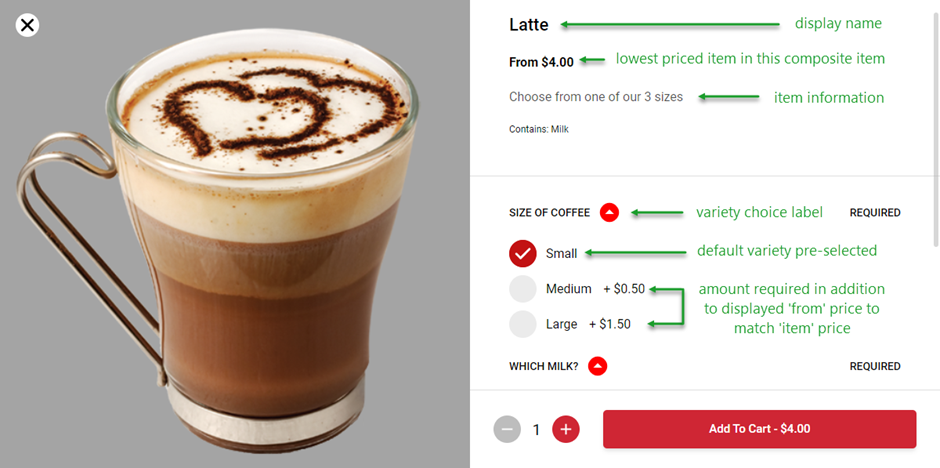
A composite item is used whenever you want to present a number of sizes or varieties to the customer from a single item displayed on the menu.
For example, customers will select their coffee and then be presented with the size choice of small, regular or large. Similarly, a customer might choose a sandwich roll, and then be presented with the filling choices of pulled pork, slow-cooked lamb or shredded chicken.
Each of the sizes or varieties will be an individual Item and will be added to the composite item by selection from the Items list.
In the Composite Items section, you will:
- determine the customer-facing name
- add the description to be displayed for the customer
- determine the label for the variety choice
- select the individual Items to be included and set the variety label for each
- assign the default variety (this will be the pre-selected choice when your customer orders)
- assign images
The Product Overview article for Menu Information Manager is here
- The From price will be the value of the lowest priced variety included.
- Any additional amount indicated on a variety will be the value required to increase the From amount to the value of the Item that corresponds to that variety.
How to Access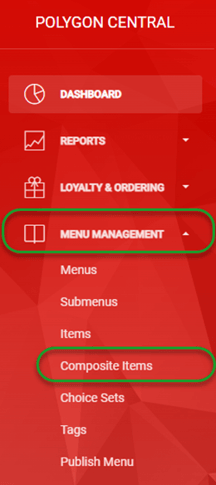
To access Composite Items:
- Login to Polygon Central
- Choose Menu Management from the menu
- Choose Composite Items from the sub-menu options.
Note: A Polygon Central user must be assigned a user Role with the following privileges in order to create and manage Composite Items.
MIM - Composite Items (view)
MIM - Composite Items (update)
Composite Items
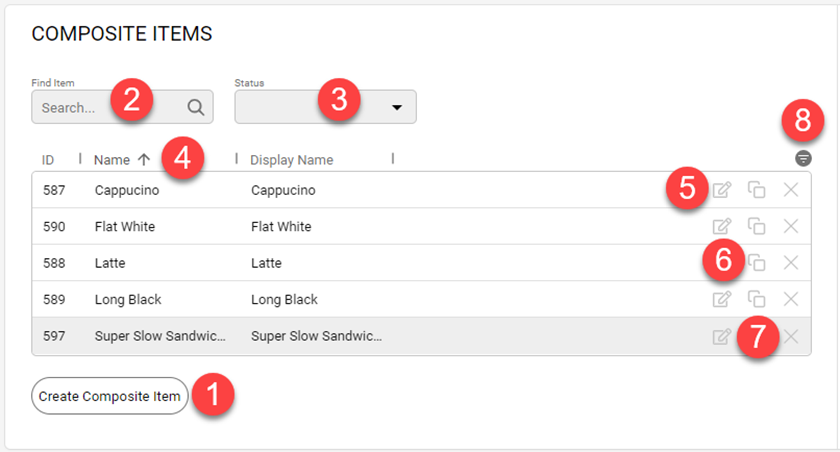
As Composite Items are added, they can be accessed and maintained as follows:
- Use the Create Composite Item button to program a new Composite Item record.
- Search for a specific Composite Item using the Find Composite Item field.
- Filter the Composite Items list by Status. Choose either Active or Inactive from the status drop-down list.
- Click on any column heading to sort by any column, an arrow will indicate if the current sort is ascending or descending. Click on the column heading again to reverse the sort order.
- Use the edit icon to open a Composite Item and view or modify the details.
- Use the copy icon to use the details in the current record as a starting point for a new Composite Item.
- Use the delete icon to remove a Composite Item from the system.
- Use the Show/Hide Columns icon to add or remove columns from the list view.
The default list will show:
ID,
Name,
Display Name
Also available is:
Status
Creating a Composite Item
When creating a Composite Item, each of the varieties of the item must first exist as an Item.
You can find more information on Items here.
To add a new Composite Item:
- Use the Create Composite Item button to open the Create Composite Item form.
- Ensure that the Active check box is ticked if you want this composite item included in the menu.
- Enter the internal name for this Composite Item in the Name field.
- Enter the Display Name for this Composite Item. This is the name that will be displayed on the menu.
- Enter the Item Information. This is additional descriptive information and will be displayed with the Composite Item on the menu.
- Enter the Variety Choice Label. This will be displayed as the heading text for the choice on the menu. For example, Size or Choose Protein.
- Use the Add Variety button to choose the Items that are to be included in this Composite Item.
- Once the varieties are added, you can enter the Override Variety Label for each item. This is the text that the customer will see for each variety.
- The varieties will be displayed for the customer in the order they are listed here. You can drag and drop them to reorder the list if required.
- Drill down into the variety to change it using the edit icon if required (the Edit Item form will open).
- Remove a choice set from this Item using the delete icon.
- Select the Default Variety from the drop-down list. This is the item that will be the pre-selected choice when the customer access this composite item from the menu.
- Add an image for this Composite Item if required. You can drag and drop images onto the form, or use the browse button to navigate to and select the image.
If you do not add an image for the Composite Item the image assigned to the default variety will be displayed on the menu.- Once uploaded, select the relevant provider for the image using the Select Provider drop-down. If the image is not for a specific provider, choose Default.
-
- File formats for images supported for Polygon Customer Ordering are gif, bmp, jpg, jpeg, webp and svg. Not all file formats listed may be supported by third-party ordering providers and image specifications for each provider should be checked before uploading and applying images.
- Use the Save button in the top right corner to record the details for this Composite Item.

Editing a Composite Item
If you need to make changes to a Composite Item:
- Select the Composite Item from the list and use the edit icon (see point 5 above) to display the Edit Composite Item form.
- Make any amendments required and use the Save button in the top right corner to record the changes.
Quickly Creating 'like' Composite Items
If you need to program a few Composite Items that are similar to Composite Items already created you can:
- Select the Composite Item to be used as your base from the list and use the copy icon (see point 6 above) to display the Create Composite Item form.
The form will be displayed with the same details as the source and the save button will be disabled until you make a change. - Make any amendments required and use the (now enabled) Save button in the top right corner to record the new Composite Item.
Deleting a Composite Item
If you need to delete a Composite Item:
- Select the Composite Item from the list and use the delete icon (see point 7 above).
- Confirm your delete action. You will be advised if the composite item you are about to delete has been included in a submenu.
Related Articles
Further information can be found in the following articles.
Menu Management - Publish Menu
MIM - How to: Create a Family Pack with multiple mains and sides.
Article Change Log
| Date | Record of Changes | Author |
|
June 2023 |
First publication of this article. |
S Black |
|
August 2025 |
Added links to the How To articles in the Related Articles section. |
S Black |