Google Map API Keys
Summary
Redcat requires that clients obtain a set of Google API keys which will be used at multiple touch points throughout the customer user experience for both Polygon Loyalty and Polygon Customer Ordering.
Essentially when ever the system needs to display a map, locate a pin or lookup an address this is facilitated by the Google API keys.
The API keys are also required prior to the build of any loyalty app.
This document details the procedure for obtaining a set of Google API keys and it is expected that the Redcat Delivery team will guide you through the process.
Contents
Creating a Google Cloud Project
- Create the Public Web UI Key
- Create the Private Programmatic Key
- Create the App Key
- Copying the API Keys
Pre-requisites
If you do not already have a Google account, you will need to create one before the cloud project can be generated.
As a Google account is also required specifically for app analytics you could use the same account. If you choose to do this, the following requirements apply.
Please create the account with the email address in the format [clientname].redcat@gmail.com.
Please ensure that 2FA (2 factor authentication) is not enabled as we will need to log in to this account.
Google API Keys
A minimum of three (3) API keys are required:
- Public Web UI Key
(used by the loyalty and ordering website to display customer facing maps). - Private Programmatic Key
(used by Polygon Central to do address lookups including Geo Shapes). - App Key
(used by Polygon Loyalty apps to display customer facing maps during ordering).
Creating a Google Cloud Project
Before the required API Keys can be created, you will need to:
- Create a project that will house the API keys
- Link a billing account to the project -
The billing account will require the client to provide payment details during setup (usually a credit card) - Ensure that the project has the relevant API’s enabled
Create the Google Cloud Project
Use this URL to access the Google Cloud Console.
https://developers.google.com/maps/documentation/embed/cloud-setup
Hit the Create New Project button, enter a Project Name and click the Create button to save.

Link a Billing Account
Once the project is created, you can choose Billing from the menu, then Link A Billing Account.

Alternatively, you can use this URL
https://console.cloud.google.com/projectselector2/billing.
Once you click on your project, you will be presented with the Link A Billing Account button.

You can then follow the steps to Create A Billing Account. This includes entry of a valid mobile number for identity verification and credit card or payment information.

Enable the Required API's
To use Google Maps Platform, you must enable the APIs or SDKs you plan to use with your project. Use this URL to first enable the Maps JavaScript API.
https://console.cloud.google.com/apis/library/maps-backend.googleapis.com
Make sure that your project is listed in the title bar, and use the Enable button.

Now that the Maps JavaScript API is enabled, you will see a further list of Additional APIs available.
Continue to enable the following list of API’s by clicking on each and using the Enable button.
- Geocoding API
- Places API
- Maps SDK for Android
- Maps SDK for iOS

When finished, you should have five (5) API’s enabled.
Steps to Creating API Keys
Now that you have created the project, added a billing account and enabled the Maps Embed API, you can proceed to create the required API Keys using this URL.
https://developers.google.com/maps/documentation/embed/get-api-key
Click the Go to the Credentials page button, and then select your project.

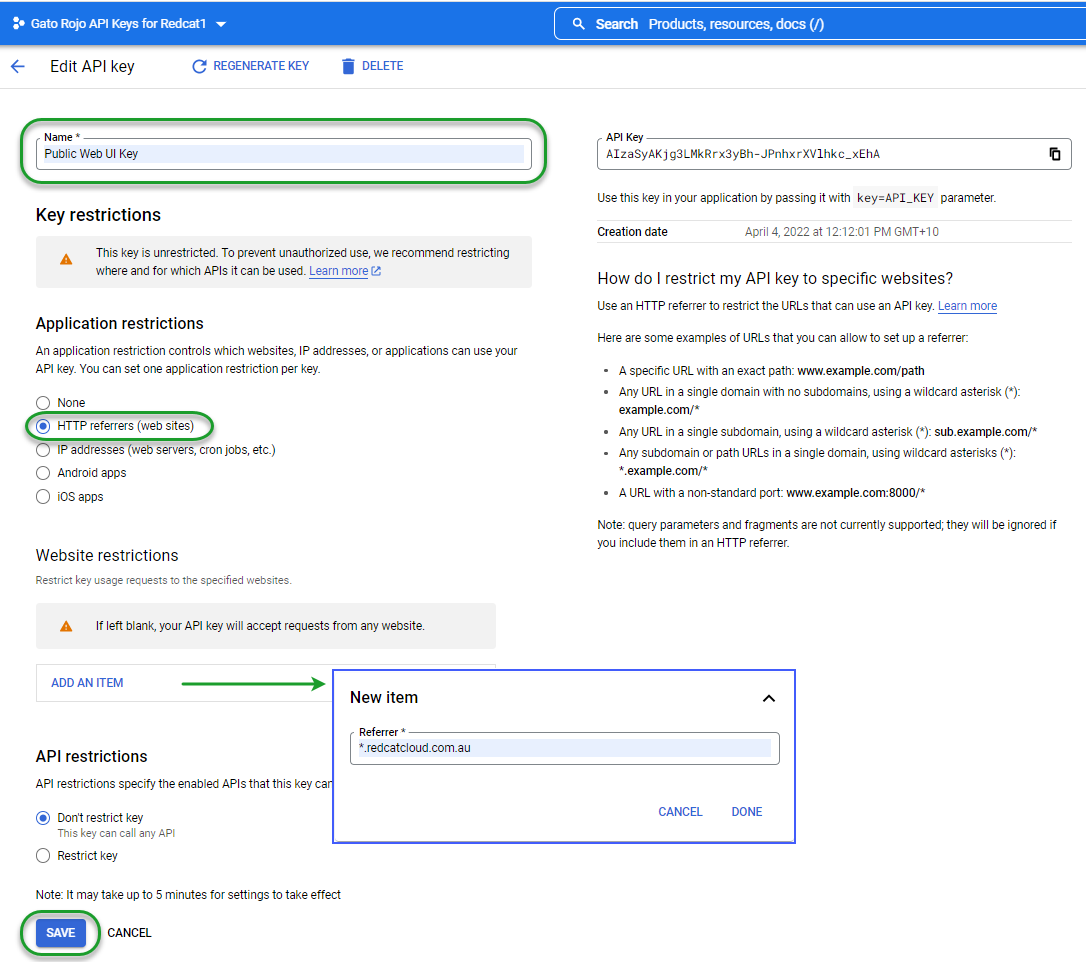
Create the Public Web UI Key
- Choose the + Create Credentials option
- then choose API key.
- When the API Key is created, choose the Close button.

- Now click on the created API Key and,
- Rename the key to Public Web UI Key
- Under Application Restrictions, choose HTTP Referrers (web sites)
- Then under Web Site Restrictions click Add An Item, then in New Item, enter *.redcatcloud.com.au
- Use the Save button.

Create the Private Programmatic Key
Repeat the above process to create the Private Programmatic Key.
- Choose the + Create Credentials option
- then choose API key.
- When the API Key is created, choose the Close button.
- Open the new key and rename to Private Programmatic Key
- Use the Save button.
No restrictions are needed as this key will be stored securely in Redcat’s backend system
Create the App Key
Repeat the above process to create the App Key.
- Choose the + Create Credentials option
- then choose API key.
- When the API Key is created, choose the Close button.
- Open the new key and rename to App Key
- Use the Save button.
By default no restrictions are needed as this key will be built directly into the app.
Copying the API Keys
The keys will now need to be included in Polygon Central configuration settings, and included in the build for your app.
To copy the keys, use the Copy API Key icon shown below and paste the key into a document.
You will need to provide these API keys to your Redcat contact for inclusion in Polygon Central configuration settings and for your app build.

