Summary
This document describes how to create and manage Groups in Polygon Central.
Groups are collections of individual members and are utilised by the Polygon Loyalty module where specific marketing solutions are tailored towards the group and the group’s points aggregate can be used to achieve predefined rewards. Groups are also useful to facilitate reporting or to apply points or money to a range of cards.
Contents
Adding Card Ranges for Auto Assignment to the Group
Adding Already Registered Member Card to the Group
Removing a Member from the Group
Uploading Member data via CSV file
Uploading Captain data via CSV file
Adjusting Pooled Money and/or Points Balances
How to Access
To access Groups: 
- Login to Polygon Central
- Go to Loyalty & Ordering in the side menu
- Click Groups
NOTE: A Polygon Central user must be assigned a user Role with the following privilege in order to create and manage groups: Groups (Modify)
Navigating the Groups List
As Groups are added, they will be listed in the system as follows:
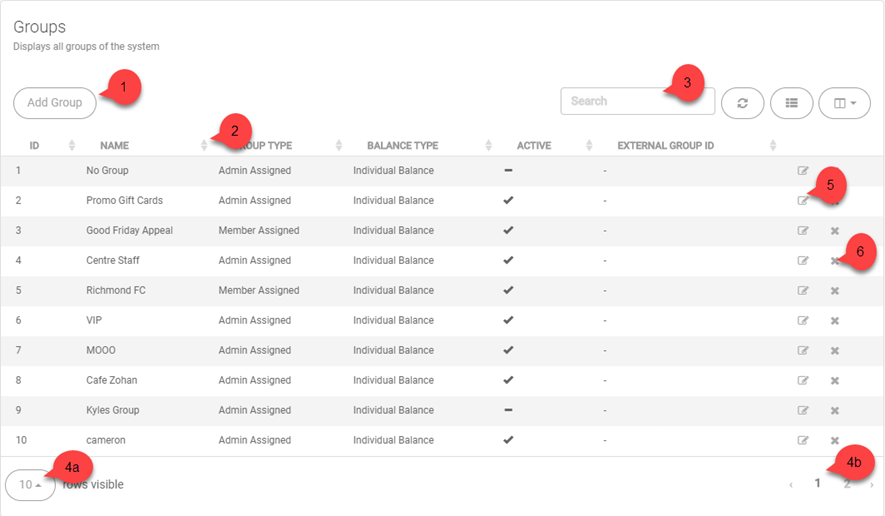
- Use the Add Group button to set up a new group.
- Use these arrows to sort the list by any column, ascending Ñ or descending D
- To find an existing Group, Search by Name. The list will filter automatically as you type.
- Visible records:
- Increase the number of rows displayed on one page
- Navigate multiple pages of promotion records
- Use the edit icon to open a Group and:
- view the configured details of an existing group
- edit the configuration for this group
- add a registration range for this group
- view or remove the members in the group
- Use the X icon to deactivate a Group from the system
The Group Wizard
Press Add Group and follow the steps onscreen to create a new group.
Fields marked as ‘Required’ must be completed before moving to the next screen. You can click:
- Next: proceed to next step in the wizard
- Back: return to previous options and change your selection
- Cancel: abort this Group without saving
- Finish: save this Group.
Listed below are the configuration steps and additional information about some of the options. During completion of the wizard your choices will be displayed in red (enabled). Other choices will be displayed in grey (disabled):
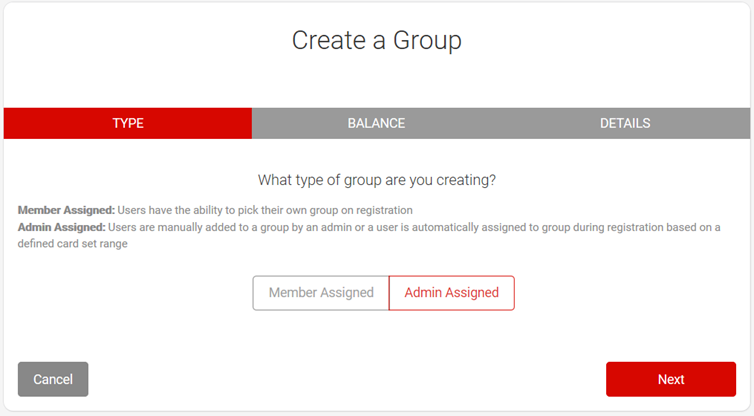
TYPE
Choose the type of Group you are creating.
- Member Assigned
Users have the ability to pick their own group upon registration. - Admin Assigned
Users are manually added to a group by an admin or a user is automatically assigned to a group during registration based on a defined card set range.
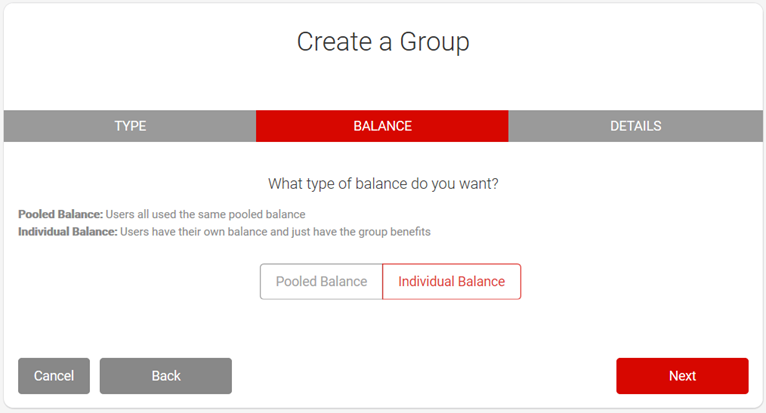
BALANCE
Choose how the balance for this group will operate.
- Pooled Balance (available only to Admin Assigned groups):
Users all use the same pooled balance. Further definition as to whether the group will pool Money and/or Points is then required. - Individual Balance:
User have their own balance and have access to the group benefits.
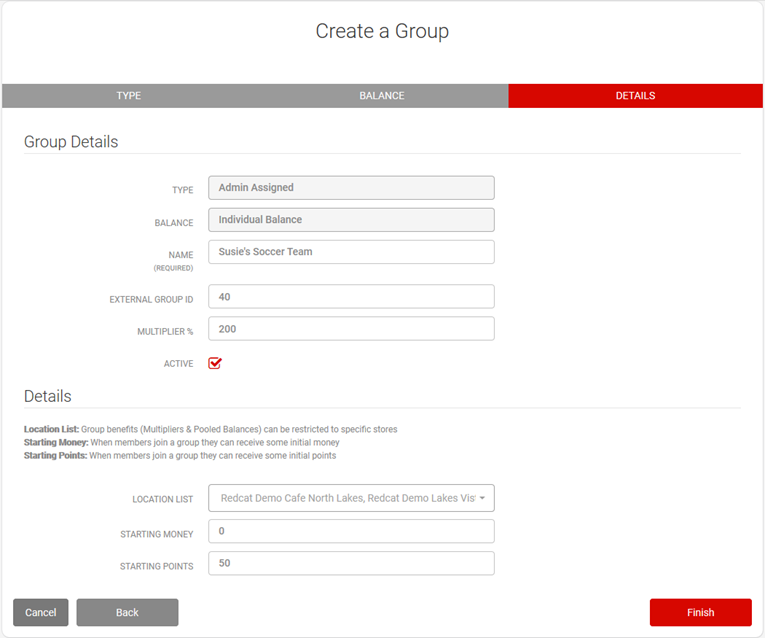
GROUP DETAILS
The group details are where the Group Name, External Group ID and Multiplier are assigned.
- Type:
Will show either Admin Assigned or Member Assigned as defined in the first step. - Balance:
Will show either Pooled Balance or Individual Balances as defined in the previous step. - Name:
Enter the name for the group you are creating. - External Group ID:
This is an optional field. Assign an external group ID if desired. - Multiplier %:
Enter the required multiplier %. This will determine the rate at which points are accrued for members of this group. For example, if a PLU is programmed with 14 accrual points:
0% and the member/pool will accrue 0 points
50% and the member/pool will accrue 7 points
100% and the member/pool will be credited with 14 points
150% and the member/pool will be credited with 21 points
200% and the member/pool will be credited with 28 points.
Further details can be added to restrict accrual and redemption of group benefits to specific locations. You can also define whether money and/or points are to be added to the cards in the group.
- Location List
Group benefits (multiplier and pooled balances) can be restricted to specific locations. If you which to do this, choose the relevant location(s) from the Locations List. Multiple selections can be made by clicking on more than one location. - Enter the value for Starting Money
When members join an individual balance group they will receive this amount of money.
For pooled balance groups, enter the amount of money that the group’s pooled balance will start with. - Enter the value for Starting Points.
When members join an individual balance group they will receive this number of points.
For pooled balance groups, enter the number of points that the group’s pooled balance will start with.
Editing an Existing Group
After a Group has been created, click the edit icon to view the configured details.
Fields displayed with a grey background are read-only and cannot be changed.
These fields are:
- Group ID
- Type (Admin or Member Assigned).
- Balance (Individual or Pooled)
- Balance Type (if pooled, either Money, Points, or Money & Points)
If an incorrect Type or Balance detail was chosen during the initial setup the Group will need to be deactivated and a new group entered.
Make the required changes. Press Submit to save changes and return to the Groups list.
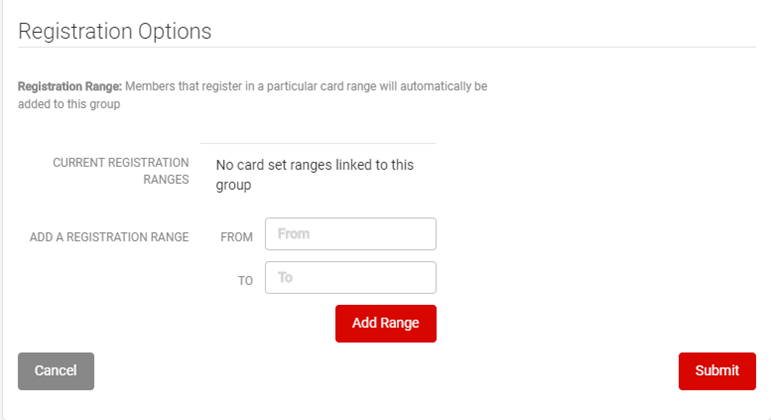
Adding Card Ranges for Auto Assignment to the Group on Registration
Ranges of card numbers can be applied to the group which will automatically assign the member to the group when they register.
To do this:
- Open the Group.
- Scroll to the Registration Options
- Enter the relevant card numbers in the Add Registration Range FROM and TO The first number of the card range will be entered in the FROM box, while the last number in the card range will be entered in the TO box.
- Use the Add Range button to save the card range.
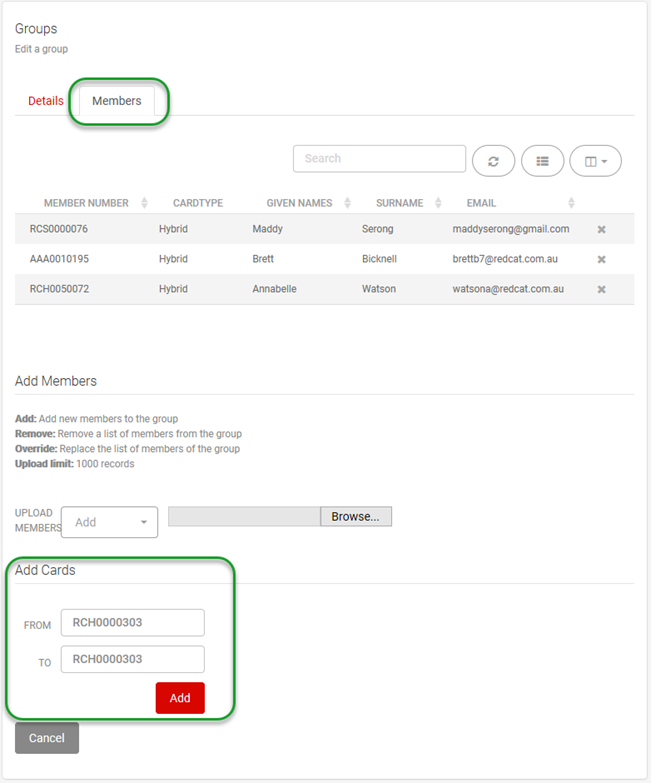
Adding Already Registered Member Card to the Group
If a member is already registered and their membership number is not part of a range which automatically assigned them to the group upon registration, they can be added to the group manually.
To do this:
- Open the Group.
- Navigate to the Members
- Scroll to the Add Cards
- Enter the card number of the member you wish to add to the group in both the FROM and TO
- Use the Add button to add the member to the group.
Note: Multiple members can be added to the group by entering a card range into the FROM and TO boxes. This will add ALL registered members existing in that card range to the group.
Removing a Member from the Group
A member can be manually removed from a group if desired.
To do this:
- Open the Group.
- Navigate to the Members
- Use the Delete (X) next to the member record to remove the member from the group.
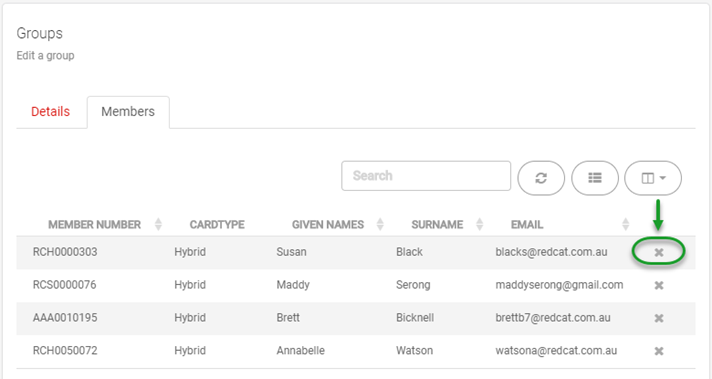
A confirmation message will be displayed.
- Check the member number listed is correct.
- Use the OK button to confirm the removal of the member from the group.
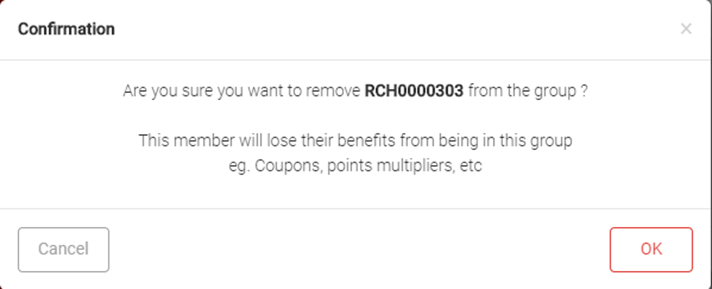
Note: Any points, points multipliers or coupons that were assigned to the member due to group membership will be removed from the member.
Captains
Within a Pooled Balance group, one or more members of the group can be designated as a Captain. These members are the group leaders.
If a pooled balance group has no assigned captains, every member is able to purchase goods with pooled points, and to spend down any pooled money.
If a pooled balance group has one or more captains, only the captains are able to use the pooled points to purchase goods, or to spend down any pooled money.
Assigning Captains
Captains can be assigned within a group by including them in a .csv file and uploading in the same manner in which members are uploaded.
Note: If the member to be assigned a captain is already listed as a ‘member’ of the group they will be removed from the member list and added to the captains list.
See the later section: Uploading Captain data via CSV file
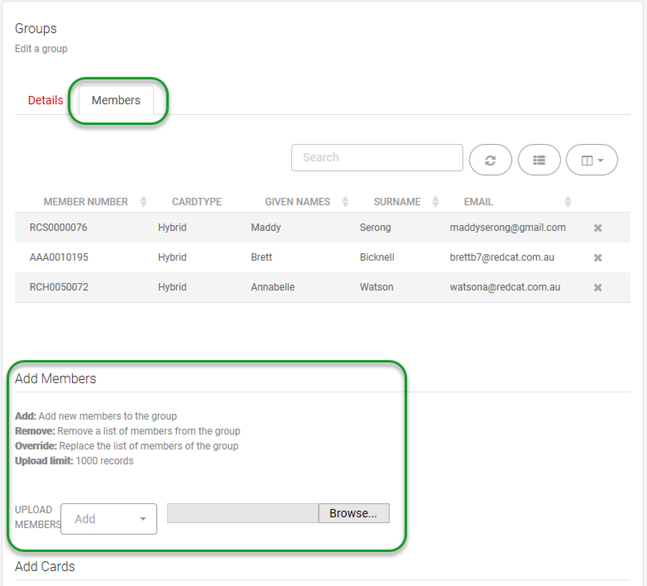
Uploading Member data via CSV file
Member data can be collated in to a .csv file and this file can be uploaded to:
- Add new members to the group (all members in the file will be added to the group)
- Remove members from the group (all members in the file will be removed from the group)
- Replace (override) the current members in the group with those contained within the file (remove all existing members from the group and replace them with the members contained in the file.
The .csv file is limited to 1000 records. If you need to add more than 1000 members to a group, split the .csv file into multiple smaller files. Use the Add or Replace (override) option when uploading the first file to suit your requirement, but ensure that the Add option is used to upload the 2nd and subsequent files.
To do this:
- Open the Group.
- Navigate to the Members
- Scroll to the Add Members
- Choose the upload type (Add, Remove or Override) from the Upload Members drop down box.
- Use the Browse button to select the relevant file.
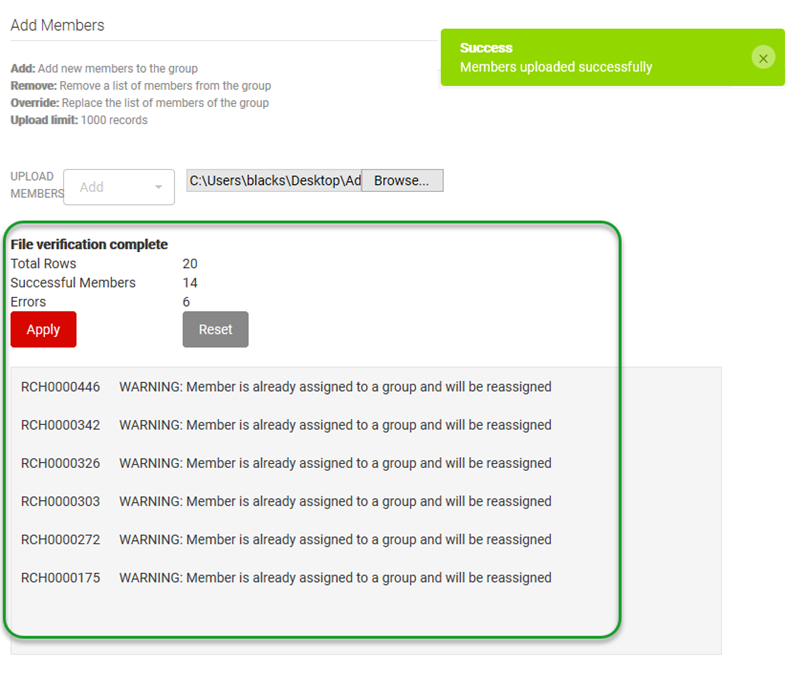
When the file is read and the data verified, the number of rows and successful member records will be displayed along with any error transactions. Descriptors of the errors will be provided so that the user can decide upon the best course of action.
- To continue and write the members into the group, choose the Apply
- To cancel without writing the members to the group, choose the Reset
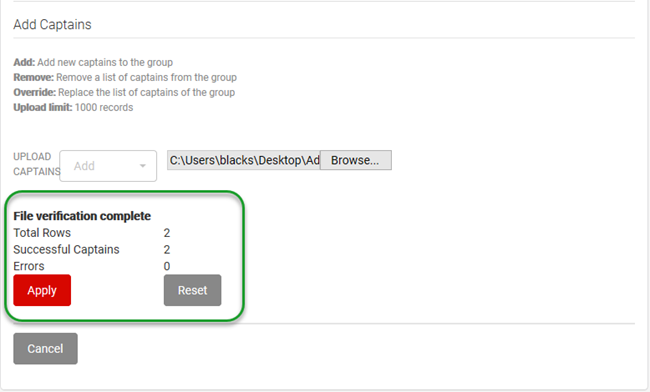
Uploading Captain data via CSV file
To assign Captains to a group (pooled balance groups only) data can be collated in to a .csv file and this file can be uploaded to:
- Add new captains to the group (all
records in the file will be added to the
group as a captain) - Remove captains from the group (all records in the file will be removed as captains from the group)
- Replace (override) the current captains in the group with those contained within the file (remove all existing captains from the group and replace them with the records contained in the file.
The .csv file is limited to 1000 records.
To do this:
- Open the(pooled balances only) Group.
- Navigate to the Captains
- Scroll to the Add Captains
- Choose the upload type (Add, Remove or Override) from the Upload Captains drop down box.
- Use the Browse button to select the
relevant file.
When the file is read and the data verified, the number of rows and successful captain records will be displayed along with any error transactions. Descriptors of the errors will be provided so that the user can decide upon the best course of action.
- To continue and write the captains into the group, choose the Apply
- To cancel without writing the captains to the group, choose the Reset
CSV file format
The file containing member data to add | remove | replace members (or captains) in the group should be a .csv formatted file which contains a single column with the heading MemberNo and the 10 character alpha(3) numeric (7) member numbers as shown.
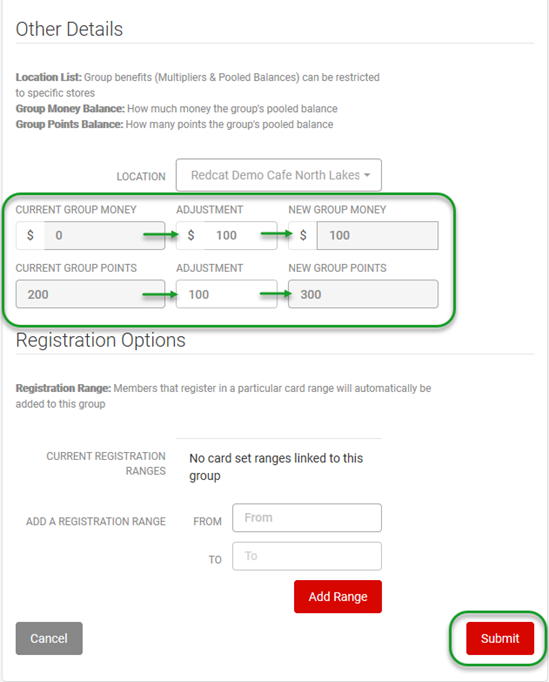
Adjusting Pooled Money and/or Points Balances
A Polygon Central admin user is able to make adjustments, both positive and negative, to a Group’s pooled balances for either money or points.
To do this:
- Open the(pooled balances only) Group.
- Scroll to the Other Details
- The Current Group Money | Points balances are displayed. Enter the amount of any adjustment required in the relevant Adjustment The new balances as effected by the adjustments will be reflected in the New Group Money | Points fields.
- Use the Submit button to save the adjustment(s).