Summary
Item availability rules allow the user to change the availability of customer facing PLU items for online orders.
These rules will remove the items selected from online menus making them unavailable for selection to customers.
Enhancements to Item Availability Rules in February 2022 include the ability to filter and select PLUs for inclusion in a rule by PLU Category.
Configuration is now available which will allow an automated menu update to third party WMOs (UberEats, DoorDash and Deliveroo) when item availability changes (both offline and return to online).
Contents
Accessing Item Availability Rules in Polygon Central
Accessing Item Availability Rules at POS
Accessing Item Availability Rules via Stellar
Navigating the Item Availability List
Accessing Item Availability Rules in Polygon Central
To access Item Availability rules:
- Login to Polygon Central
- Choose Loyalty & Ordering in the menu
- Now choose Item Availability Rules.
Note: A Polygon Central user must be assigned a user Role with the following privileges in order to create and manage Item Availability Rules:
- Access to view PLU Availability.
- Access to edit PLU Availability.
Accessing Item Availability Rules at POS
Legacy POS
To access Item Availability Rules from a LEGACY POS you will need to navigate to the Manage Web Orders screen via the button located on the POS.
Once here you will need to select Manage Available Items when this button is pressed you will be redirected to the web portal interface of the Item Availability Rules.

Polygon POS
To access Item Availability Rules from a POLYGON POS you will need to access the Admin menu, then Online Settings.
When you select the Manage Item Availability button you will be redirected to the web portal interface for Item Availability Rules.

Note: When creating rules from the POS web portal interface, users are not able to select any other locations. (To make changes for all locations users must use the Polygon Central interface.)
Note: Internet Explorer versions prior to Version 11.0 are not supported and may experience issues
Accessing Item Availability Rules via Stellar
To access Item Availability Rules from Stellar you will need to navigate to the Offline Items tab located on the top left side of the screen.

Note: When creating rules from the Stellar interface, users are not able to select any other locations. (To make changes for all locations users must use the Polygon Central interface)
Note: Internet Explorer versions prior to Version 11.0 are not supported and may experience issues
Prerequisites
You may need to confirm with your Redcat contact that all configuration settings are enabled to facilitate the enhancements introduced in February 2022 to automate a menu push to relevant third party WMOs when availability rules are created or expire.
These options are not generally exposed to Admin users.
Settings are located:
Configuration | Ordering | Stock Out | Stock Out Reasons
Configuration | Ordering | Stock Out | Export Menus on Update
Configuration | Ordering | Stock Out | Which Ordering Providers to Trigger Exports
Configuration | Integrations | DoorDash | Use Availability Rules
Configuration | Integrations | Google Food | Use Availability Rules.
You should consider what standard Stock Out Reasons you would like included.
Navigating the Item Availability List
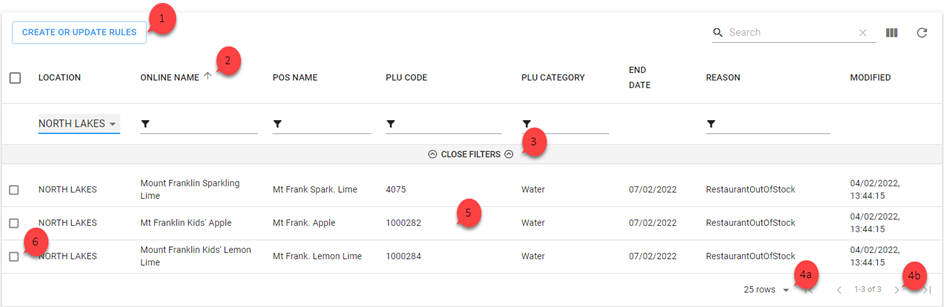
As Item Availability Rules are added, they will be listed in the system as follows:
- Use the Create or Update Rules button to set up an Item Availability rule.
- Click on any column heading to sort by any column, and arrow will indicate if the current sort is ascending Ñ or descending D. Click on the column heading again to reverse the sort order.
- Click on Open Filters to open the filter bar (toggles to Close Filters):
- Visible Records:
- Increase the number of rows displayed on one page.
- Navigate multiple pages of Item Availability records.
- You can click anywhere on an Item Availability rule to open and edit.
Note: only fields that are not ‘greyed out’ may be edited. - Use the select box to mark items as selected for actioning.
Multi-Select Actions
If multiple items are selected (see point 6 above) the multi-select action bar will be displayed.
The number of records selected will be shown, and the bin icon is available for use.
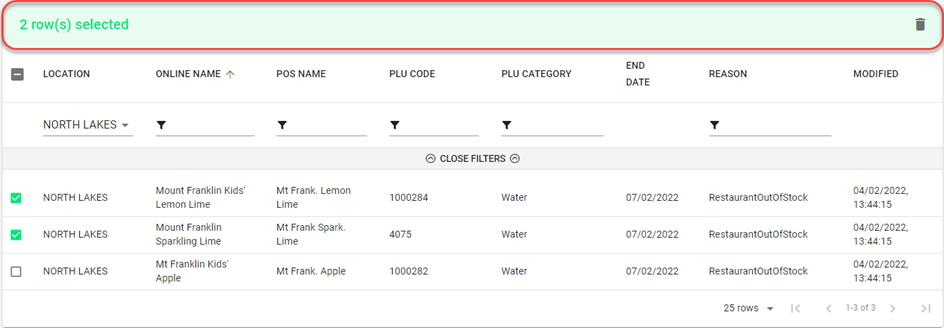
Deleting an Item Availability Rule
To delete an Item Availability Rule, you will need to tick the select box for that record (see point 6 above) and use the bin icon in the multi-select bar to delete it.
Filtering the Item Availability Rules List
With the filter bar open, (see point 3 above) options to filter the Item Availability rules are available. Filtering may be on:
- Location (chosen from drop down options)
- Online Name (data entry field)
- POS Name (data entry field)
- PLU Code (data entry field)
- PLU Category (data entry field)
- Reason (data entry field)
Note: The Open Filters option toggles to Close Filters once clicked.

Multi-selecting from a list
To multi-select items from a list you will click to select records as required, then click OFF THE LIST to insert your selections.
Creating Rules
To add an Item Availability rule:
- Use the Create or Update Rules button
- Complete the Take Item(s) Offline form. The details below will assist you.
- Use the Submit button to save the Item Availability rule when finished.

Fields marked with * are mandatory fields and must be entered for the rule to be saved successfully.
Select Items
A sub form with filtering enabled is provided to facilitate quick and easy selection of the PLU(s) that you want to include in an Availability Rule.
PLU: lists and allows filtering on the PLU number.
POS Name: lists and allows filtering on the PLU Name.
Online Name: lists and allows filtering on the Item Display Name as programmed in the Customer Ordering Interface tab of the PLU.
PLU Category: lists and allows filtering on the PLU Category. 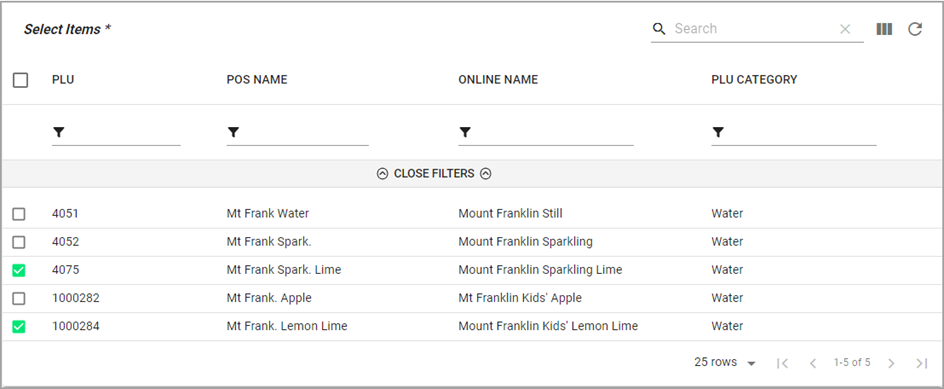
Locations
Select the required location from the drop down list. This list is multi-select and you may choose more than one location. If you want to select all locations within a State, choose the State name.
End Date
This section allows the user to define the end date for the item availability rule. This section is optional and if left blank the PLU or PLUs will be marked as unavailable indefinitely. In the default offline items screen this will show as a blank end date. 
Reason
Select one of the pre-set Stock Out Reasons from the drop down list. If one of the pre-set options does not apply you may choose Custom. An extra field is then displayed in which you may enter the text for your Custom Reason.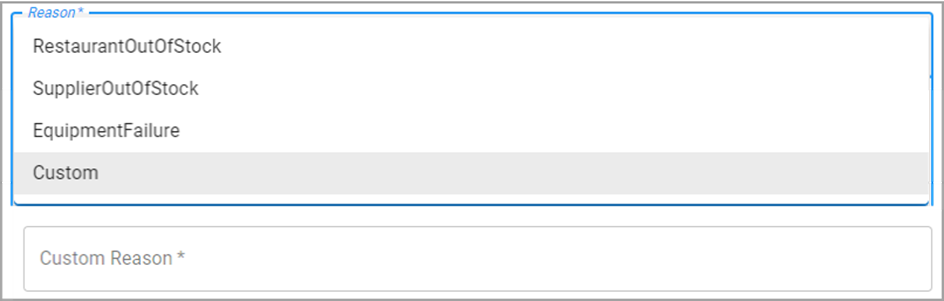
Export Menus
If you want this rule to trigger an automatic menu push to third party WMOs, ensure the Export Menus tick box is enabled. If this option is not enabled, the item availability will be applied to Polygon Customer Ordering only.
If the rule has been programmed with an end date, the item will be returned to available status accordingly. Items are returned to available status depending on the WMO process/procedure.
Uber Eats:
The Uber Eats integration respects availability and the end date is included when the menu export is triggered. Uber Eats will automatically make the item available according to the end date specified.
DoorDash and Deliveroo:
A job runs at 3:00 AM every day which will assess any rules that finished ‘yesterday’. Any locations associated with these expired rules will have a menu export triggered.
MenuLog:
Menulog V2 supports direct updates to item availability without requiring a full menu export. Creating, updating, or deleting item availability rules will trigger an update to the availability endpoint.
Updating Rules
Once a rule has been created the user is able to edit the rule by clicking anywhere on the rule.
Changes may only be made to the End Date & Reason.
If you are changing the End Date, you may also need to reselect the Export Menus tick box to ensure that the new end date is pushed to the relevant WMOs.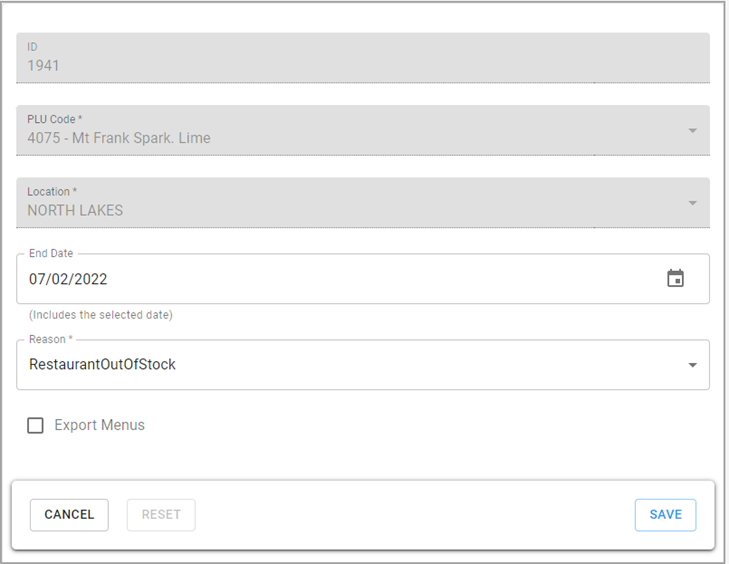
Article Change Log
| Date | Record of Changes | Author |
|
September 2024 |
Updated to remove specific reference to Google as the change from Google Food Ordering to Order With Google means that orders are no longer received via Google. |
S Black |
|
November 2025 |
Updated to include details regarding MenuLog (v2). |
S Black |