The article will provide instructions on creating and managing Items for your online ordering menu using the Menu Information Manager.
Summary
Items are the products included in your online menu for customers to purchase.
Each Item starts when a PLU created in your Polygon POS Management database is tagged as a Customer Ordering PLU. The 'PLU ID' and 'PLU Name' of a Customer Ordering PLU along with the programmed price level 1 are shown as the base detail for a Menu Information Manager Item. The Item also inherits all programmed price levels, PLU Class and Category details from the PLU.
In the Items section, you will set all the details about this product including:
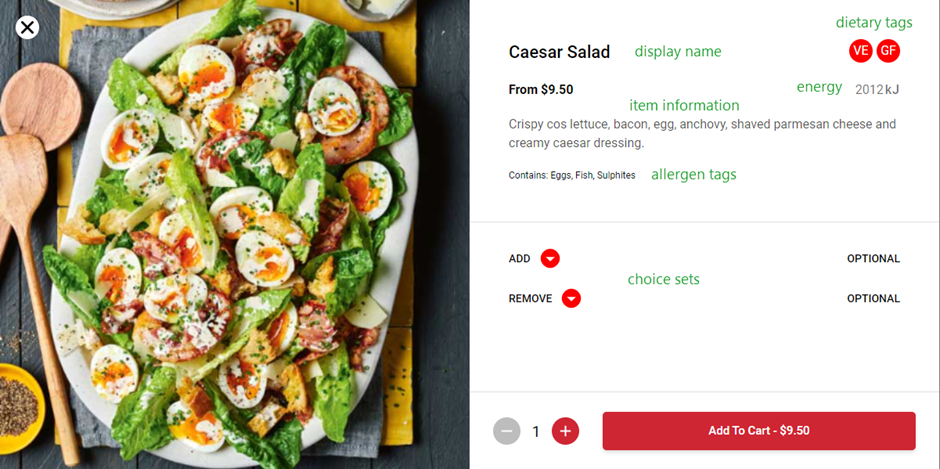
- determining the customer-facing name
- adding the description to be displayed for the customer
- assigning dietary and allergen tags
- determining availability for ordering providers and|or sale types
- energy values (kilojoules | calories)
- item availability (day part menus)
- adding choice sets
- defining upselling prompts
- assigning images
The Product Overview article for Menu Information Manager is here
How to Access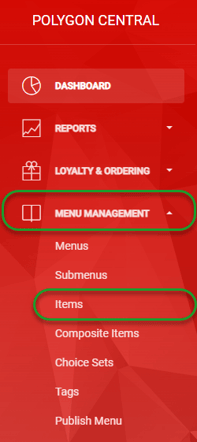
To access Items:
- Login to Polygon Central
- Choose Menu Management from the menu
- Choose Items from the sub-menu options.
Note: A Polygon Central user must be assigned a user Role with the following privileges in order to create and manage Items.
MIM - Items (view)
MIM - Items (update)
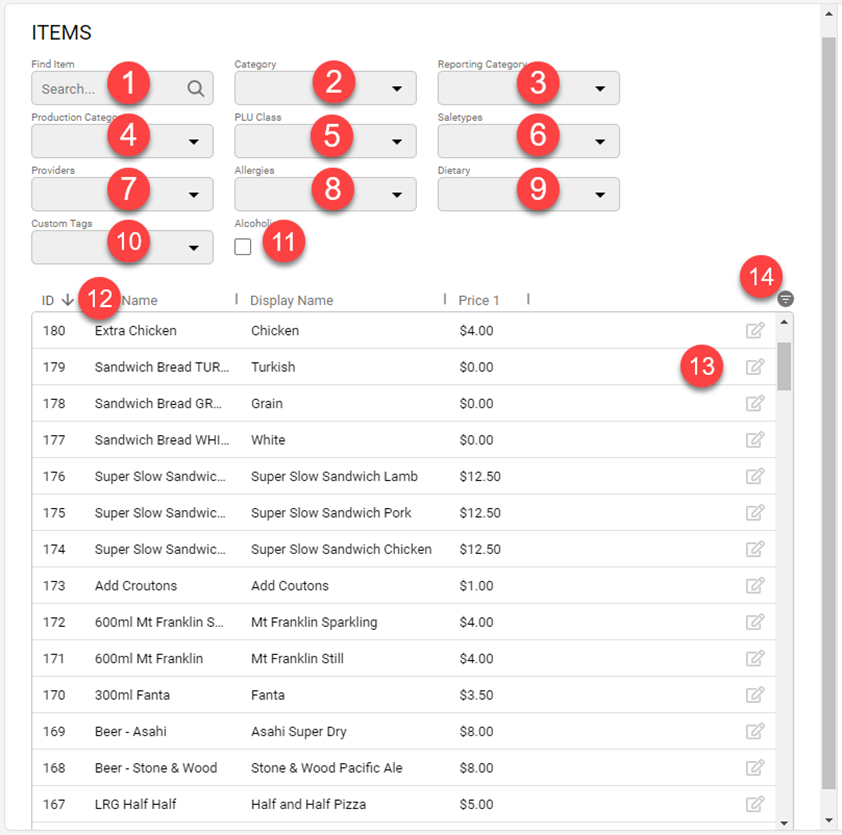
Filtering Items
Within Items you can:
- Search for a specific Item using the Find Item field.
- Filter the Items list by Category. Choose the required category(s) from the drop-down list. The categories listed are the keypad categories from the Polygon POS Management database that are assigned to customer-ordering PLUs.
- Filter the Items list by Reporting Category. Choose the required category(s) from the drop-down list. The categories listed are the reporting categories from the Polygon POS Management database that are assigned to customer-ordering PLUs.
- Filter the Items list by Production Category. Choose the required category(s) from the drop-down list. The categories listed are the production categories from the Polygon POS Management database that are assigned to customer-ordering PLUs.
- Filter the Items list by PLU Class. Choose the required PLU Class(es) from the drop-down list. The classes listed are those which include customer-ordering PLUs in the Polygon POS Management database.
- Filter the Items list by Sale Type. Choose the required Sale Type(s) from the drop-down list.
- Filter the Items list by Provider. Choose the required ordering provider(s) from the drop-down list.
- Filter the Items list by Allergies. Choose the required allergen tag(s) from the drop-down list.
- Filter the Items list by Dietary requirement. Choose the required dietary tag(s) from the drop-down list.
- Filter the Items list by Custom Tags. Choose the required tag(s) from the drop-down list.
- Filter the Items list by Alcohol status. To display only those items that are marked as alcohol items tick the alcohol check box.
- Click on any column heading to sort by any column, an arrow will indicate if the current sort is ascending or descending. Click on the column heading again to reverse the sort order.
- Use the edit icon to display the details of the item and make changes if required.
- Use the Show/Hide Columns icon to add or remove columns from the list view.
The default list will show:
ID,
PLU Name,
Display Name,
Price 1.
Also available are:
Price 2
Price 3
Price 4
Price 5
Reporting Category
Production Category
Keypad Category
PLU Class
Allergen Tags
Dietary Tags
Custom Tags
Sale Types
Providers
Creating an Item
To detail a new Item:
- Use the edit icon (see point 13 above) to display the Edit Item form.
- Enter the Display Name. This will be the name of the item displayed for the customer on the menu.
- Enter the Item Information. This is additional descriptive information about this item and will be displayed with the item on the menu.
- If this item needs to be tagged as an Alcoholic Item ensure the alcoholic item check box is marked on.
- Select any Dietary Tags that apply to this Item. Dietary Tags are displayed on the menu and customers will be able to filter the menu on these tags.
- Any dietary tag that could be applied to this item given all possible modifications by choice set selections should be added.
For example, if it is possible to select 'Almond Milk' (which has the dietary tag 'Dairy Free' applied) as a choice for 'Cappucino' the 'Cappucino' should also have the dietary tag 'Dairy Free' applied.
When a menu is displayed, all possible dietary tags will be initially shown and updated as choice modifiers are selected - so the base item 'Cappucino' will have the 'Dairy Free' tag shown, but if the milk choice selected (perhaps 'Full Cream' or 'Skim') does not also have the 'Dairy Free' tag that tag removed from the menu item. - This means that items are not incorrectly removed from the menu when dietary filtering is applied. For example, you don't want your 'Meal Deals' or 'Combos' filtered from menu when filtering on 'Vegetarian' is applied as vegetarian options are included in the choices.
- Any dietary tag that could be applied to this item given all possible modifications by choice set selections should be added.
- Select any Allergen Tags that apply to this Item. Allergen tags are included with the detailed view of items on the menu. Customers will be able to filter the menu using these tags.
- Unlike dietary tags which start with all possible tags and remove them as choices are made, allergen tags work in the opposite way. Any allergen tag applicable to the base item is shown, and any additional allergen tags that are assigned to choices will be added to the menu item as the choices are selected.
- Select any Custom Tags that apply to this Item. Custom tags are displayed alongside dietary tags with the item on the menu.
You can find more information on how to create Tags here.
- If required, choose specific Ordering Providers for this Item.
- If an item does not have specific ordering provider(s) applied it will be available to ALL providers.
- If you choose one or more ordering providers it will become available ONLY to those providers.
- If you intend to include different images for different ordering providers you will need to ensure that the ordering providers have been selected here.
- If you want this Item available only on the menu for a specific sale type, choose the relevant Sale Types from the drop-down list.
- If an item does not have specific sale type(s) applied it will be available to ALL menus.
- If you choose one or more sale types it will become available ONLY on those menus.
- If you enter the Energy details for this Item it will be included on the menu for the customer. You may enter the energy value in either kilojoules or calories and the other value will be automatically calculated. You may choose to display the kJ, kcal or both energy values on the customer-facing menu. Please discuss this with your Redcat contact to ensure that the correct configuration setting is applied.
- Indicate the Item Availability that will apply by selecting the relevant radio button:
- If an item is always available on the menu, choose All day.
- If the item is to be included in a Daypart Menu complete the Scheduled section.
- enter the applicable start and end times using the drop-down selectors.
- select the applicable days from the drop-down list.
- Use the Add Choice Set button in the Choice Sets section to select any relevant choice sets for this Item. Choice sets are groups of items that the customer can use to modify a base item.
- The choice sets will be displayed for the customer in the order they are listed here. You can drag and drop them to reorder the list if required.
- You can enter the text you want to be displayed for each choice set in the Modifier Name field.
- Drill down into the choice set to change it using the edit icon if required.
- Remove a choice set from this Item using the delete icon.
You can find more information on how to create Choice Sets here.
- In the Up Selling section:
- Enter the text you want to display on the Upsell modal in the Display Title field.
- Use the Add Choice Set button in the Up Selling section to select the choice set that will be used for the Upselling modal. If you include more than one (1) choice set you need to ensure that the Daypart Menu scheduling for each does not conflict. That is, only one choice set may be active as the Upsell on any given day/time.
- Add images to this Item if required. You can drag and drop images onto the form, or use the browse button to navigate to and select the image.
- Once uploaded, select the relevant provider for the image using the Select Provider drop-down. If the image is not for a specific provider, choose Default.
- Only those providers selected as Ordering Providers for this Item will be available in the list.
- File formats for images supported for Polygon Customer Ordering are gif, bmp, jpg, jpeg, webp and svg. Not all file formats listed may be supported by third-party ordering providers and image specifications for each provider should be checked before uploading and applying images.
- Use the Save button in the top right corner to record the details for this Item.

Editing an Item
If you need to make changes to an Item:
- Select the Item from the list and use the edit icon (see point 13 above) to display the Edit Item form.
- Make any amendments required and use the Save button in the top right corner to record the changes.
Deleting an Item
- Mark the corresponding PLU in the Polygon POS Management database as inactive. This will cause it to be removed from the Items list. The PLU will also no longer be available at POS.
- Remove the Item from any Submenu. It will no longer be included in the menu displayed for customers.
- Check the Composite Items and Choice Sets and remove the Item from those if applicable. It will no longer be an option for customers to select when modifying menu items.
You can find more information on Composite Items here.
You can find more information on Choice Sets here.
Related Articles
Further information can be found in the following articles.
Article Change Log
| Date | Record of Changes | Author |
|
June 2023 |
First publication of this article. |
S Black |
|
June 2024 |
Updated to include scheduling for Daypart Menus in Item Availability section. Updated to include details for Upsellling. |
S Black |
|
Nobvember 2024 |
Updated Sunmmary section to include reference to Ite mAvailability and Upselling. |
S Black |