Summary
The Polygon Paperless - Kitchen Management System (KMS) module provides a powerful way to manage orders once they are sent to kitchen production areas. This is achieved by configuring several roles which determine which items will be displayed together on kitchen displays. Several kitchen monitors can be assigned to share a role, enabling the order queue to be intelligently distributed between multiple kitchen displays which share the same role.
Kitchen monitors can be used to trigger SMS notifications to customers when orders are ready, and to update the status of orders to be displayed on Order Status Screens.
The Kitchen Management System is an optional add-on module for Polygon POS Management.
Redcat versions used during this documentation process:
RCSECR 2106.16.1s onwards RCSPOOLER 2104.26.1 onwards
RCIPD 2106.23.1 onwards RCAPPLAUNCHPAD 2104.26.1 onwards
Contents
Recalling Parked or Served Orders
- Local Device Settings
- Display Settings
- Product Filtering
- Workflow Settings
- Other Settings
- Serve All Orders
Programming Production Ingredients
- Required Settings
- Production Management in Category Setup
- Create and Assign Production Ingredient PLUs
- Assign Categories to Relevant Roles
Including BOM (Bill of Materials) Ingredients and Measures
Getting Started with KMS
KMS Roles
Before kitchen displays can be used at the FOH, KMS Roles must be configured from in POS Management. KMS Roles are setup in a similar way to production printer peripheral devices. Multiple kitchen displays can share a single role, so it is not necessary to configure a different role for each kitchen display. Instead a role will be setup for each set of PLUs which will be prepared at a kitchen station. If a kitchen station will receive orders from multiple POS terminals, its role should be setup once (usually for the master terminal) and the other POS terminals should be assigned that role via a shared network peripheral connection. Please refer to the Polygon Paperless Licensing & Installation paper for detailed instructions.
Configuring PLUs for use with KMS
PLU Load
Kitchen Displays show load information for each order assigned to that display, as well as total load information for a kitchen display. Load information includes the number of items assigned to an order and the estimated make time for an order.
KMS devices will automatically balance load between multiple devices sharing the same role. Load balancing assigns new orders to the kitchen display with the least load, that is the kitchen display with the least total estimated make time. A kitchen display's total estimated make time is calculated by adding the total make time of all PLUs belonging to orders which have been assigned to a display.
Make Time and Item Count
Each PLU can be assigned an approximate amount of time (in minutes) as the make time for the item. We suggest that it may be easier for you to use a 'weighted minute' value. For example, basic items on your menu should be applied a score of 1 minute while larger or more complex items should be assigned an appropriately weighted minute value, perhaps 2 for items that would take twice as long, and 3 for items which may take 3 times as long. Using this 'weighted' method will mean that you don't need to determine exactly how long each item on your menu takes to make.
If you want the PLU to be included in the item count at the KMS ensure that the Include in KMS reporting tick is on. You may not want supplementary or instructions items such as + Cheese or Extra Avocado to be included in the load calculations even though they will be assigned to display on the KMS.
POS Manager Access
When a KMS device is run for the first time the Role will need to be assigned. Ensure that there is a staff member with Reset master terminal (POS manager) privilege to proceed with this process. Please refer to the Polygon Paperless Licensing & Installation paper for detailed instructions on assigning the Role.
The KMS Display
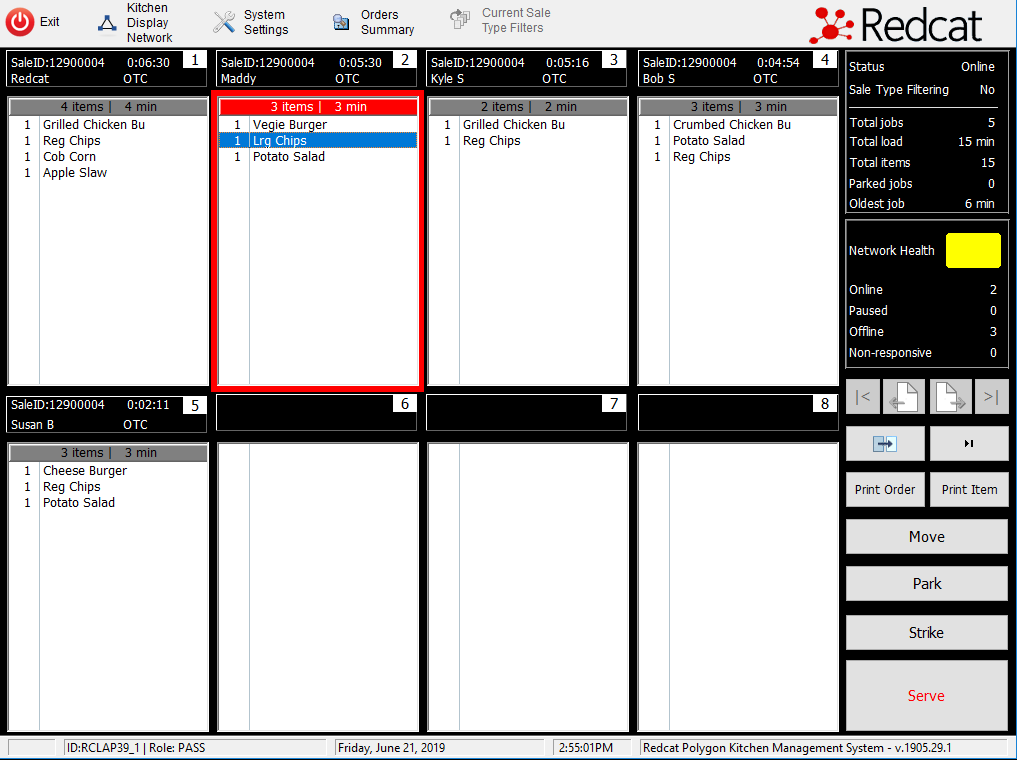
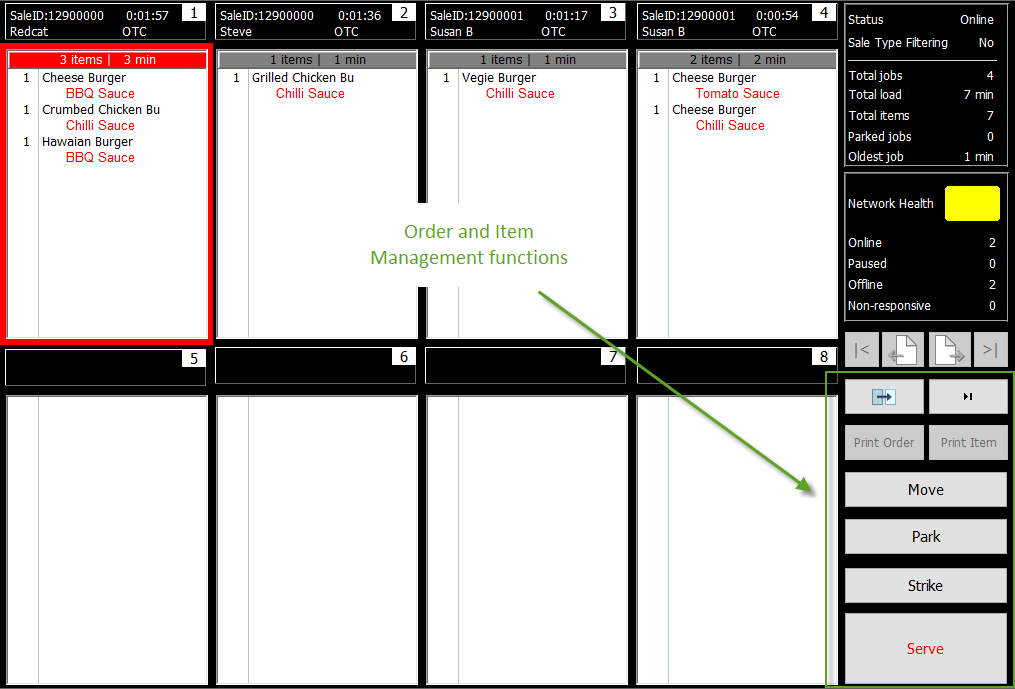
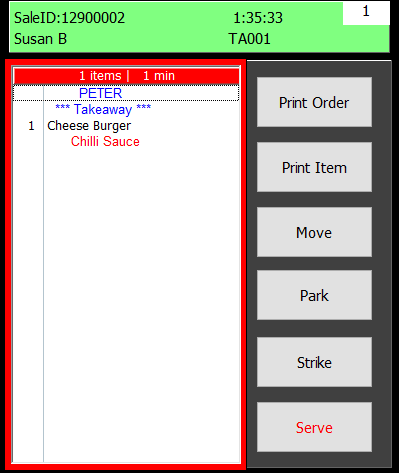
Each Kitchen display can show up to 8 orders at a time. Orders are displayed in chronological order with the oldest order first and the newest order last.
Each order displays the following information on the order header –
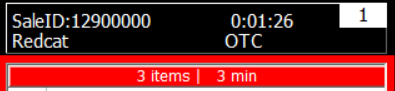
- Sale ID,
- time elapsed since the order was placed
- name of POS user who processed the order,
- the table where the order was recorded,
- the order load in items, the order load in minutes.
An order can be selected by tapping on the area where order items are listed. Selected orders are shown with a red border. An individual item belonging to an order can also be selected by tapping on the item. Selected items are highlighted in blue.
HANDY HINT: Double click on an order to open the Zoom Order window. All of the above functions are available in this window, but in a larger format. Zoom Order is useful for managing an order in detail, for example Striking 3 out of 7 items. Press Close button to return to the standard Kitchen Display view
Paging Forwards and Backwards
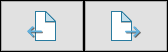 Kitchen displays show up to 8 orders at a time. If more than 8 orders are in the production queue you can page forward and backwards using the Page Forward button and the Page Backwards button . These buttons are located towards the bottom right of the main kitchen display window.
Displaying Long Orders
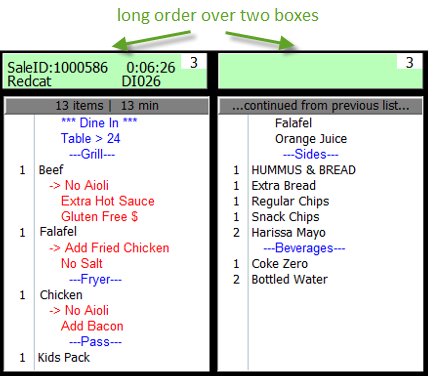 Orders which contain more items than will fit in a single order box will now extend onto the next logical numerical box (ie. from left to right) where:
- The order header is blank on additional boxes, only the first box contains the header for this order.
- Additional boxes display “continued from previous list” in the list header.
- The same box number is applied to the whole order to ensure a user can trace which boxes make up this entire order.
- The first box of a long order (ie. where the order header is) MUST be selected in order to Serve, Park or Move the order. This ensures that the user is aware of where the order starts and caters for cases where an order spills onto the next page of boxes.
- You may Strike any item in the sale from the box in which it is contained.
- Any box of the order can be double-clicked to open the Zoom Order window to display the entire order
KMS Device Status Information
Status information is displayed at the top right of the main kitchen display window. The following information is available from the Status Area:
- Kitchen display Status - Can be On-Line, Off-Line or Paused, or Pass Through
- Sale Type Filtering - Can be Yes or No
Job Load Statistics
A panel of Job Load Statistics applicable to the KMS device allows you to determine at a glance:
- Total jobs - Indicates the number of outstanding orders assigned to this kitchen display
- Total load - Indicates the estimated total load (in minutes) of all outstanding orders assigned to this kitchen display
- Total items - Indicates the total number of items from all outstanding orders assigned to this kitchen display
- Parked jobs - Indicates the number of orders which have been parked instead of being served. Parked orders can be managed through the Recall Order button.
- Oldest job - Indicates the time (in minutes) that the order at the front of the queue on this kitchen display has been waiting
- Average Serve – Displays the average serve time per order for today (resets at midnight).
Network Health
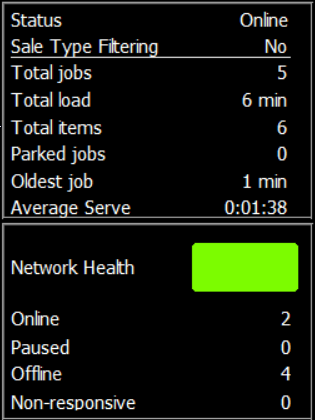 A separate panel displays information relating to your Network Health status. At a glance you can see the number of KMS devices on your network that are:
- online,
- offline,
- paused, or
- non-responsive.
A coloured block indicator provides a visual alert and will flash:
- Yellow - to alert you if there are orders pending which are currently not assigned to a role for completion, or
- Red – If there is a device on the network which is non-responsive.
Double clicking on either a yellow or red network health block will display the relevant information to assist with resolution.
The Order Toolbar
The order toolbar contains the buttons for Order and Item Management functions.
|
|
Serve indicates that work for the order is complete and removes it from the display screen. |
|
|
Recall provides a list of all served orders, allow you to view the details of the order, and choose to recall the order to the display screen. |
|
|
Recall Last shortcut is a fast method to recall the last served order to the display screen |
|
|
Move allows you to pass the order to another active kitchen display. This function could be useful for staff about to go on break to push a remaining order to another role. The active displays to choose from is shown listing both the Role and Device ID of each display. Select from the provided list which KMS device you wish to move the order to. |
|
|
Park will allow an order to be removed from the active display and ‘parked’ for a later time. Parked orders can be recalled using the Recall Order function. |
|
|
Strike allows the user to strike through an item in an order to indicate completion. You may strike either a parent item and instructions will also be struck, or highlight the instruction and strike only that. Hitting the strike button again will remove the strike from the item(s). |
|
|
Print Order will send the entire order to print at a production printer designated for this purpose. This is useful if a docket is required to be delivered with the order. Print Item will send a selected item to print at a production printer designated for this purpose. You may want this if a specific item in an order has special instructions (eg. gluten free) and you need a docket to accompany the item. |
 or
or 
 or
or 


Recalling Parked or Served Orders
Orders which have been parked or served can be recalled to the production queue by clicking the Recall Order button which is located at the bottom right of the main kitchen display window.
Using the Recall Order button will display the Served/Parked Orders File.
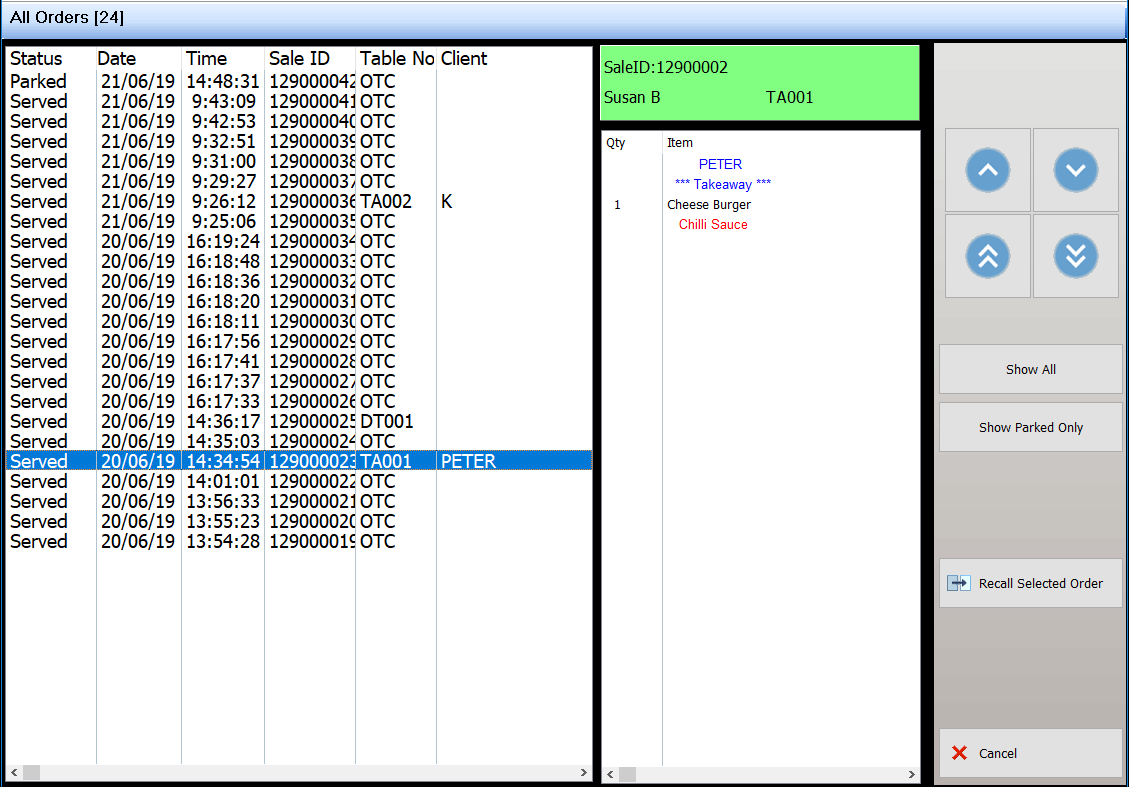
Filtering the view
By default, the Served/Parked Orders File lists both served orders and parked orders, this list can be filtered to display parked orders only, by clicking on the Show Parked Only button. You can revert to the default view (all orders) using the Show All button.
Selecting an order displays the order's details to the right of orders list.
Recalling the order
A parked or served order can be recalled by selecting the order and then clicking the Recall Selected Order button. This will return the selected order to the production queue which is displayed on the main kitchen display window.
Navigating the list
Use the single up and down arrows to move up and down the Served/Parked Orders List one item at a time. Use the double up and down arrows to move up and down the Served/Parked Orders List one page at a time.
These buttons are located to the right of the Served/Parked Orders File.
Pending Orders
If the Network Health icon is flashing YELLOW to indicated there are pending orders, you can double click the icon to display the Pending Orders File.
Displayed will be a list of the orders that currently have no KMS Device | Role configured to accept them. The list will contain:

- Role (the role the order is destined for)
- Date (date of the order)
- Time (time the order was entered)
- Sale ID (the unique sale ID identifier)
- Table Number (the table number)
- Client Details (if applicable, details recorded against particular sale types)
The details of the highlighted order will be displayed to the right of the listing.
The pending orders can be recalled to this KMS device using either the Recall Selected Order, or Recall All Orders buttons.
Kitchen Display Network
 Information regarding all KMS devices on the network is available from the Kitchen Display Network button on the application toolbar..
The listing displayed will show for each KMS:
Role: The role currently assigned to the KMS device
Device ID: To assist in determining on which computer a device is located. The device ID is made up of [computer name]_[ID number (from shortcut)].
Status: Displays the current status of each device. Status can be

Online Currently active and accepting orders
Offline KMS application is not running on device
Paused Device has been manually logged as paused – no orders will be assigned
Pass Through Device has been manually programmed to pass orders to another device
Unresponsive Logging indicates device should be active but it is not responding to network polling.
Load Displays the current load for each device.
Setting a KMS to Paused
This is also where staff can set the KMS device to paused and return to online mode. Setting a device to PAUSE will allow staff about to go on break to finish existing orders, while simultaneously instructing the system they are not available to accept any new orders. You should ensure that another role is enabled to catch the jobs that meet the criteria of this device.
A visual alert is displayed in the KMS Status on the main display
Check Out
The Check Device Out button will remove the KMS device from the network and should only be used if the device is to be decommissioned. Note: This function requires entry of the Redcat Supervisor password.
Non-responsive KMS Device
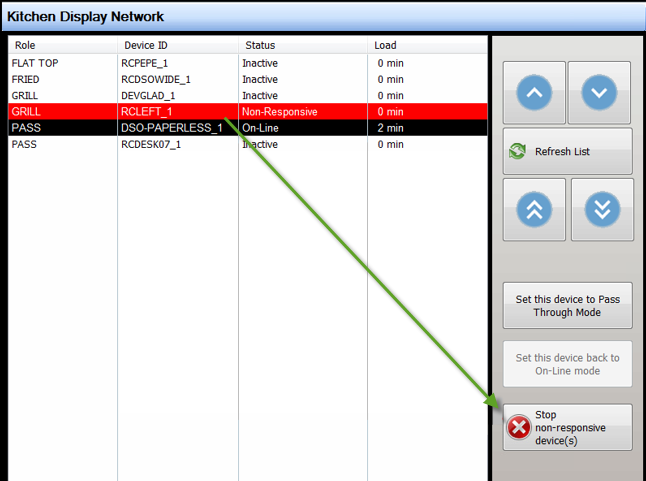
If the Network Health icon is flashing RED to indicated there is a non-responsive KMS device on the network, you can double click the icon to display the Kitchen Display Network.
The non-responsive KMS device will be listed in the file and highlighted in RED so that you can identify which device it is.
A Stop non-responsive device button is now available. You can use this button to issue a command to the non-responsive device to stop the KMS application.
You should then be able to restart the application on the affected KMS device to restore it to full functionality.
System Settings
Configurable options for various features of the KMS are available from the System Settings button on the application toolbar. Access to these setting require the password of user with POS Manager privileges.
Local Device Settings
The Local Device Settings tab contains the following settings and information.

Server Name: This is a read only field displaying the name of the server controlling the KMS network.
This Device ID: This is a read only field displays the device ID as it will be listed. The format is [computer name]_[ID number (from shortcut)]
Device Role: This is where you will set, or change the Role assigned to this KMS device Choose the desired role from the pick list provided.
Device Mode: A read only field which indicate the mode in which is KMS device will operate. It is governed by the licensing options in the Redcat Helpdesk application. Intelligent mode is the licensed version of the product, while Production Display Only is non-licensed and therefore contains limited functionality. Please refer to the Polygon Paperless Licensing & Installation paper for a listing of functionality per mode.
Show Sticky Toolbar buttons:
 If the monitor of the KMS device is large or of a widescreen format he location of the order and item management buttons can be swapped from the side toolbar to within the active order window if desired.
The buttons will appear within the order window of only the ACTIVE order.
Note: If either Spy Mode or Executive View Mode are enabled, the Show Sticky Toolbar buttons will be disabled.
Track Order Roles:
If the Track Order Roles setting is enabled, the system will assess all the items in a sale, track the role each item is assigned to, and list in the order window on the KMS device any other roles that have been assigned items in the same sale. This is particularly useful for staff as they can see that other items are being prepared at a different section and can coordinate delivery of the entire order at the same time.

Please note: the roles are listed for information only and carry the following limitations:
- A strike cannot be applied to them.
- They will not print if the order is sent to a printer.
- They are not dynamically updated if further items are added to the sale which would be assigned to a role not already listed.
However, if an order is served and recalled, the order will retain the original tracked roles.
If either Spy Mode or Executive View Mode are enabled for this device, the Track Order Role option will be disabled on this local device.
Filtering Role Tracking
If Track Order Roles are enabled on a local KMS device, the user may filter the roles that need to be tracked on this device. This is useful if the kitchen or production area has a role for Pass or Co-Ordinator where all orders are to be displayed but where no production takes place. The Pass role could be filtered from Role Tracking.

Filter the roles to be tracked by highlighting the relevant role in the Role Tracking section, on the Workflow Settings tab and choosing the Set On or Set Off button as desired.
Note: The Role Tracking filtering shown will apply to the local KMS device. Tracking of relevant roles will need to be applied on each KMS device that has role tracking enabled.
Enable Spy Mode:
Spy mode is used where the operator needs to see the contents of a queue but does not control the completion of orders. ie. another operator is Serving off the orders on a different monitor.
A device that is operating in Spy Mode can:
- Navigate the screen independently, such as changing pages, launching the Order Summary, etc.
- Read all orders assigned to the selected Role, even if those orders are being load-balanced across multiple devices.
- Apply local ingredient and summary filtering settings, that may be different to the monitor it is reading from. For example, the main PASS monitor that is in Serve Mode may be viewing orders by product name, while the Spy Mode monitor views those same orders by Ingredient.
NOTE: Sale Type filtering (if in use) will be read from the monitor that is in Serve Mode
Spy Mode + Serve Mode:
Enabling Spy Mode with the addition of + Serve Mode enables the user to effectively double (triple or quadruple) the number of order windows visible AND retain the serve function.
It is useful when a large monitor is available with enough real estate to reasonably display multiple KMS windows.
Two (or more) instances of a KMS will be opened, situated on the monitor and assigned to the same role. The second and subsequent instances will be tagged with Spy Mode AND + Serve Mode.
The instances will now replicate each other (show the same orders rather than load balance) and both will be reactive to their ‘serve’ buttons. On the second and subsequent instances, use the Next Page button to display order boxes 9 through 16 (17 through 24 etc).
In this way number of order windows have effectively been increased.
Enable Executive View Mode:
Executive View mode will enable a KMS device which reads orders for the entire KMS network.
When Executive View mode is selected, the setting to Show sticky toolbar buttons is disabled, Enable Spy Mode is active then disabled, and the Order Toolbar is not displayed on the KMS Display Window.
When deploying an KMS instance in Executive View Mode it is not necessary to select a Role therefore configuration of a Role in the POS Network Hardware tree to support it is not required.
A device that is operating in Executive View mode can:
- Navigate the screen independently of any other KMS device, such as changing pages, launching the Order Summary, etc.
- Read and display all orders assigned to ALL ROLES.
- Dynamically update the status of items within each order based on their current status at each production station. As strike is applied to items on a station, the item will also appear with a strikethrough on the Executive View along with the name of the Role where the strike was applied. When all component items of the order are finalised on each of the production stations the order will be removed from the Executive View.
Note: Where an individual sale item has been sent to multiple serve stations it will in certain circumstances by displayed multiple times on the Executive View. This occurs when the strike status of the item varies between stations (that is, the item has a strikethrough applied on one station but not the other).
Executive View – Average Serve Time
While the Average Serve time on a KMS Role displays the average serve time per order for the day, the average serve time for an Executive View is calculated over a specified period of time.
This relevant time period is applied by choosing System Settings | Other and entering the required number of minutes in the Average Serve calculation window (minutes) box.
Incoming Orders Sound Alerts:
To ensure that orders are not missed, an audio alert can be activated to play when an order is received. A different alert can be configured to play when online orders are received as these orders generally do not coincide with a customer standing in the store. Users can customise these alerts by providing their own .wav files.
The .wav files must reside in the T1 directory of the Master terminal, and while you can use any .wav file, the naming convention must be:
Standard Alert: POSALERT.WAV
Web Order Alert: POSALERT_WEB.WAV
The sound alert can be tested using the Test Alert button(s).
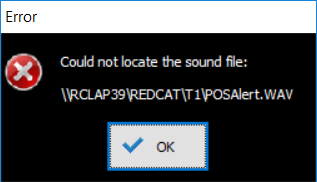 Validation of Sound Alerts:
The system will validate the Incoming Order Sound Alerts when the setting is enabled, or when the Test Alert button(s) are used.
If the relevant .wav files are not found in the T1 directory a message will be displayed.
Display Settings
Some settings are applicable to ALL KMS devices on the network and can be applied using any KMS device. The Display Settings tab contains the following settings and information.
If you wish a device to deviate from the global settings, you can indicate on this tab by selecting the Local option and changing the programming. Note: your local settings will not take effect until the application has been closed re-launched. This is useful when a KMS role has a different operational purpose, eg. it takes longer to make a burger than it does to make a coffee so it makes sense that the Grill role timer settings would be greater than the timer settings for the Barista role.
Kitchen displays allow colour coding of different Sale Types, and time-triggered colour coding of the order window to indicate when an order has been waiting for a long period of time. The warning and urgency colours, and the warning and urgency time periods can be configured from this form. These settings include visual alerts on elapsed timer thresholds for orders, assigning colour coding to POS Sale Type headers and choosing per Sale Type if the ‘table’ label will be displayed.

Listbox Status Settings
Time Warning (colour) - This setting assigns the background colour for orders which have been displayed for longer than the assigned Timer Warning time value. To set the warning colour click the browse button to the right of the warning colour, select the colour then click the OK button.
The Timer Warning (time) - This setting is shown to the right of the Timer Warning colour. This indicates how long an order will be displayed before having the order background colour display the Warning colour. Click the up and down arrows to increase or decrease the Warning time. By default, the Warning Time is 10 minutes.
Timer Urgent (colour) - This setting assigns the background colour for orders which have been displayed for longer than the assigned Timer Urgent time value. To set the urgent colour click the browse button to the right of the urgent colour, select the colour then click the OK button.
Timer Urgent (time) - This setting is shown to the right of the Timer Urgent colour. This indicates how long an order will be displayed before having the order background colour display the Urgent colour. Click the up and down arrows to increase or decrease the Urgent time. By default, the Urgent Time is 15 minutes.
Pending Orders Threshold - This setting indicates how long an order can wait without being assigned to a kitchen display before it is considered a dead letter job. If an order has not been assigned to a kitchen display after this period, the kitchen display network will set the network health to yellow. This is shown as a yellow square on the main kitchen display window next to the Network Health text. Clicking the yellow square will load the Pending Orders list which displays a list of pending orders not received by a kitchen display for longer than this period. The Pending Orders list can be used to reassign orders to kitchen displays.
Delete jobs older than - This setting allows the KMS system to remove any orders which have been waiting for more than a specified number of days. Click the up and down arrows to increase or decrease the number of days to wait before removing orders.
Use Default Values - Click this button to return the default values for ALL elapsed timer visual alerts and settings.
Sale Type Colours and “Table” Labels
 Orders can be assigned a variety of sale types including Delivery, Dine In, Drive Through, Pick Up, Table Service, Takeaway, Web Ordering and None (when no sale type has been assigned to the order at POS).
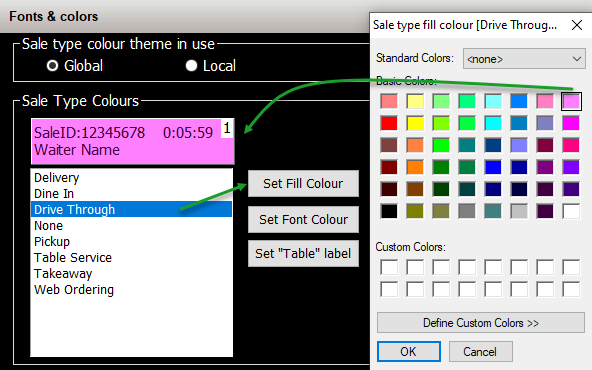
The Sale Type Colours settings allows you to assign colours to individual sale types and the header for each order will be displayed accordingly to make them easily identifiable. For example, you may leave your Dine In sales without any colour code, but the Takeaway and Drive Through sales could be set to pop with colour on the screen. A different colour can be assigned to the header background colour and header font colour for each sale type.
To set the background colour for a sale type:
- Select the sale type which you wish to change
- Click the Set Fill Colour button. This will display a colour picker form.
- Select the desired colour and then click OK.
To set the font colour for a sale type
- Select the sale type which you wish to change
- Click the Set Font Colour button. This will display the colour picker form.
- Select the desired colour and then click OK
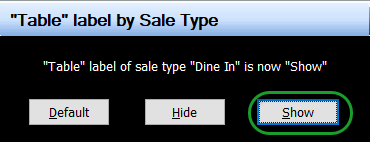
To set the “table” label for a sale type
- Select the sale type which you wish to change
- Click the Set “Table” Label button. This will display the “Table” Label by Sale Type form..
- Select the desired Option and then click OK.
 Note this setting works in conjunction with the Display table numbers and Hide “Table” label settings.
For example, if you want to hide the “Table” label for all sale types except Dine In you could:
Turn ON Display table numbers
Turn OFF Hide “Table” label (default)
then select the Dine In sale type and use the Set “Table” label button.
Choose Show.
Set the ‘Table’ label for remaining sale types to Hide.
The ‘Table’ label will then only be displayed for the Dine In sale type.  Close and reopen the application on each kitchen display for new Sale Type Colours and/or Table Label settings to be applied.
Setting Fonts:
The fonts used for kitchen displays can be customised from this section. A preview is available to view output changes as they are made. If you want to change the fonts an colours for the order windows (by sale type) for just this device ensure that the Local radio button is selected.
Order List Box -. This allows the user to set the font size of Items listed in each order. Tick the Bold option to display order items in bold. Tick the Auto Size List Font Size box if you want the system to auto size for best fit.
Order Header and Buttons -. This allows the user to set the font size on the order header and buttons. Tick the Bold option to display the header in bold. Tick the Auto Size Header Font Size box if you want the system to auto size for best fit.
Display Table Numbers - Enabling this function will display each order's table number in the order header.
Hide "Table" label – Enabling this function means any table numbers displayed will not begin with text saying "Table:"
Use Default Values - Click the Use Default Values button to re-assign device fonts to system default values.
If you want the system to apply font sizes to best fit the real estate of the order window, use the Auto Size List Font Size and Auto Size Header Font Size tick boxes.
To change the font applicable to the role names displayed due to the Track Order Roles settings, use the Set Tracked Order Roles Font Style button. Your changes will preview on the button text (like this).

Reset Listbox Format - If you are unhappy with your changes to the listbox format, click the Reset Listbox Format button to revert to the most recently saved configuration (not necessarily the default values). This will force a restart of the application. close the kitchen display.
Product Filtering
Product filtering settings determine which orders are to be displayed on this KMS device according to Sale Type.
An IPD device may be configured with both Product/Main Item PLUs and Production Ingredient PLUs assigned to the KMS Role via Category printing.
Production ingredients are assigned to PLUs to indicate to the kitchen what the item is that needs to be produced when a PLU is sold. For example, it doesn’t matter if the item sold is a Beef Burger, a Burger with the Lot, or a Cheese Burger – in each case the grill needs to produce the same beef pattie.
See the later section on Programming Production Ingredients for detailed instructions on how to achieve this.
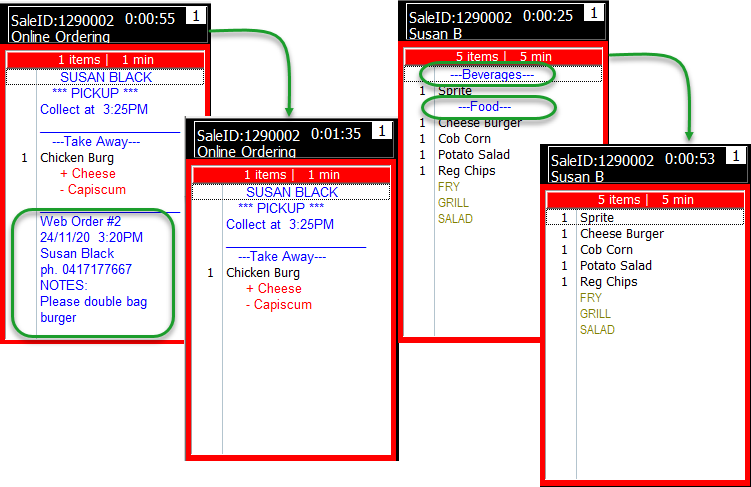
Ingredient Filtering options allow for Orders in the main window to be displayed by product name, whilst the Order Summary can be displayed by Production Ingredient (or vice versa if desired).
You may also configure the Order Summary to include items from only the local KMS device, or from all KMS devices in the network, depending on the operational requirement.

Accepted Sale Types.
This setting will allow you to choose to display only specific sales types on a device. You may wish to assign only sale type where the items need to be plated to one display (Dine In), while sale types where the items need to be wrapped (Drive Through, Delivery and Takeaway) display on another.
To set Sale Types accepted by this KMS device:
- Display the list of available sale types using the list button to the right of the Accepted Sale Types window.
- Highlight the desired Sale Types and choose the Select button to assign.
A forced restart will be performed after which the Sale Type filtering will be applied.
Order Ingredient Filtering.
Order Ingredient Filtering applies to the items shown in the main window order boxes, on this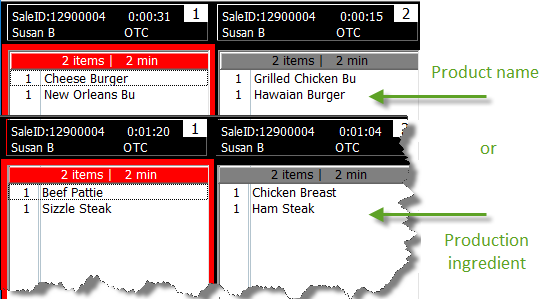 device only. The default setting is ‘None’, meaning the order boxes will display all assigned items.
Choosing Show Products Only will instruct the KMS device to filter out the production ingredients and only display the Product PLUs.
Choosing Show Ingredients Only will instruct the KMS device to filter out the Product PLUs and only display the Production Ingredients.
A forced restart will be performed after which the Order Ingredient filtering will be applied.
Some details are included in orders and displayed by default which users may choose to exclude if desired.
If you do not wish to include details which would normally display in the footer of online orders, exclude these using the Hide web order details (footer) setting.
Similarly, if you do not wish item grouped by class, exclude the class headings using the Exclude class headers setting.
Note: these changes take effect immediately and any active order windows will be updated.
Summary Screen Ingredient Filtering.
Summary Screen Ingredient Filtering applies to the items shown in the Order Summary list, when launched on this device. The default setting is ‘None’, meaning the Order Summary will tally all assigned items, regardless of whether the order boxes are being filtered or not.
Choosing Show Products Only will instruct the KMS device to filter out the production ingredients and only display the Product PLUs.
Choosing Show Ingredients Only will instruct the KMS device to filter out the Product PLUs and only display the Production Ingredients.
The Order Summary will display the list of items grouped by Class, if an unbroken list is preferable, enable the Exclude Class Headers option.
Summary Screen Device Filtering.
To cater to the particular operational requirements of the kitchen, the Order Summary on a particular KMS device may be set to display either a tally of items assigned to this device only or a tally of all items currently in the queue across all KMS devices in this network.
Swap the radio button as required between:
- Include orders assigned to this device only (default), or
- Include orders from all devices
Workflow Settings
Workflow settings will allow the user to define how an order should be handled when completed at this station. In addition to the default workflow, a different workflow may be programmed for each sale type if desired.
A Product Assembly Workflow can be created by defining which role the order should be passed to when completed. The final role will ‘serve’ the order. For example, when an order is recorded as ‘done’ at the dress bench it could be transferred to a KMS device assigned the pass role.
Alternatively, rather than transferring the order to another KMS role, you may choose to Push to print the order at a designated production printer instead. Using this facility, you make also choose to automatically send a docket to Print Upon Item Strike if an item is completed in advance of the entire order.
If using a Product Assembly Workflow, consider what is to be shown on each KMS device and at what time when assigning categories to the KMS devices. For example, if all orders are going first display at the Entrée Role and nothing will be shown on any other Role until the Entrée role is recorded as Done, the Entrée Role will have full category assignment and the other Roles will have nothing assigned to them.
This same logic applies for a Printer if it is to be included in the Workflow. No Categories should be assigned to the printer so that it will only print when the user clicks DONE and passes the job to it.
This tab allows you to define how orders progress from this kitchen display.
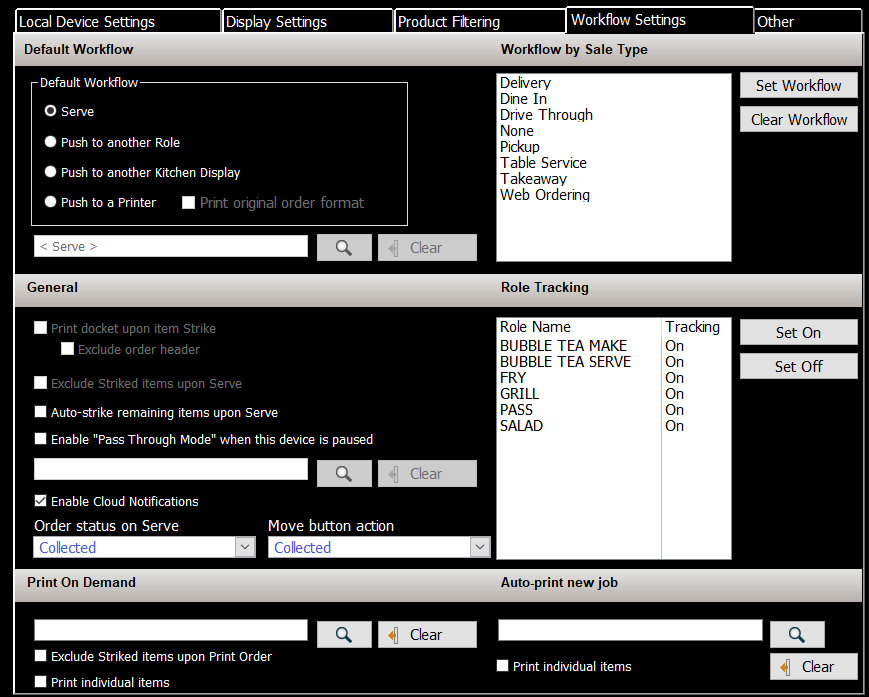
Default Workflow.
The Default Workflow for orders on this KMS device can be:
- Serve: Orders will be deemed as finalised and retired.
- Push to another role: Orders will be released and made available to a specific Role. If there are multiple devices assigned the target Role the system will automatically load balance between the devices and assign the order to the device with the least load. If you choose this option, click the browse button and select the KMS Role that orders will be released to. If the workflow is Push to Role, the option to Reset job timer when pushed is also available - the time elapsed for the order will start from 00:00 when the order is received at the target role. This is especially useful if you need to determine how long an order may have been waiting for collection.
- Push to another Kitchen Display. Orders will be released and sent to another specific kitchen display. If you choose this option, click the browse button and select the KMS device | Role which orders will be sent to.
- Push to a Printer. Orders will be retired and sent to a production printer (Push to Print). If you choose this option, click the browse button and select the production printer to which orders will be sent. If the workflow is Push to Printer, the option to Print in Chronological Order is also available - items will print in the order they were entered at the POS instead of grouping by Class as they will on the display.
Note: When utilising Push to a Printer inverse printing of instructional categories as defined in the Categories File will be respected.
Workflow by Sale Type.
To provide ultimate control over how orders
are processed from this KMS device, the workflow can be programmed for each individual sale type.
To do this:
- Highlight the sale type and choose the Set Workflow button.
- Program the workflow details, including the relevant ‘push’ option
if appropriate and choose the OK button to save.
Note: If you choose Push to a Printer for a sale type workflow, you may also choose to select the Print original order format option. This is useful if the global setting Print in Class Order is enabled but for particular circumstances you require a production
docket exactly as originally enter at the POS.

To disable a Product Assembly Workflow, choose the Clear button to the right of the ‘push’ setting to remove the next assembly station.
When a next assembly station has been configured, the SERVE button will change to DONE. If you are using a global order toolbar, it will also show the details of the next Assembly Station programmed.
If you are utilising a sticky toolbar within the order window the details of the next Assembly Station will be shown in the network health statistics window.

General
The General settings provide further options for orders processed by this KMS device.
- Enable Print docket upon item strike if desired by placing a tick in the box. As the strikethrough is applied to each item a docket will be sent to the printer containing only that item.
- If you choose to Exclude Striked Items upon Serve only the active items remaining in the sale will print when the order is marked as Done.
- If Auto-strike remaining items upon serve is enabled, any items in the order that are not already shown with a strike will have a strikethrough applied. This is useful if an Executive View mode instance is in use.
Note: The Print Docket Upon Item Strike and Exclude Striked Items upon Serve options are ONLY available if the default workflow is Push to a Printer. It is therefore recommended that if any sale type requires a Push to Print workflow this should be programmed as the Default Workflow. Sale types that do not require Push to Print should then have individual workflows programmed.
Pass Through Mode
Pass through mode allows orders to be automatically sent to a designated KMS device when the kitchen display is Paused.
To enable ensure the Enable "Pass Through Mode" when this device is paused setting is ticked, click the browse button and select the KMS device | Role which you would like orders to be sent to.
To disable this feature, remove the tick from the Enable "Pass Through Mode" when this device is paused setting.
When this setting is enabled the “Set this device to Paused mode’ button in the Kitchen Display Network file becomes a ‘Set this device to Pass Through Mode’ button.
A visual alert is displayed in the KMS Status on the main display.
Cloud Notifications
Enabling this setting will send an SMS to the customer's mobile number collected by the POS at the time the order was placed.
Choose the relevant notification from the Order Status on Serve drop down box. Usually this would be Ready for Collection.
If you are ultising Order Status Screens and also need to update the status of an order, you can allocate an order status to the Move button to facilitate this. Choose the relevant status from the Move Button Action drop down box. For orders entered at POS, this would usually be
Received at Store or Processed at Store to have the order show in ‘pending’ panes, Ready for Collection to have the order moved to ‘ready’ panes, and Collected to remove the order from the Order Status Screen.
Print on Demand
On occasion operational requirements may mean that a printed docket is needed for a specific order without consistently printing production dockets for all orders. From time to time, it may be that a specific item in an order has special instructions (eg. gluten free) and you need a docket to accompany just that item.
To enable this functionality, you can define a production printer in the Print on Demand setting by clicking on the browse button to the right of the field and choose a printer from the list of production printers currently available in the network.
Please note: the chosen production printer does not need to have categories assigned to support the orders that will be sent from the KMS.
Defining a printer in the Print on Demand setting will enable the Print Order and Print Item button on the Order Toolbar.
If you do not wish to include items that have already have a strikethrough applied when issuing a Print Order command, place a tick in the Exclude Striked items upon Print Order box.
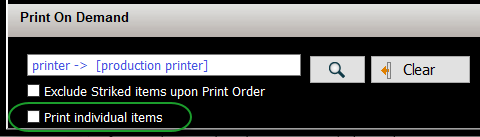 If you wish to emulate the POS setting ‘split production print jobs’ when sending the order/item(s) to the printer ensure the Print Individual Items setting is turned on. This will print one docket for each individual item (instructions will print with parent item). The order header details will print on each docket and each will include the #/total # (1/3, 2/3, 3/3 etc ) so that all items of the same order can be easily recognised.
Auto-print New Job
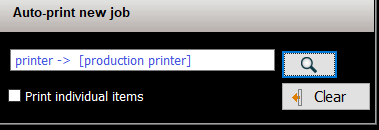 If you need new orders to automatically print when received, this can be achieved by assigning a printer from the list in the Auto-print new job section.
If you wish to emulate the POS setting ‘split production print jobs’ when sending the order/item(s) to the printer ensure the Print Individual Items setting is turned on. This will print one docket for each individual item (instructions will print with parent item). The order header details will print on each docket and each will include the #/total # (1/3, 2/3, 3/3 etc ) so that all items of the same order can be easily recognised.
This is useful if a docket is required to accompany each order, or a sticky label required to affix to items.
Other Settings
This tab contains settings which are normally used by Redcat staff.
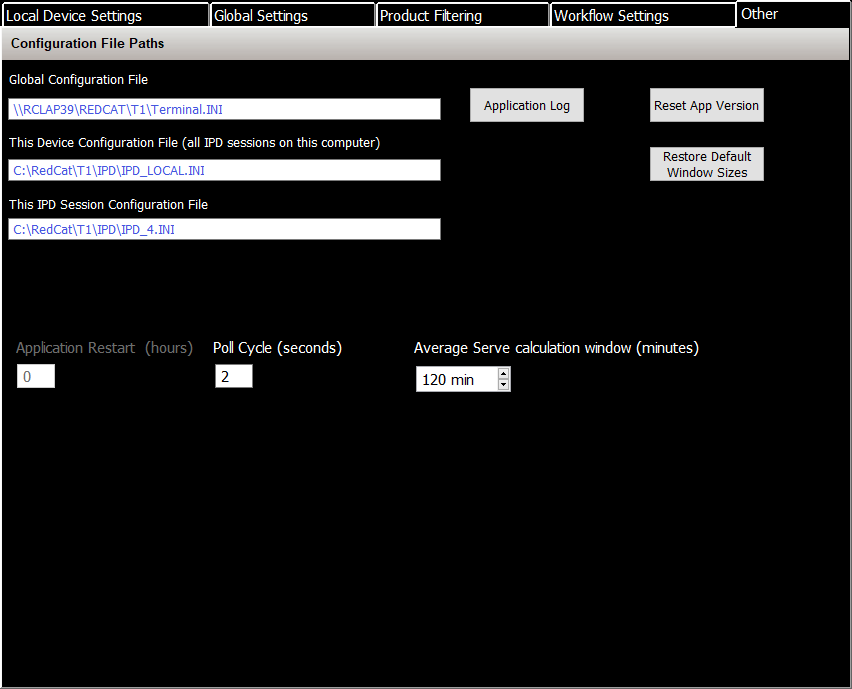
The network paths for the following configuration files are displayed for reference.
- Global Configuration File
- This Device Configuration File (all IDP sessions on this computer)
- This IDP Session Configuration File
The following buttons will:
| Application Log | Open the Application Log applicable to the IDP network. |
| Reset App Version | Will reset the version recorded for the application causing the system to check for update instruction upon re-entry. |
| Restore Default Window Sizes | Will restore all windows applicable to the KMS device to the default settings. |
The following settings can be applied:
| Application Restart (hours) | Setting a value other than 0 will cause kitchen displays to restart in hourly intervals of the entered value. |
| Poll Cycle (seconds) | This indicates how frequently (in seconds) kitchen displays will check for new orders. |
| Average Serve calculation window (minutes) | This indicates the time period that that will be used for the Average Serve time calculation if Executive View mode is enabled. For example, if set to 120 minutes, the system will calculate the average serve time of all orders over the past 2 hours. |
Serve All Orders
It is possible to serve all orders for a KMS device simultaneously. This process will require POS Manager privileges to complete.
Access the System Settings button on the toolbar.
On the right hand side of the screen is a Serve All Orders button. 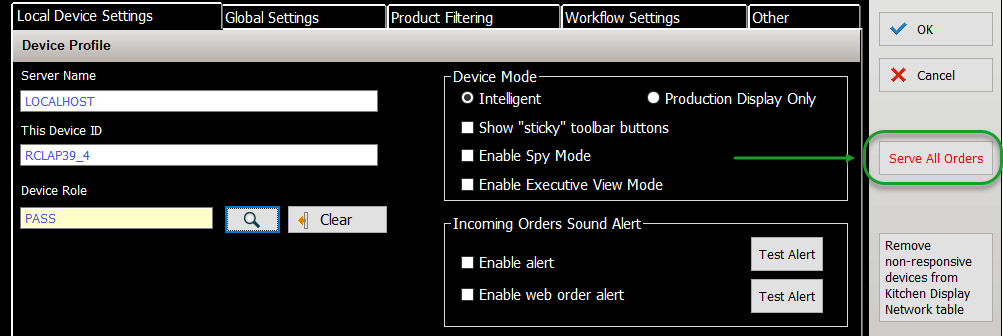
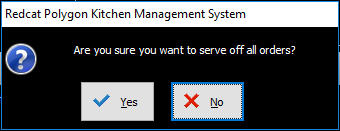 A message will be displayed asked for confirmation to serve all orders.
Choose Yes to confirm. All outstanding orders for this KMS device will be removed from the production queue.
Note: If product assembly workflow is enabled on this KMS device, all outstanding orders will be passed to the next device in the workflow.
Orders Summary
The Orders Summary button on the toolbar will display a list indicating the total order quantity of each PLU type required to complete outstanding orders. This may be only items required for orders applicable to this KMS device, or for all KMS devices on the network according to the setting defined under Summary Screen Device Filtering.
The Orders Summary will display either PLU items, or Production Ingredients according to the setting defined under Summary Screen Ingredient Filtering.
Detailed or Aggregate View
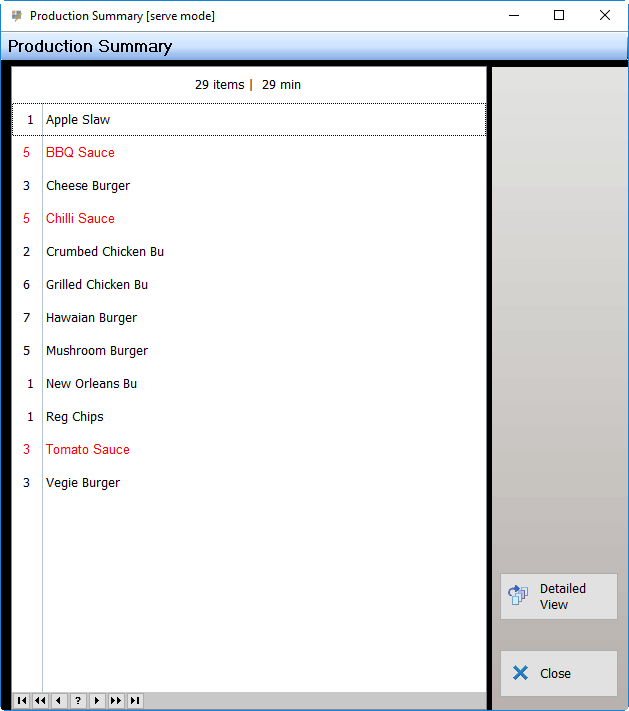 The view can be toggled between Detailed View which compresses all like products but retains all instructional items with the parent product, and Aggregate View which collates and compresses all items including instructional items. The aggregate view will also list items in alphabetically order, rather than the order that the items are found in the queue. This is intended to provide relatively consistent positions for items within the Summary list, so they can be quickly located/viewed in a busy environment.
Resizing and Position
The Order Summary window may be re-sized in both width and height and positioned on screen as desired. These values will be applied each time the window is opened.
Status
The status of the Order Summary (ie. open or closed) is saved upon application exit. If the summary was left open it will be launched automatically when the application is re-opened. The Order Summary window can be launched when there are no orders in the queue.
Current Sale Type Filters
 If you have configured sale type filters for this KMS device, the assigned filters can be viewed by clicking the Current Sale Type Filters button on the toolbar. If no Sale Type Filters have been configured, the Current Sale Type Filters button will be disabled.
Sale Type Filters can be configured in the System Settings in the Accepted Sale Types under Product Filtering.
Application Exit
 The Exit button closes this Kitchen Display Window. If orders are currently assigned to this KMS device you will be prompted to either Release Jobs or Keep Jobs.
Keep Jobs
Selecting Keep Jobs will save the current order queue for this KMS device. The current orders will not be moved to another display. Those current orders will only become visible again when this kitchen display is reopened.
Release Jobs
Selecting Release Jobs will release the current jobs from this KMS device. The released orders will be reassigned to any other KMS devices which are on-line and sharing the same role as this device.
If no other KMS devices are available which meet this criteria, the outstanding orders will be sent to the Pending Jobs File.
Having unassigned jobs in the Pending Jobs File will set the network health indicator to yellow on any other kitchen displays. Clicking the yellow network health icon will display the Pending Jobs File where unassigned jobs can be reclaimed. See the section on Recalling Parked or Served Orders.
Programming Production Ingredients
Programming of Production Only Ingredients will allow production jobs to display generic ingredient names, in place of the product names.
For example:
|
Order entered at POS |
Order displayed by Ingredient |
|
2 Classic Burger 1 Big Boss Burger 2 Grilled Chicken Burg 1 Cheese Burger 1 Chicken Little Add Bacon 1 Vegetarian Delight
|
4 Beef Pattie 3 Chicken 1 Bacon 1 Veg Pattie |
Required Settings
For the POS to recognise and recompile production print jobs replacing PLU items with Production Ingredients, the Enable PLU ingredient printing setting needs to be activated in the Location System Settings | POS Terminal Settings | Display| Enable Quick Service Ordering Mode.
Production Management in Category Setup
 Categories will need to be created to house the new Production Ingredient PLUs. It is recommended that consideration be given to the naming convention of these categories so as not to create confusion. Prefixing the category name with i- (for ingredient) works well. For example, the category containing the production ingredient PLUs for Burgers could be “i-Burgers”.
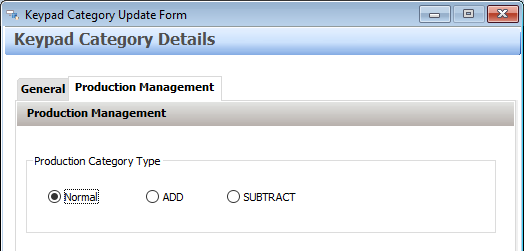
For compatibility with QSO mode programming, the Keypad category will also need to be designated as either a ’normal’, ‘add’ or ‘subtract’ category. This means that if Bacon is removed from an item during the sale, a ‘less bacon’ ingredient can also be applied to remove it from the production job.
To assign the correct designation, go to the Production Management tab and choose the relevant Production Category Type.
Create and Assign Production Ingredient PLUs
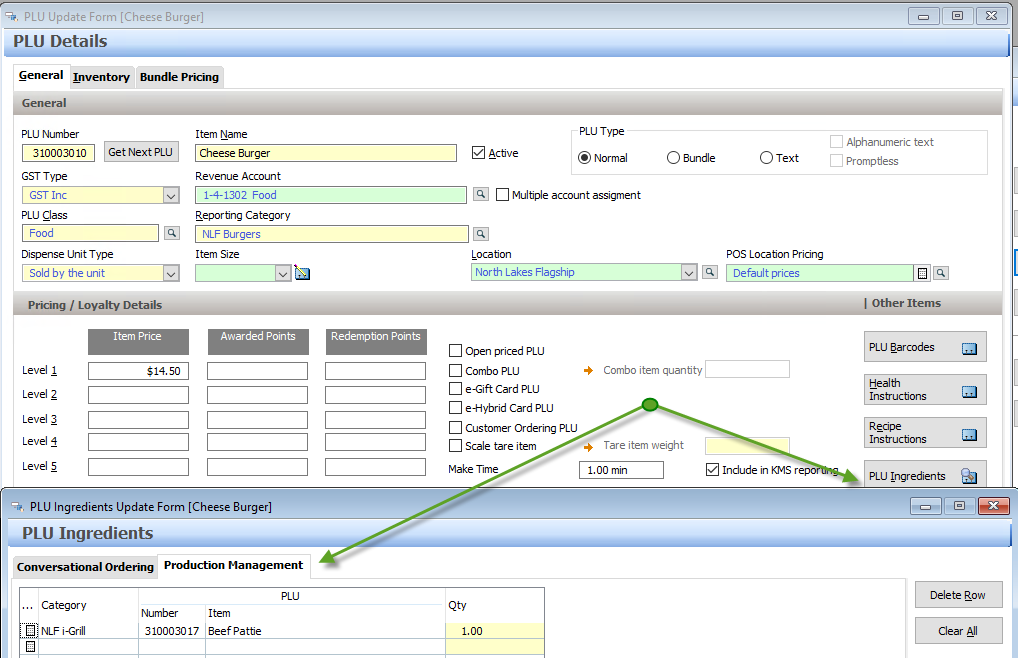
The next step is to create the PLUs which will be the Production Ingredient PLUs. These PLUs will then be assigned as the production ingredients within the parent PLUs.
- Open the relevant PLU, and choose the PLU Ingredients button.
- On the Production Management tab, use the pick list button to display the list of PLUs.
- Choose the required PLU from the list and use the SELECT button to save your choice. The Category, PLU number and Item Name of the selected PLU will be filled.
- Enter the required Qty. For example, the production ingredient required to make the PLU Double Beef Burger could be 2 x Beef Patties.
Assign Categories to Relevant Roles
For the POS to be able to successfully make the substitution of Production Ingredient for PLU item, both categories (ie. Burgers and i-Burgers) must be assigned to the target Roles.
Ensure that all relevant categories are assigned to all relevant Roles and send an update to the POS.
Including BOM (Bill of Materials) Ingredients and Measures
 If you are utilising the BOM (Bill of Materials) Module, you can choose whether this information is also presented in the Order Window on KMS devices.
The BOM Ingredients and Measures will replace the instructional PLUs entered during the sale with the relevant ingredients and measures from the BOM Matrix applicable to the chosen combination.
The choice may be made per KMS Role, for example you may choose to have the Bubble Tea Make role include the BOM ingredients and measures, and have the Bubble Tea Serve role exclude them and instead show the instruction PLUs as entered.
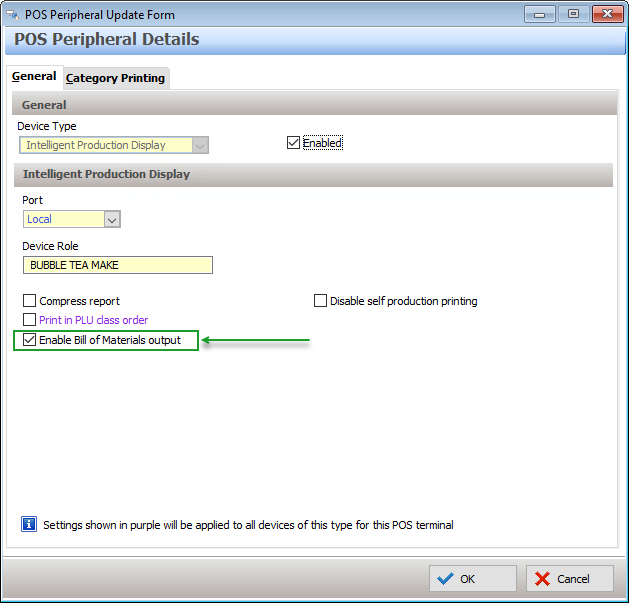
Enabling at KMS Role
To enable this functionality, ensure the Enable Bill of Materials Output setting is selected on the POS Network | POS Peripheral Details form for the relevant role.
Order Window with BOM
If Bill of Materials output has been enabled for a KMS Role, the BOM ingredients and measures will:
- replace the instructional PLUs entered on the display.
- cause the supplementary details from Web or Kiosk orders, such as order and pickup date/time, customer contact details and any notes to be excluded.
- exclude POS Sale Type indicators
This leaves the focus of the order on the recipe required for production.
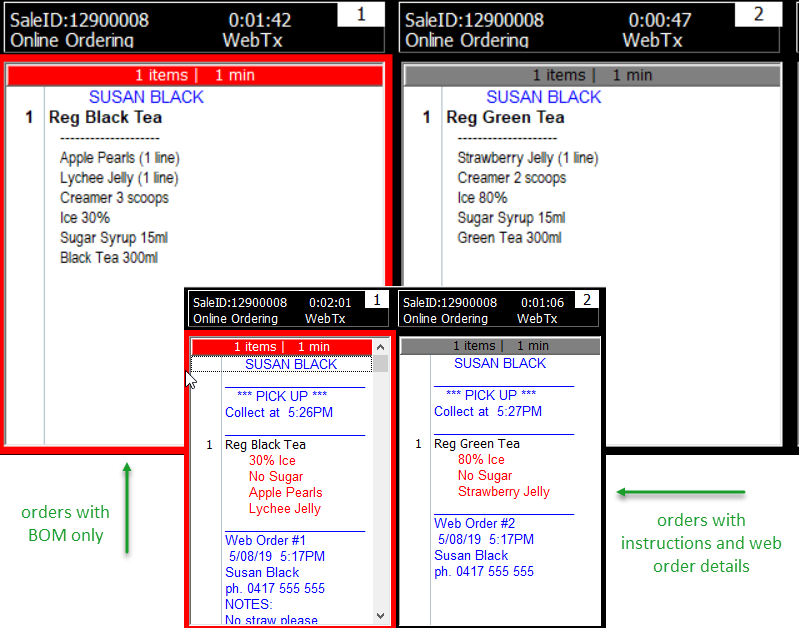
This is useful as the staff member responsible for making the bubble tea (role = Bubble Tea Make) is given exact measures for each ingredient, while the staff member who will deliver the bubble tea (role = Bubble Tea Serve) knows exactly what the customer ordered and can announce it appropriately – “Regular Green Tea for Susan, 80% Ice, No Sugar, with Strawberry Jelly”.