Summary
The Mapped Codes section of Polygon Central is designed to obtain the URL endpoint or code to facilitate the creation of customer facing QR codes.
These QR codes can then be utilised to lead your customers directly to a specific online ordering sale type and location for:
- Web Ordering
- Legacy Web Ordering
Similarly, Mapped Codes can be created for easy internal access to menu items within your Polygon Central Admin Portal.
Mapped codes can be created individually, or the bulk creator can be used to create the same ‘code’ for multiple locations.
Once created, the codes can be exported to .csv. It is expected that this data then be input into a QR code generator to obtain the relevant QR codes.
Contents
Navigating the Mapped Codes List
How to Access
To access Mapped Codes:
- Login to Polygon Central
- Choose Loyalty & Ordering in the menu
- Now choose Mapped Codes.
Note: A Polygon Central user must be assigned a user Role with the following privileges in order to create and manage Mapped Codes:
Mapped Codes (View)
Mapped Codes (Edit)
Navigating the Mapped Codes List
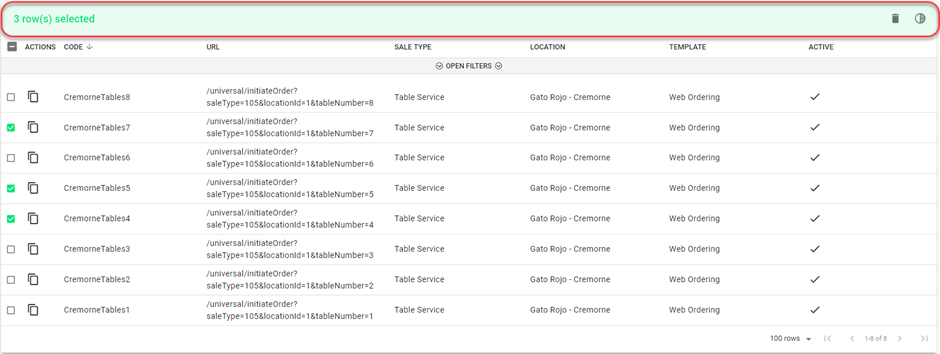
As Mapped Codes are added, they will be listed in the system as follows:
- Use the Create Mapped Code button to set up a single mapped code.
- Use the Bulk Creator button to create a list of ‘like’ codes.
- Use the Export CSV button to generate a CSV file containing the codes currently displayed.
- Click on any column heading to sort by any column, an arrow will indicate if the current sort is ascending or descending ¯. Click on the column heading again to reverse the sort order.
- Click on Open Filters to open the filter bar (toggles to Close Filters):
- Use the Search field to search for any code by the Code Name.
- Visible Records:
- Increase the number of rows displayed on one page.
- Navigate multiple pages of mapped codes records.
- Use the select box to mark items as selected for actioning.
- Use the copy to clipboard icon to copy the mapped code URL.

Multi-Select Actions
If multiple items are selected (see point 8 above) the multi-select action bar will be displayed.
The number of records selected will be shown, and the bin and toggle active status icons are available for use.
Deleting Mapped Codes
To delete a mapped code, you will need to tick the select box for that record (see point 8 above) and use the bin icon in the multi-select bar to delete it.
Filtering the Mapped Codes List
With the filter bar open, options to filter the mapped codes are available. Filtering may be on:
- Code (data entry field)
- URL (data entry field)
- Sale Type (chosen from drop down options – multi select available)
- Location (chosen from drop down options – multi select available)
- Template (chosen from drop down options – multi select available)
- Active Status (indicator toggles between active , inactive and all statuses when clicked)
Note: The Open Filters option toggles to Close Filters once clicked.

Multi-selecting from a list
To multi-select items from a list you will click to select records as required, then click OFF THE LIST to insert your selections.
Adding a Single Mapped Code
To add a new mapped code:
- Use the Create Mapped Code button
- Complete the form. The details below will assist you.
- Use the Submit button to save the mapped code when finished.

Complete these fields on the form. Fields marked with * are mandatory fields and must be entered for the mapped code record to be saved successfully.
Note: Fields to be completed will change dynamically as selection are made. For example, the Table Number field is not presented if Sale Type Delivery is chosen.
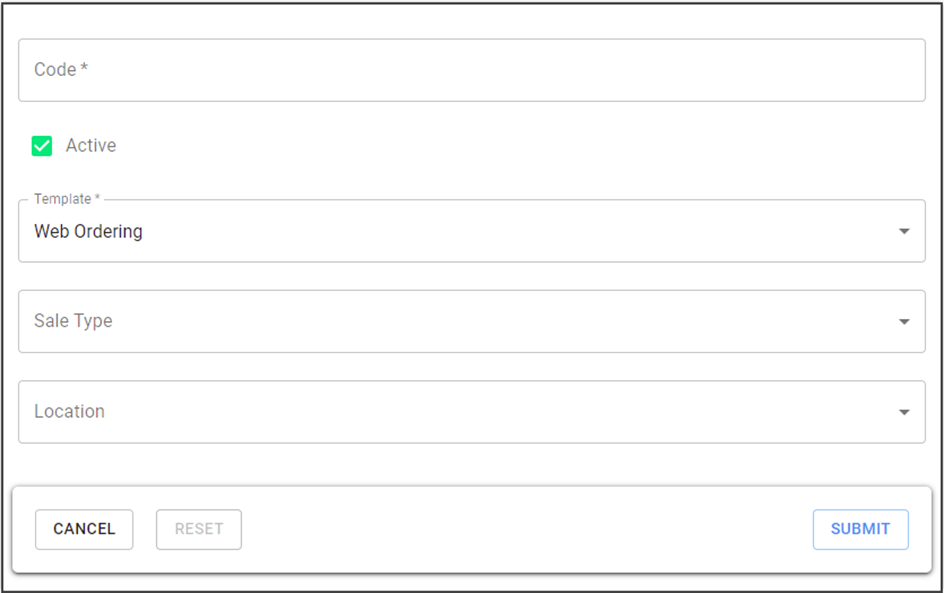
Code
Create a name for the code.
Active
The active status of this mapped code can be toggled on or off using the Active checkbox.
Template
What you choose as the template will determine what the mapped code will be used for.
- Web Ordering
- Legacy Web Ordering
- None
Note: please speak with your Redcat contact if you are unsure if your online ordering falls into the Web Ordering, or Legacy Web Ordering category.
The matrix below indicates which fields are relevant to the various Templates.
|
|
|
|
|
|
Web Ordering |
Y | Y | N |
|
Legacy Web Ordering |
Y | Y | N |
|
None |
N | N | Y |
Sale Type
Choose the relevant Sale Type from the drop-down list.
- Delivery
- Dine In (used for pre-paid table orders)
- Pick Up
- Takeaway
- Table Order (used for Open Tab table orders)
The matrix below indicates which fields are relevant to the various Sale Types.
|
|
|
|
|
Delivery |
Y | N |
|
Dine In |
Y | Y |
|
Pick Up |
Y | N |
|
Takeaway |
Y | N |
|
Table Order |
Y | Y |
Bypass Delivery Address


Location
Select the required Location from the drop-down list. Locations are displayed grouped by state.
Table Number
This field is only available if the Sale Type Dine In or Table Order is chosen.
Enter the relevant table number.
For example, you could create a mapped code that, when scanned, would present a customer with an online Dine In order where the location and table number are already selected – ideal for attaching to the tables in the store.
To create a set of codes (eg, you want to create a mapped code for a single location for tables 1 through 20) you can enter either:
1,2,3,8,9,10,15,16,17,18,19,20, (will create only those tables specified) or
1-20 (will create a mapped code for all tables 1 through 20) or
1a, 1b, 2c, 2d (alpha numeric codes must be listed individually).
URL Path
This field is only available if the Template type None is chosen.
The text that you enter in this field will be appended to your base URL. The URL Path you enter must be prefixed with /.
For example, if you want to create a mapped code that will take your customer directly to a page that will allow them to register as a member, the system will automatically assume the base URL https://[yourclientname].redcatcloud.com.au and you would enter ‘/auth/loyalty’ in the URL path.
The end result would be https://[yourclientname].redcatcloud.com.au/auth/loyalty as the endpoint for the mapped code.
We have not listed all possible URL Paths as the list is comprehensive and can be dynamic. Please discuss with your Redcat contact if there is a specific path within the Admin Portal that you want to reach via mapped code.
Editing a Mapped Code
To edit to a mapped code, simply click on the mapped code record in the list.
The mapped code form will be opened, and you can make the required changes.
Choose the Submit button to save your changes.
Using the Bulk Code Creator
There are times when you might want to create a bulk lot or run of similar mapped codes. For example, you may want a mapped code to display in the front window of every store in NSW which will direct customers to an online Pick Up order for that store.
To create bulk codes:
- Use the Bulk Creator button
- Complete the form. The details below will assist you.
- Use the Submit button to save the mapped code when finished.

Complete these fields on the form. Fields marked with * are mandatory fields and must be entered for the bulk code creation to be successful.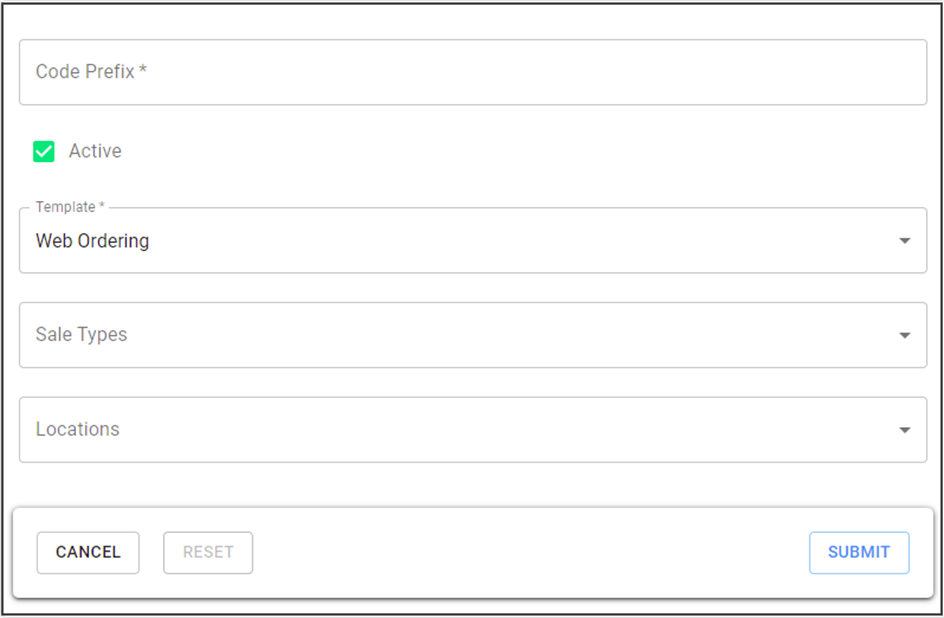
Code Prefix
Enter the Code Prefix for this run of codes. This will be used as the base for the code and will have a numeral sequentially appended.
For example, a bulk creation with the code prefix Takeaway will result in codes named:
Takeaway1
Takeaway2
Takeaway3 …………
Template
What you choose as the template will determine what the mapped code will be used for.
- Web Ordering
- Legacy Web Ordering
Please note: The None template is not available when creating bulk codes.
Sale Type
Choose the relevant Sale Type(s) from the drop-down list.
- Delivery
- Dine In
- Pick Up
- Takeaway
- Table Order
In the bulk creator, this is a multi-select field. Once all relevant sale types are chosen, click off the field to save your selection.
Note: when selecting multiple sale types Dine In and Table Order should be grouped together as both these require a table number. Delivery, Pick Up and Takeaway can also be similarly grouped.
Location
Select the required Location(s) from the drop-down list. Locations are displayed grouped by state.
In the bulk creator this is a multi-select field. Individual locations can be selected, or you may include all locations for a state by selecting the state name from the list.
Once all relevant locations are chosen, click off the field to save your selection.
Exporting Mapped Codes
Once created, you need to export the mapped codes to .csv file for use with your QR Code generator.
To do this:
- Use the filters to create the list of codes that you want to export.
When you export, the list currently displayed will be included in the export file. - Use the Export CSV
The export file will be created and downloaded.
The file will contain the following fields:
- Active
- Code
- FullURL
- ID (mapped code record number)
- Location (store ID number)
- Sale Type
- Template
- URL

Copying a Single Mapped Code
To obtain the URL for a single mapped code, rather than filtering to display only that code and creating an export file containing a single entry, you can use the copy to clipboard icon (see point 9 – Navigating the Mapped Codes List) to copy the URL required for that mapped code.
The FULLURL for the record will be copied to your clipboard.
Using the Mapped Codes
When using the data in the exported Mapped Codes file to generate your QR codes you may use either of these formats where BASE URL = https://[yourclientname].redcatcloud.com.au
BASE URL + /mappedcode/CODE (this is included in the export file as FullUrl)
BASE URL + /URL
https://gatorojo.redcatcloud.com.au/universal/mappedcode/cremornetables5
Or
https://gatorojo.redcatcloud.com.au/universal/initiateOrder?saleType=105&locationId=1&tableNumber=5
Mapped codes for the delivery sale type will include an extra parameter, either:
&bypassDeliveryAddress=true, or
&bypassDeliveryAddress=false
https://gatorojo.redcatcloud.com.au/universal/initiateOrder?saleType=103&locationId=5&bypassDeliveryAddress=true
Mapped Codes created using the Table Order sale type are for use with Open Tabs. You can read about Open Tabs in this article.
Mapped Codes are created using Universal Linking.
You can read about Universal Linking in this article.
Article Change Log
| Date | Record of Changes | Author |
|
Jan 2023 |
Mapped codes enhanced to include: Inclusion of previous enhancement to use universal linking when creating mapped codes. |
S Black |
|
May 2023 |
Updated example of mapped code to reflect universal linking. |
S Black |
|
August 2024 |
Delivery mapped codes now include option to bypass the delivery address and take the customer directly to the delivery menu for the location (entry of delivery address occurs later in the workflow). |
S Black |