Summary
Menus is where you will build the final menu that will be offered to customers.
Submenus are added to the menu until all the product categories you want to be presented for ordering are included.
Menus created here can then be included in the configuration settings as the menu applicable to specific sale types and ordering providers.
In the Menus section, you will:
- create or manage menus
- determine if this menu is available to all POS locations or a subset of your POS locations (it is recommended that location filtering not be applied at the Menu level).
- select the individual submenus to be included in the menu
The Product Overview article for Menu Information Manager is here
How to Access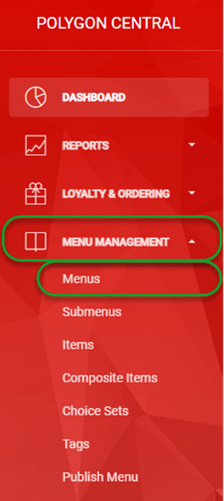
To access Menus:
- Login to Polygon Central
- Choose Menu Management from the menu
- Choose Menus from the sub-menu options.
Note: A Polygon Central user must be assigned a user Role with the following privileges in order to create and manage Menu Configuration.
MIM - Menus (view)
MIM - Menus (update)
Menus
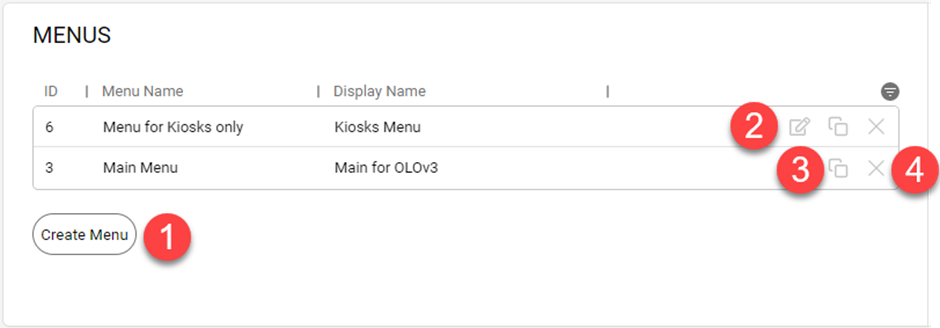
As Menus are added, they can be accessed and maintained as follows:
- Use the Create Menu button to program a new Menu record.
- Use the edit icon to open a Menu and view or modify the details.
- Use the copy icon to use the details in the current record as a starting point for a new Menu.
- Use the delete icon to remove a Menu from the system.
Creating a Menu
When creating a Menu, each of the category groups you want to include must first exist as Submenus.
You can find more information on Submenus here.
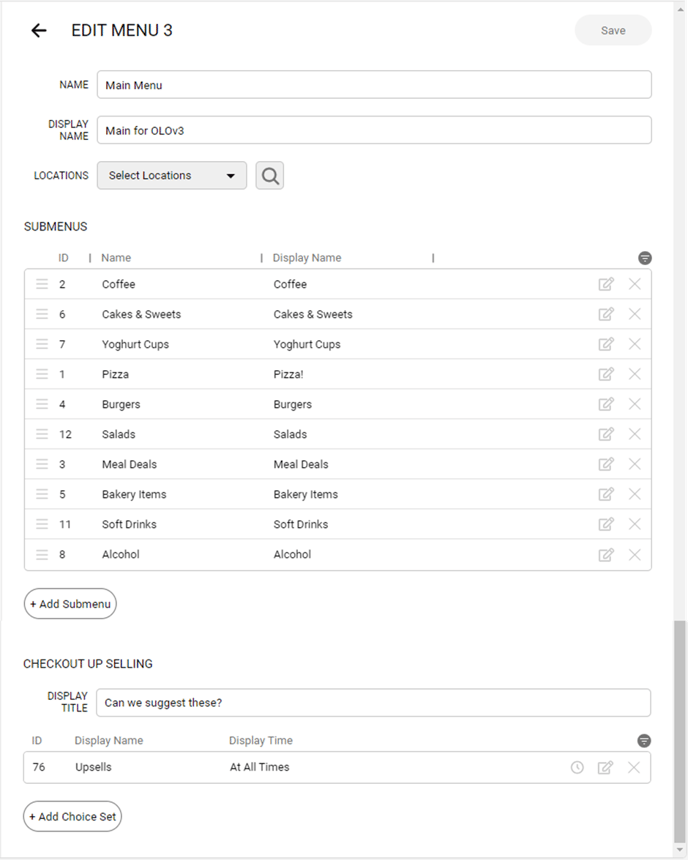
To add a new Menu:
- Use the Create Menu button to open the Create Menu form.
- Enter the internal name for this Menu in the Name field.
- Use the Display Name field to include any internal notes about this menu.
- It is recommended that each Menu be available to all Locations. If location filtering is required, it is generally best that this be applied at the Submenu level.
If no locations are selected, the menu will be available to ALL locations. - Use the Add Submenu button to select the Submenus you want to be included in this Menu from the Add Submenu list.
- The Submenus will be displayed for the customer in the order they are listed here. You can drag and drop them to reorder the list if required.
- Drill down into the Submenu to change it using the edit icon if required (the Edit Submenu form will open).
- Remove a Submenu from this Menu using the delete icon.
- In the Checkout Up Selling section:
- Enter the text you want to display on the Upsell modal in the Display Title field.
- Use the Add Choice Set button in the Up Selling section to select the choice set that will be used for the Upselling modal. If you include more than one (1) choice set you need to ensure that the Daypart Menu scheduling for each does not conflict. That is, only one choice set may be active as the Upsell on any given day/time.
- Use the Save button in the top right corner to record the details for this Menu.
Editing a Menu
If you need to make changes to a Menu:
- Select the Menu from the list and use the edit icon (see point 2 above) to display the Edit Menu form.
- Make any amendments required and use the Save button in the top right corner to record the changes.
Quickly Creating 'like' Menus
If you need to program a few Menus that are similar to Menus already created you can:
- Select the Menu to be used as your base from the list and use the copy icon (see point 3 above) to display the Create Menu form.
The form will be displayed with the same details as the source and the save button will be disabled until you make a change. - Make any amendments required and use the (now enabled) Save button in the top right corner to record the new Menu.
Deleting a Menu
If you need to delete a Menu:
- Select the Menu from the list and use the delete icon (see point 4 above).
- Confirm your delete action.
Related Articles
Further information can be found in the following articles.
Menu Management - Composite Items
Menu Management - Publish Menu
MIM - How to: Create a Family Pack with multiple mains and sides.
Article Change Log
| Date | Record of Changes | Author |
|
June 2023 |
First publication of this article. |
S Black |
|
September 2023 |
Correction of typographical error. |
S Black |
|
June 2024 |
Updated to include details for Upsellling. |
S Black |
|
August 2025 |
Added links to the How To articles in the Related Articles section. |
S Black |