Summary
Status Screens allow you to configure display screens that will list online orders (or orders received via API) according to the current ‘order status’.
Orders entered at POS of the relevant sale type can also be listed on Status Screens.
Ideal for letting those who have placed orders externally or third-party delivery drivers determine if their order is ready when they arrive at the restaurant.
The most common example would be a two-paned screen that lists orders not yet completed or ‘pending’ on one pane, and orders which are completed or ‘ready for collection’ on the other.
Screens may be configured to either display panes side by side (or top and bottom on mobile devices), or the screen can cycle through the programmed panes.
Alternatively, you may want a single-paned screen programmed to display only ‘ready for collection’ delivery orders designed exclusively for third-party delivery drivers to check before entering the restaurant – just scan the QR code to determine if the order is ready!
As panes can be programmed to filter by both Sale Type and Order Status configuration options abound!
An Average Wait Time pane is available to display the current average wait time per sale type. Useful for staff to be able to relay accurate wait times when asked, or for customers to determine if they 'have time' before their movie starts! An Average Wait Time pane may be displayed independently or used in conjunction with Order Status panes.
Advertising and marketing opportunities are available with full-page advertisements able to cycle with the panes, or banner-style advertisements situated at the bottom of the screen.
Status Screens may be operated on any device with an active internet connection and a contemporary web browser.
If you are presenting on an internet-connected screen in store simply enter the URL into your browser or use the URL to generate a QR code for display.
Contents
Navigating the Status Screens List
Creating an Average Wait Time Pane
How to Access
To access Order Status Screens: 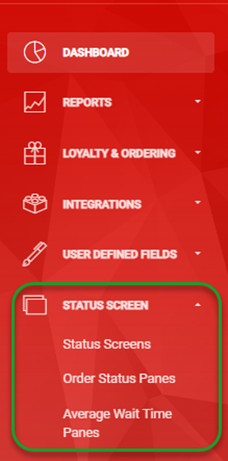
- Login to Polygon Central
- Choose Order Status Screen from the menu
- Sub-menus available are:
- Status Screens
- Order Status Panes
- Average Wait Time Panes
Note: A Polygon Central user must be assigned a user Role with the following privileges in order to create and manage Order Status Screens:
Order Status Screens (View)
Order Status Screens (Edit)
Order Status Panes (View)
Order Status Panes (Edit)
Pre-requisites
If you intend to utilise Order Status Screen at only some of your stores, we recommend that these stores are specifically listed in the configuration settings in the interest of reducing load and overhead.
You may need to discuss this with your Redcat contact as configuration options are not generally exposed to Admin users.
Settings are located:
Configuration | System | Status Updates | Status Update Stores.
Navigating the Status Screen Lists
Status Screens allow you to determine for which location the screen should display orders and which configured Panes it will display, along with theming and behavioural options.
Status Screens is where you will define the overall look and feel for the screen.
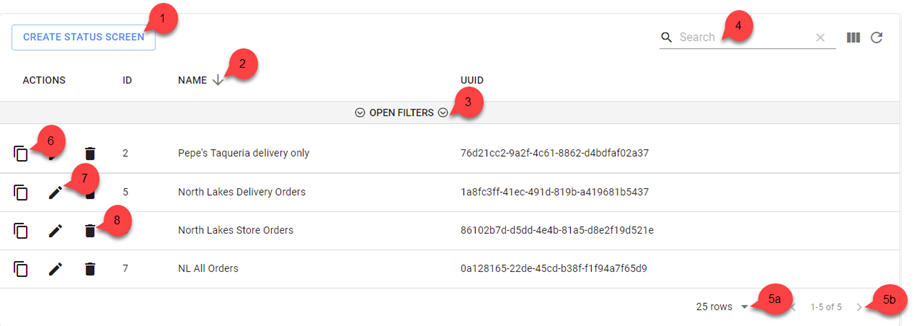
As Status Screens are added, they can be access and maintained as follows:
- Use the Create .... button to set up a new item.
- Click on any column heading to sort by any column, an arrow will indicate if the current sort is ascending or descending. Click on the column heading again to reverse the sort order.
- Click on Open Filters to open the filter bar (toggles to Close Filters):
- Use the Search field to search the list by Name.
- Visible Records:
- Increase the number of rows displayed on one page.
- Navigate multiple pages of status screen records.
- Use the copy to clipboard icon to copy the URL required to run the screen from your internet browser (applies to Status Screens only - is not available for Order Status or Average Wait Time panes)
- Use the edit icon to open a record and view or modify the details. You can also click anywhere on the record to open.
Note: only fields that are not ‘greyed out’ may be edited. - Use the bin icon to delete a record from the system.
Filtering the Status Screens List
With the filter bar open, options to filter the status screens are available. Filtering may be on:
- ID (data entry field)
- Name (data entry field)
- UUID (data entry field)
Note: The Open Filters option toggles to Close Filters once clicked.

Filtering the Order Status Panes List
With the filter bar open, options to filter the order status panes are available. Filtering may be on:
- ID (data entry field)
- Name (data entry field)
- Display Name (data entry field)
Note: The Open Filters option toggles to Close Filters once clicked.

Filtering the Average Wait Times Panes List
With the filter bar open, options to filter the status screens are available. Filtering may be on:
- ID (data entry field)
- Name (data entry field)
- Display Name (data entry field)
Note: The Open Filters option toggles to Close Filters once clicked.

Creating a Status Screen
To add a new Status Screen:
- Use the Create Status Screen button
- Complete the form. The details below will assist you.
- Use the Submit button to save the status screen when finished.

Complete these fields on the form. Fields marked with * are mandatory fields and must be entered for the status screen record to be saved successfully.
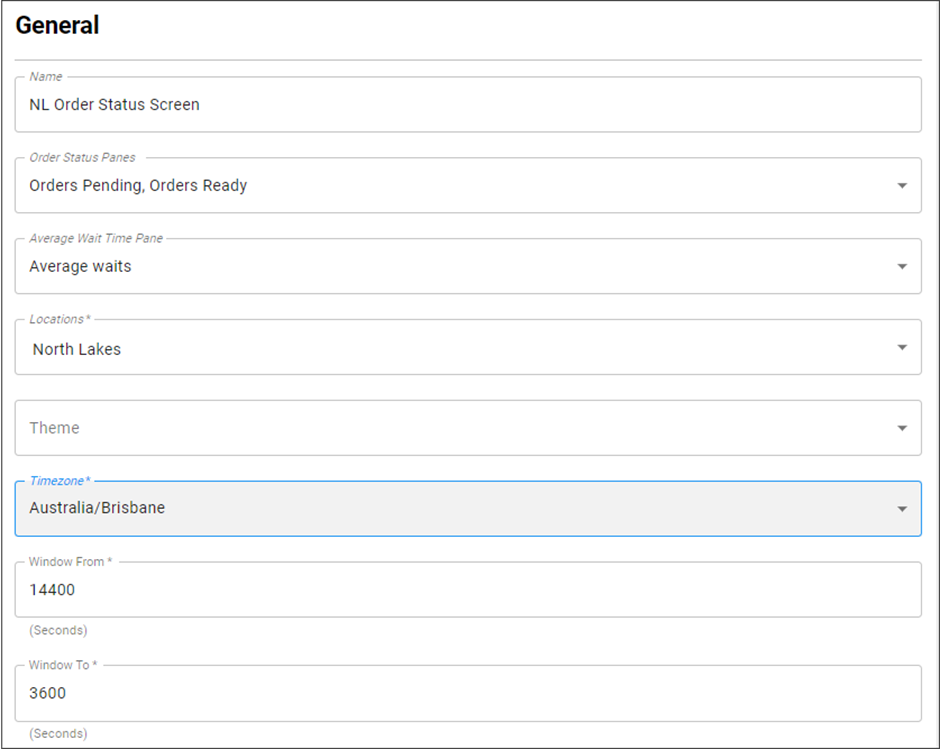
Name
Create a name for the Status Screen.
Order Status Panes
Select the relevant panes from the drop-down list of programmed Order Status Panes. This is a multi-select field. Once all relevant panes are chosen, click off the field to save your selection(s).
Average Wait Time Pane
If you also want to display a pane containing the Average Wait Time(s) for various Sale Types, choose the relevant pane from the drop-down list of programmed Average Wait Time Panes. You may only make one selection.
Note: At least one order status pane, or one average wait time pane must be selected before the status screen can be saved.
Locations
Select the location(s) at which this status screen will be used. This is a multi-select field. Once all relevant panes are chosen, click off the field to save your selection(s).
Theme
If specific theming has been provided by Redcat’s web development team, choose the required theme.
Timezone
Choose the timezone relevant to the location of the Order Status Screen. The system will use this to determine both ‘local time’ and the age of the order.
Window From
The default for this field is 14400 seconds (4 hours). If an order has aged more than this value it will be excluded from the display. Used to ensure that orders which have not completed the flow of status updates (pending -> ready -> completed) are removed and the screen are ‘clean’ for the next session of trade.
Window To
The default for this field is 3600 seconds (1 hour). If an order is scheduled more than this value into the future it will be excluded from the display. Used to ensure that orders which have been scheduled for later in the day are not unnecessarily taking real estate in the ‘pending’ pane until they become relevant.
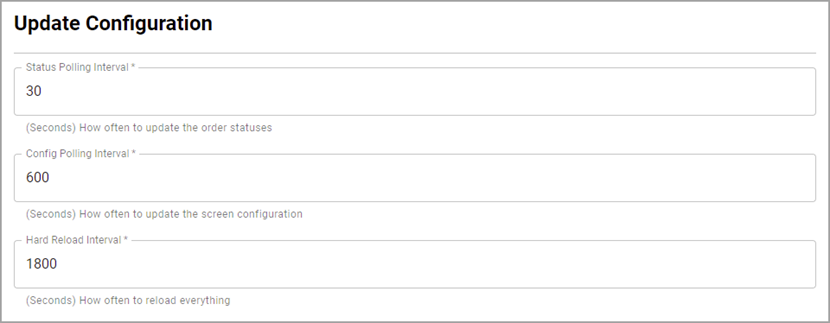
Status Polling Interval
Enter the number of seconds before the status screen polls for new orders or order statuses. The default setting is 30 seconds.
***Note: If you have programmed a full page advertisement for inclusion on the status screen the polling interval entered here must be greater than 4 seconds (the advertisement must also be programmed for a duration of 4 seconds).
Config Polling Interval
Enter the number of seconds before the status screen polls for new or updated configuration settings. The default setting is 600 seconds (10 minutes).
Hard Reload Interval
Enter the number of seconds before the status screen will completely reload all settings and orders. The default setting is 1800 seconds (30 minutes).
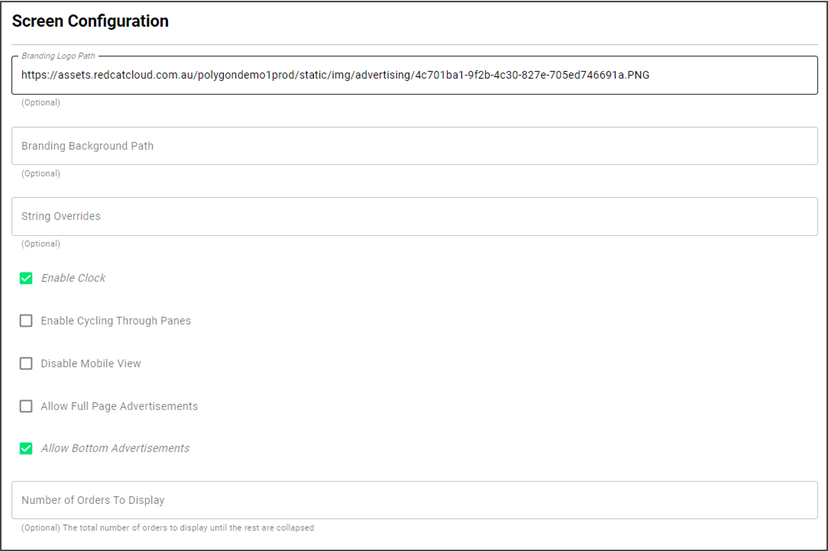
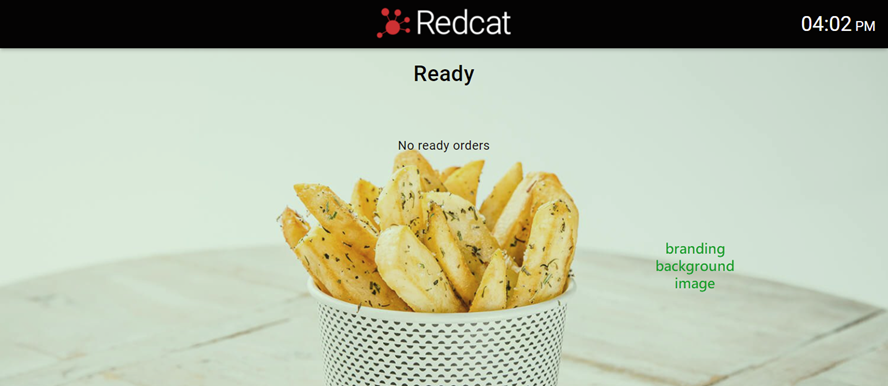
Branding Logo Path
If you wish the status screen to include a branding logo across the top please enter the URL path where the logo is resident. This must be hosted on a secure connection (SSL), such that the URL starts with https://
The branding logo image should be 300x300 pixels or similar with a transparent background. It will be centred in the top bar on any device.

Branding Background Path
If you wish the status screen to include a branding background image on the status panes, please enter the URL path where the image is resident. This must be hosted on a secure connection (SSL), such that the URL starts with https://
The successful inclusion of a branding background image is dependent on many factors including screen size, pane configuration and theming. If you want to include a branding background image, please discuss this with your Redcat contact.
String Overrides
String overrides may be utilised to customise default wording on screens. If there is something that you wish to change, please discuss it with your Redcat contact – changes will need to be implemented by our web development team.
Enable Clock
If desired, you can have the current time in digital format displayed in the top right corner of the status screen.

Enable Cycling Through Panes
Rather than displaying the panes side by side (divided equally on the available real estate) you may choose instead to display each pane alone and cycle through the panes at prescribed intervals. If this is enabled the Pane Cycling Duration entry field becomes available – enter the number of seconds each pane will be visible.
Note: if you intend to include full page advertisements, the recommended cycle time is 8 seconds.

Disable Mobile View
Status Screens displayed on a non-mobile device (monitor, TV etc) will show the Order Status Panes side by side. Order Status Screens displayed on a mobile device (smartphone, iPad etc) will show Order Status Panes stacked on top of each other, and the user can scroll up and down the display.
If you would like the Order Status Panes displayed side by side, regardless of the device on which is it displayed, ensure that Disable Mobile View is selected.
Allow Full-Page Advertisements
If you wish to display full-page advertisements interspaced with the status panes, enable this check box.
Programming for the advertisements will be completed using Loyalty & Ordering | Advertisements.
You will use:
- Client: Customer Display
- Section: Order Status Screen Full
- Type: Post
Note: each full-page advertisement will be displayed for 4 seconds.
The resolution of the full-page advertisement images will depend on the required output. If you intend to run the order status screen on a landscape 1080x1920 pixel screen, then your advertisement image should also conform to this. If you intend to use a portrait orientation the advertisement image should change accordingly.
Basically, you need to determine what your display screen will be and create your advertisement image accordingly – will you have a huge screen hanging on a wall, or a small screen facing through the front window? Do you intend that the screen only be accessed by a mobile device? All three options will require different sized images.

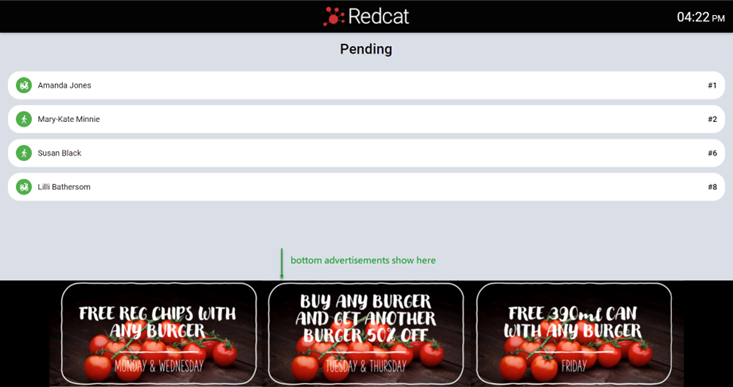
Allow Bottom Advertisements
If you wish to display advertisements along the bottom of the status screen, enable this check box.
Programming for the advertisements will be completed using Loyalty & Ordering | Advertisements.
You will use:
- Client: Customer Display
- Section: Order Status Screen Bottom
- Type: Post .
Image sizes for bottom advertising will also depend on the display screen. Your image should be as wide as the screen, and can be as high as you want your ad to be. So for a 1080x1920 pixel screen your bottom banner ad will be 1080px wide, and then as tall as you determine.
Number of orders to display
You can choose to display a limited number of orders in the panes and have the remainder collated into '+ x more orders'. Determine how many orders should be displayed, and enter the relevant number.

You can read more about creating advertisements in this article:
Creating an Order Status Pane
To add a new Order Status pane:
- Use the Create Status Screen Pane button
- Complete the form. The details below will assist you.
- Use the Submit button to save the pane when finished.

Complete these fields on the form. Fields marked with * are mandatory fields and must be entered for the status screen pane record to be saved successfully.

Name
Give the order status screen pane a name. This does not display on the customer-facing screen, it will only be for your reference.
Display Name
Enter the text that you want to be displayed on the order status screen pane – this will be the ‘title’ of the pane.
Type
Order status screen panes are grouped as either:
- Pending, or
- Ready.
Choose the relevant type from the drop-down options.
Sale Types
Choose the sale types that you want to be displayed in this order status screen pane. This is a multi-select field. Once all relevant sale types are chosen, click off the field to save your selection(s).
Sales types can include (but are not limited to):
- Catering
- Delivery
- Dine In
- Drive Through
- None
- Pick Up
- Table Service
- Takeaway
- Web Ordering
Statuses
Choose the order statuses that will be displayed in this order status screen pane. This is a multi-select field. Once all relevant order statuses are chosen, click off the field to save your selection(s).
Although the list of Statuses is comprehensive, listed below are the most common statuses for this application:
- Received at Store (pending)
- Processed at Store (pending)
- Ready for Collection (ready)
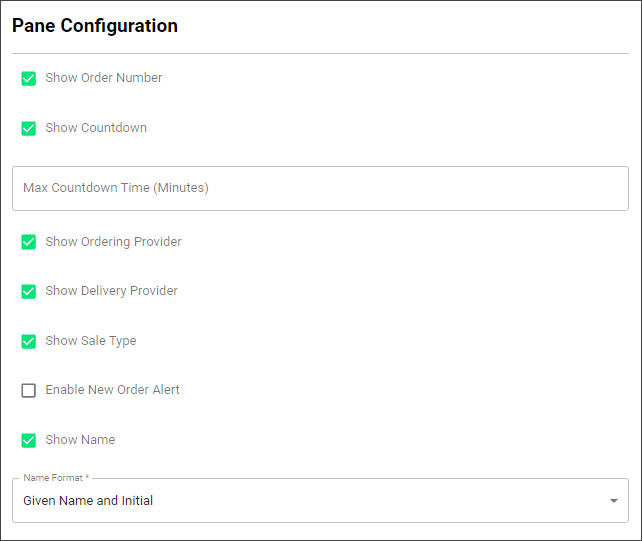
Show Order Number
If you want the order number to be listed in the order detail, ensure this tick box is enabled.

Show Countdown
Enable this option if you want a countdown to the estimated order ready time included in the order detail.
Your system can be configured to use the Average Order Wait Times when determining the estimated order ready time. Please discuss with your Redcat contact if you would like this enabled. The configuration settings are located in Polygon Central | System | Average Wait Times and are not usually exposed to Admin users.

If the order countdown reaches 00:00 the countdown will change to 'Almost there...'.

Max Countdown Time (Minutes)
If you enter a value here (eg. 20 mins) and an order has a countdown to ready greater than the value, the countdown will not be displayed on the order. Once the countdown is less than the value, the timer will be displayed on the order.
You could choose to use this feature to have all orders only countdown the last 5 minutes, or simply to ensure that long wait times are not displayed should an order be manually released by the POS in advance of the scheduled time.
Show Ordering Provider
If this option is enabled, and the relevant Ordering Provider has a custom icon, this will be included in the order detail (the ordering provider icon has priority 2 and will show if the order does not already match a custom icon for a delivery provider).

Show Delivery Provider
If this option is enabled, and the relevant Delivery Provider has a custom icon, this will be included in the order detail (the delivery provider icon has priority 1).

Show Sale Type
Enable this option to have the Sale Type reflected in the order detail (the sale type icon is priority 3 and will be displayed if the order does not already match a custom icon for either delivery provider or ordering provider).

Enable New Order Alert
If you wish an alert triggered when a new order is displayed in the status screen pane, ensure this option is enabled. The border surrounding the order detail will flash when a new order arrives in a pane.

Show Name
If you want the customer’s name displayed in the order detail, enable this option.
You then must choose the format in which the name will be displayed. Your options are:
- Full Name (Susan Black)
- Initials Only (S B)
- Given Name and Initial (Susan B)

Creating an Average Wait Time Pane
To add a new Average Wait Time pane:
- Use the Create Average Wait Time Pane button
- Complete the form. The details below will assist you.
- Use the Submit button to save the pane when finished.
Complete these fields on the form. Fields marked with * are mandatory fields and must be entered for the average wait time pane record to be saved successfully.
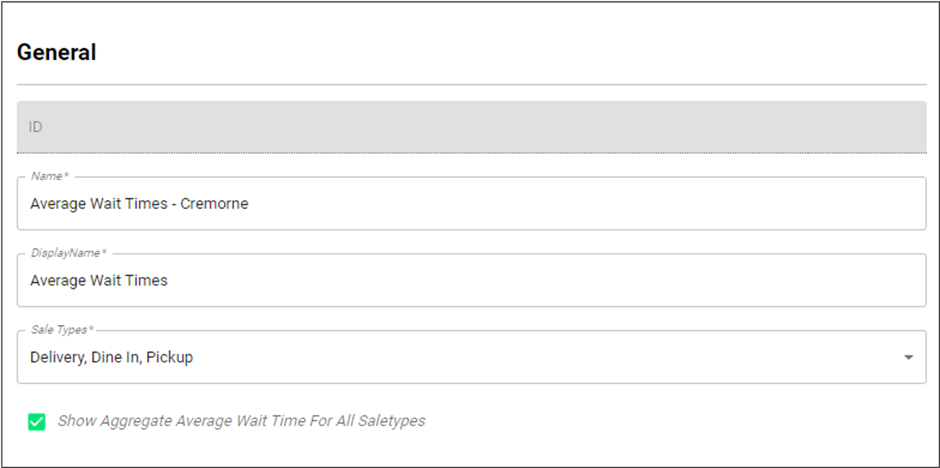
Name
Give the average wait time pane a name. This does not display on the customer-facing screen, it will only be for your reference to assist with identifying the pane.
Display Name
Enter the text that you want to be displayed on the status screen pane – this will be the ‘title’ of the pane.
Sale Types
Choose the sale types for which you want the average wait times displayed. This is a multi-select field. Once all relevant sale types are chosen, click off the field to save your selection(s).
Sales types can include (but are not limited to):
- Catering
- Delivery
- Dine In
- Drive Through
- None
- Pick Up
- Table Service
- Takeaway
- Web Ordering
Show Aggregate Average Wait Time For All Sale Types
If you would like the aggregate average wait time for all sale types included in the pane, ensure this setting is on. The record on the pane will be labelled All Orders and will always be displayed at the top of the pane.
An average wait time pane will look something like this:
You can read this article to find out more about Average Wait Times and how they are calculated.
Accessing an Order Status Screen
An Order Status Screen can be opened in one of two ways – by the direct entry of the URL copied from the Status Screen record, or utilising the URL to create a QR code.
By URL
To open an Order Status Screen using the direct URL, simply paste the URL obtained from the Status Screen record into your web browser.

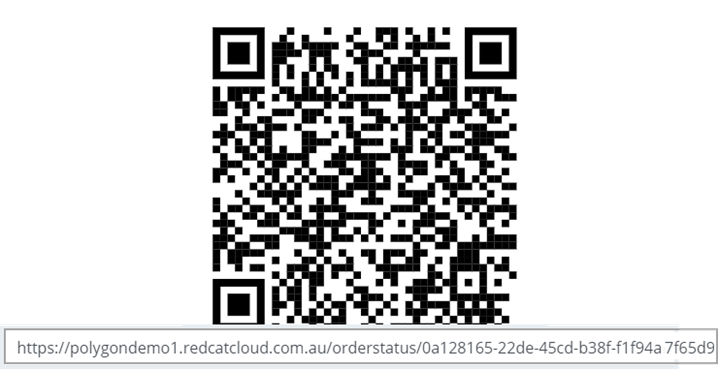
QR Code
The URL obtained from the Status Screen record can be input into a QR Code generator to obtain a QR Code that can be used to open the Order Status Screen.
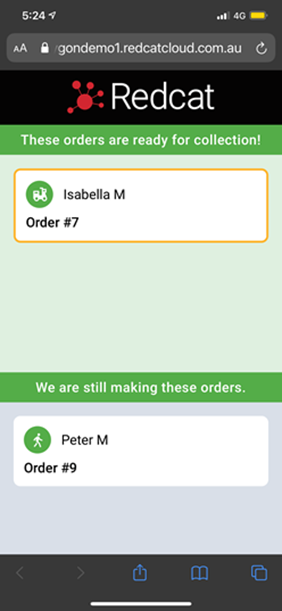
Scanning on a mobile device will display something like this:
Workflow in Store
As online orders are received by the SmartOrder processor at POS they are tagged with the status Received at Store. When the order is released and lodged with the POS for production the status is updated to Processed at Store.
Both these statuses fall into the ‘pending’ category.
Once the order is produced the order status needs to be updated – usually to Ready for Collection, which then falls in to the ‘ready’ category.
Updating the status will remove the order from the ‘pending’ pane and install it on the ‘ready’ pane.
Similarly, once the order has been collected either by the customer or delivery driver, the order status should again be updated – usually to Collected, which will remove the order from the Order Status Screen.
Orders from POS require the KMS device to lodge the initial Processed at Store status.
Updating the Order Status
The status of an order can be updated via the Kitchen Management System (KMS) devices.
Remember, the online orders will already have the status Processed at Store when they arrive on the KMS.
Orders entered at POS will have no status when they arrive at the KMS and the order status will need to be assigned.
You need to determine:
- If you want orders from POS to display on your Order Status Screen,
- Does the status need to change before the order is served/passed from this KMS, and
- What the status should be when the order is served/passed from this KMS?
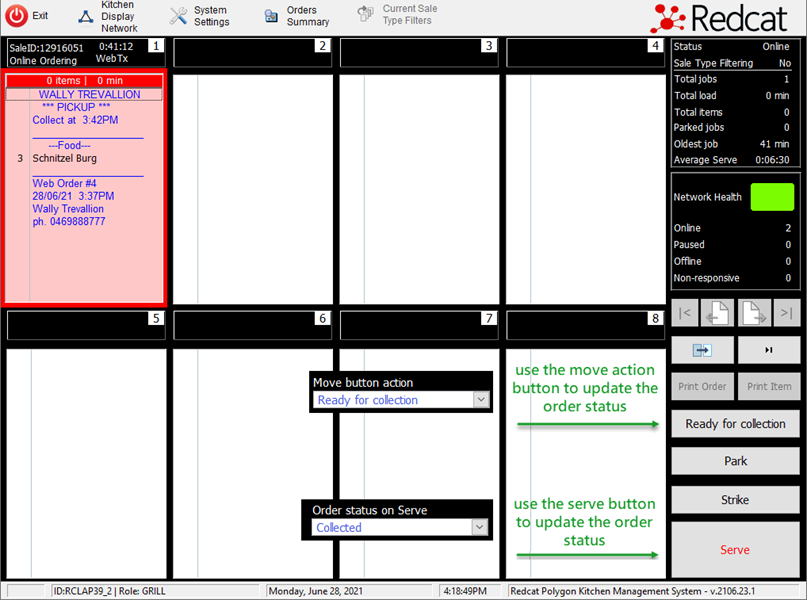
To setup the status changes, access the System Settings on the KMS.
On the Workflow Settings tab:
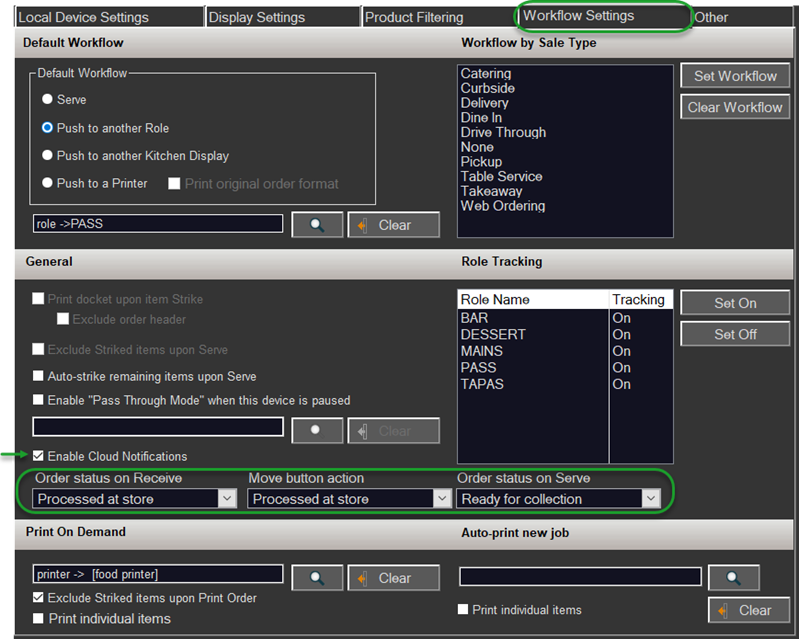
- If you want POS orders on your Order Status Screen, choose Processed at Store for the Order Status on Receive, otherwise select <None>.
- Select the relevant status from the Move button action drop-down.
- Select the relevant status from the Order Status on Serve drop-down.
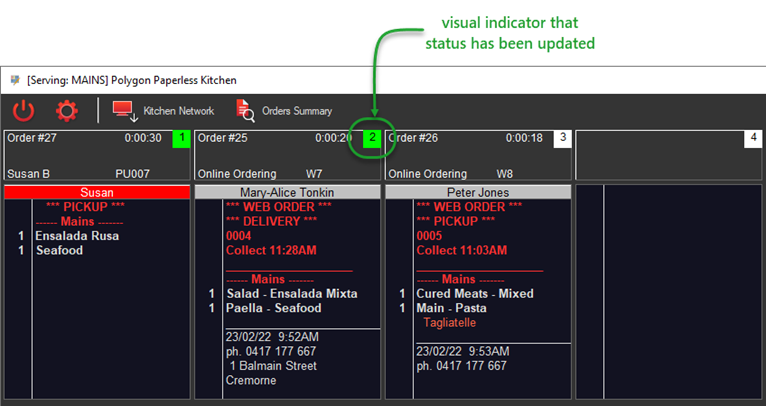
Visual Indicator of Status Change
For Polygon POS installations only, there is a visual indicator on your KMS device to show that the status of an order has been updated.
If the status of the order has been updated by this KMS device the order box number will turn GREEN.
If an order has been served and is subsequently recalled, the status indicator will remain green for that order.
Workflow Examples
Here are a couple of example workflow scenarios which may help you.
Kitchen has 2 KMS (MAKE and PASS)
The workflow settings for MAKE is Push to another role -> PASS
The Order Status on Receive is set to Processed at Store
The Order Status on Serve is set to Ready for Collection.
- POS Order arrives on MAKE and the KMS sets the status to Processed at Store. The order will now be displayed on the pending pane on the Order Status Screen.
- Online Order arrives on MAKE with status Processed at Store and is displayed on the pending pane on the Order Status Screen.
- As the order is ‘pushed’ from MAKE to PASS, the status of the order is updated to Ready for Collection and the order moves from the pending pane to the ready pane on the Order Status Screen.
The workflow settings for PASS is Serve.
The Order Status on Serve is set to Collected.
- When the customer/driver collects the order, and it is served from PASS the order status is updated to Collected and the order is removed from the ready pane on the Order Status Screen.
Kitchen has 1 KMS
The workflow setting is Serve.
The Order Status on Receive is set to Processed at Store
The Move button action is set to Ready for Collection.
The Order Status on Serve is set to Collected.
- POS Order is received and the KMS sets the status to Processed at Store. The order will now be displayed on the pending pane on the Order Status Screen.
- Online Order arrives with status Processed at Store and is displayed on the pending pane on the Order Status Screen.
- As the order is made, the staff member uses the ‘move action’ button (which says Ready for Collection) to update the status of the order and the order is moved from the pending pane to the ready pane on the Order Status Screen.
- When the customer/driver collects the order, and it is served the order status is updated to Collected and the order is removed from the ready pane on the Order Status Screen.
Article Change Log
| Date | Record of Changes | Author |
|
May 2022 |
Introduction of Window From, Window To, Timezone and Disable Mobile View fields when creating screen. |
S Black |
|
Jan 2023 |
Inclusion of Average Wait Time panes. |
S Black |
|
July 2024 |
Clarification on Status Polling Interval configuration if full page advertisements are included for the Order Status Screen. |
S Black |