Summary
The Polygon Kiosk can be installed in-store to supplement the POS Terminals. It is a self-ordering unit that will allow customers to place and finalise an order.
Accepted payment types are Eftpos (via a Tyro pinpad), member loyalty points or member hybrid cash, gift cards and coupons.
The features detailed in this article require kiosk version 0.0.142 or later.
Contents
Placing an Order using the Kiosk
Paying for an Order using the Kiosk
Confirmation of a Successful Order
Polygon Kiosk Components
The physical unit for a Polygon Kiosk may differ from store to store, but it will be comprised of four (4) basic parts.
- A touch screen for choosing menu items, reviewing orders and finalising payment.
- A POS Printer for issuing customer receipts.
- A barcode scanner to enable customers to scan their loyalty membership details, coupons and gift cards; and
- A Tyro Eftpos pinpad to facilitate payments.
Placing an Order using the Kiosk
As a customer approaches the kiosk unit should be displaying the Welcome Screen.
- Touch the Start button (or anywhere on the Welcome Screen) to start the ordering process.

Choose the Sale Type
If multiple sale types have been enabled for the kiosk, the customer will next be prompted to select the required sale type.
If only one sale type is enabled for the kiosk, this screen is skipped.

Member Sign In
The kiosk can now prompt customers to sign in as loyalty members. Members who have not yet completed the registration process [unregistered member] can still scan their barcode and accrue points or rewards for the sale.
They can:
- Use the Scan Member Barcode button to scan their membership barcode
- Scan the QR code shown to visit the registration page for your loyalty program and become a member
- Use the Checkout as Guest button to process the sale without membership details

Virtual Brands
If your kiosk is enabled for virtual brands, the customer will be prompted to choose the required brand.

Customers can swap between brands using:
- The Select Another Brand button at the top left of the screen
- The Also Order From section at the bottom of the screen.

The Menu Screen
The menu items available will be displayed and grouped into categories of like items.
Touching a category from the menu bar (which can be displayed either across the top of the screen as it is in the picture below, or down the left-hand side of the screen) will open the Menu Screen and display the items available within that category.
- Choose a category, and then touch the item to be ordered.
- If there are more categories than can be displayed on the category bar a scrolling arrow will allow the customer to scroll backwards and forwards across the bar.
- Use the search function to display a keyboard – now type to search for the required menu item.

The Item Editor Screen
The item and its description will be displayed at the top of the screen, along with the base kilojoule count for the item before modification (if programmed).
Modification options for the item will also be displayed for you to choose as desired.
- Scrolling arrows will be shown if there are more options available that are not visible in the current row.
- Each modification header advises how many mods have been chosen of the total number allowed.
- Use the cross (X) on a selected item to remove it from your selections.
- To include the same option more than once, touch it multiple times.
- Use the arrows to collapse or expand choice sets as desired.
- Swipe up and down the screen to see all available choice sets.
- If no modifications are available for an item it will be added directly to the order cart.
When the modifications on the item are complete, use the Add to Cart button to add the item to the order cart.
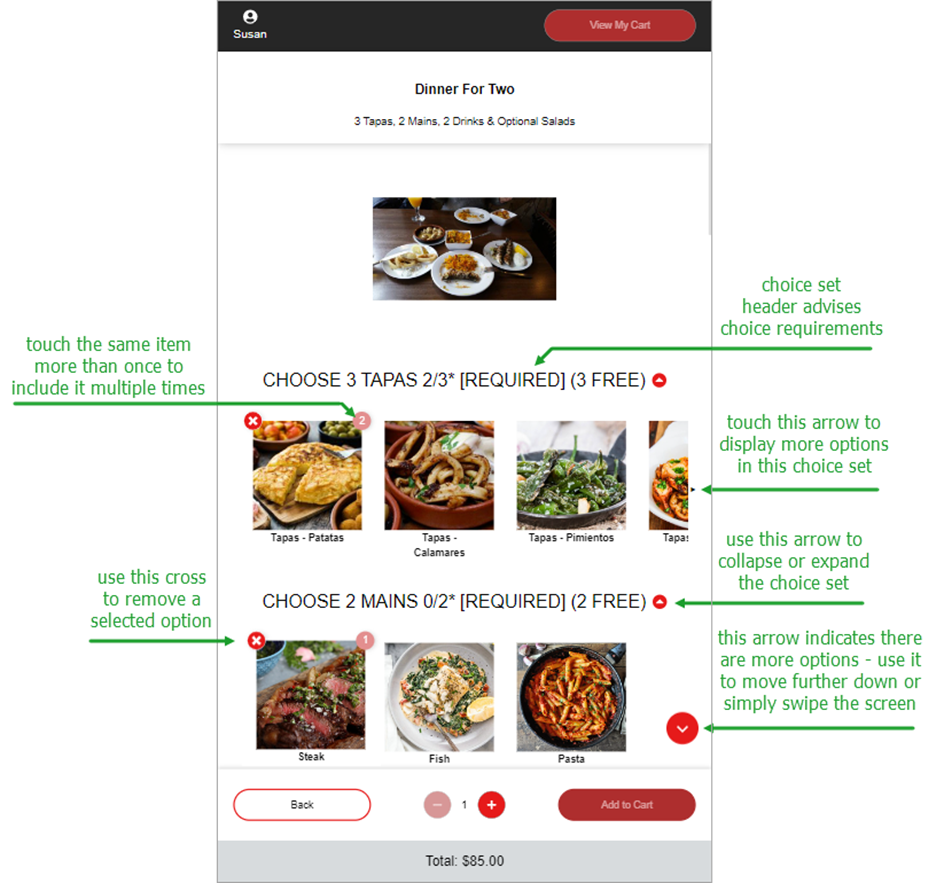
Use the View My Cart button on the top toolbar to review the order.
![]()
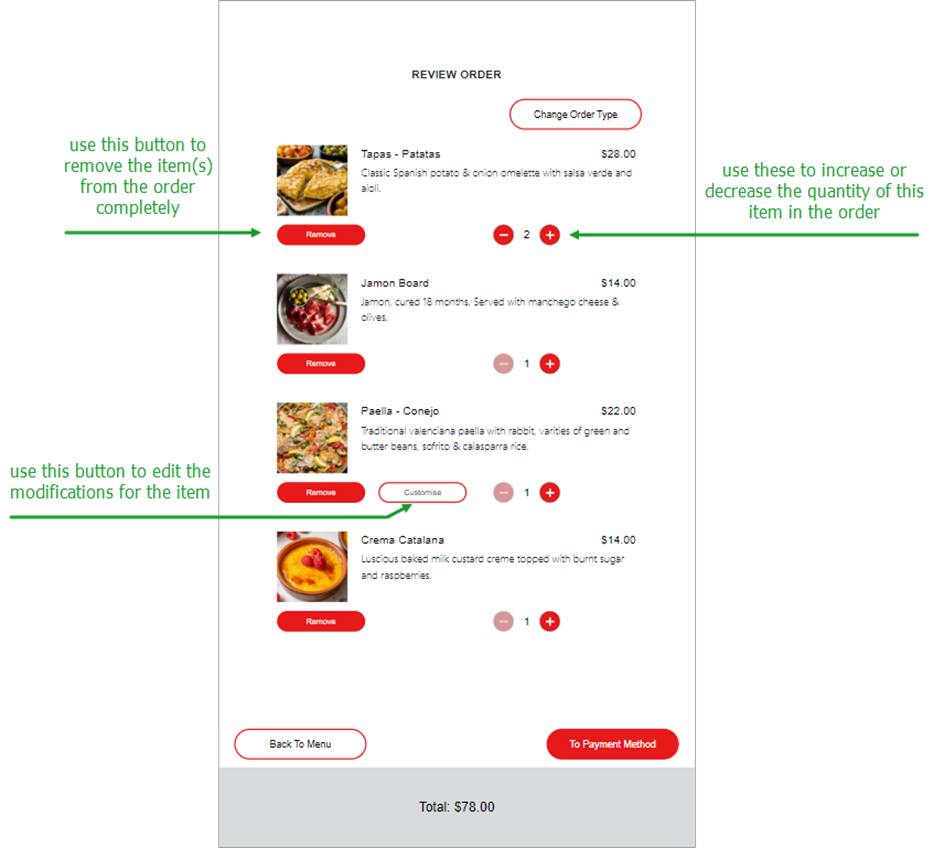
The Order Cart
The Order Cart displays all items in the order and from here customers can:
- Increase or Decrease the quantity of an item in the order using the - and + buttons.
- Remove an item from the Order Cart completely using the Remove button.
- Make changes to the modifications for the items using the Customise button. If an item does not have any modification options this button will be disabled.
- Use the Back to Menu button to return to the Menu Screen or the To Payment Method button to finalise the order.
Adding a table number
If the sale type chosen requires a table number (eg, Dine In) the customer can enter it on the Review Order page. Configuration allows for either a numerical or alpha/numerical keypad for data entry.
The customer will not be able to advance past this page unless a table number has been entered.

Member Details
At any time during the sale, a member may scan their loyalty card which will add the members' details to the order, and accrue points accordingly.
Alternatively, they can use the Scan Code button to invoke the Scan Member Barcode Now window.

When a member is associated with the order the member's name will be displayed in the toolbar at the top of the screen.

To disassociate the member from the order, touch the member's name and the member details will be displayed.
Use the Sign Out button to remove the member from the sale.
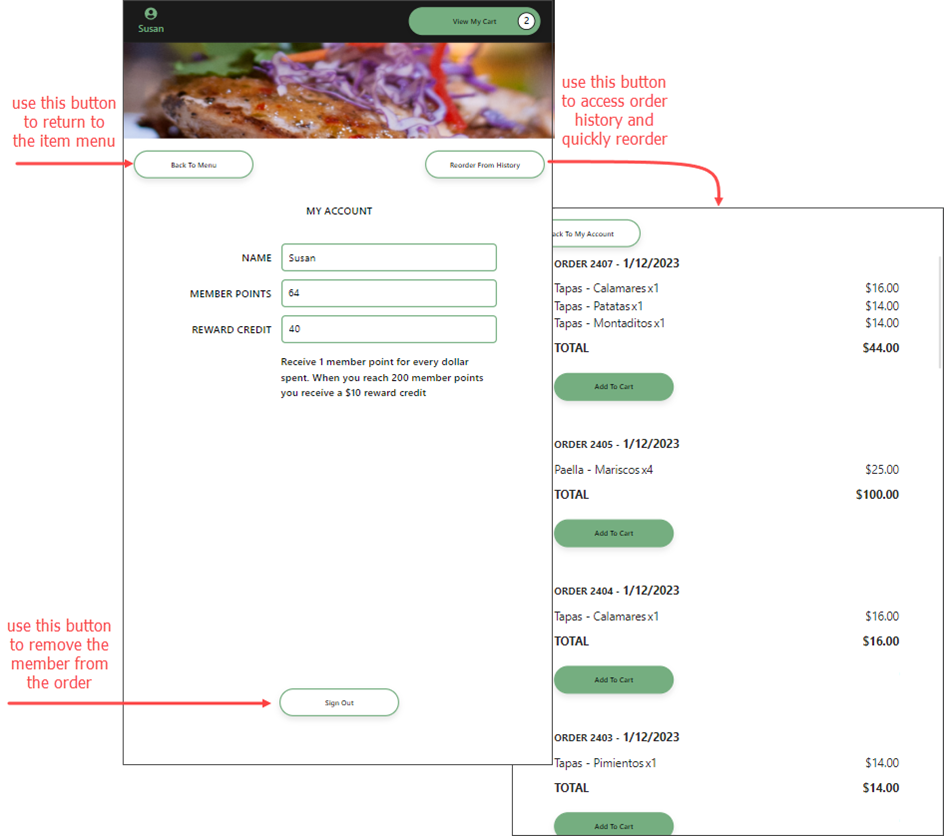
Members can access their order history and re-order using the Reorder from History button and then Add To Cart from the relevant order.
Entering the Customer Details
If no member has been associated with the order the customer can checkout as a guest.
The type of on-screen keyboard displayed will be the best match for the data field selected (eg. name will display a base alpha-only keypad, mobile will present a numerical keypad, while email will show an alpha-numeric keypad).
Required fields will be marked with an *.
Enter the Customer Details and use the To Payment Method button to continue.

Paying for an Order using the Kiosk
From the Order Cart, choose the To Payment Method button to display the Payment Screen.
From the Payment Screen customers can choose the relevant payment method.
Possible payment types are:
- Credit Card (eftpos pinpad is activated)
- Scan Member (prompt to scan member barcode)
If a member is already associated, these buttons are displayed instead
- Member Points/Rewards
- Member Cash (if applicable) - Coupons (prompt for customer to scan a coupon and apply an offer or discount)
- Gift Cards (prompt for customer to scan gift card)
Multiple payments are enabled for kiosks and customers can choose more than one payment type.
Multiple payment rules apply. This article explains the rules for using multiple payment methods to finalise online orders.
Pay Using Member Points or Member Money
If a member is already associated with the sale, the Member Points and Member Money buttons will display the current balances. If the member does not have sufficient points or cash balances that button will be disabled.
If no member is associated with the sale, the customer can use the Scan Member button and scan their membership card.

Use the To Payment Summary button to confirm the payment information
The Payment Summary
Review the items in the sale, the payment media chosen and the order total.

Use the Checkout button to finalise the order.
Confirmation of a Successful Order
Once the payment has been processed, and the order submitted successfully, a customer receipt will print from the POS Printer in the kiosk.
- Use the New Order button to return the kiosk to the Welcome Screen.

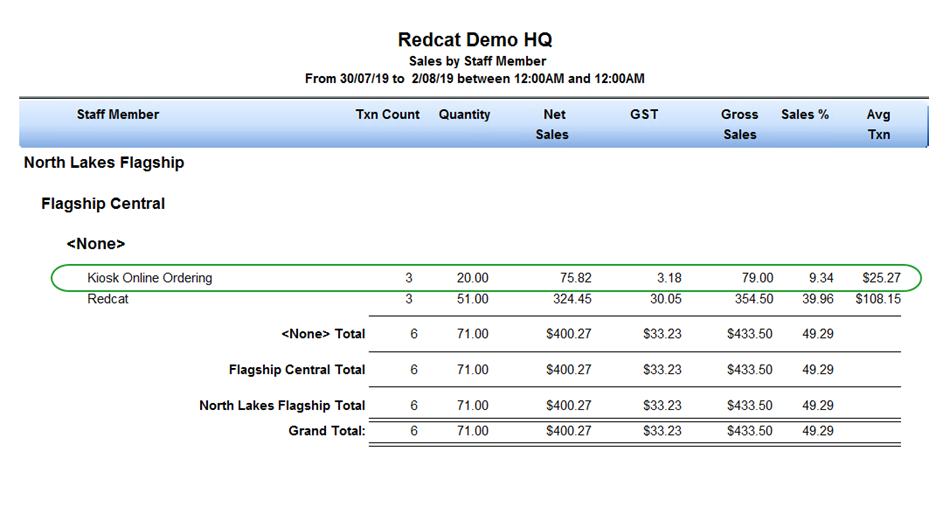
Reporting on Kiosk Sales
Sales made though a Kiosk will be reported in the BOH with:
- Table Number: WebTx
- Staff Member: Kiosk Online Ordering
- Media Type: As finalised - Member points, Member Cash or eftpos type (Visa, Mastercard etc).
To determine the value of sales originating from the Kiosk therefore, the Sales by Staff Member reporting should be used.
From BOH Database
To run the Sales by Staff Member reports from the BOH Database:
- Open Polygon POS Management.
- Choose the Reports button on the toolbar, or choose Reports from the main menu.

- In the Sales section, choose Sales by Staff Member.
- Complete the Selection Criteria as required.
- Choose OK to compile and display the report.
From Polygon Central
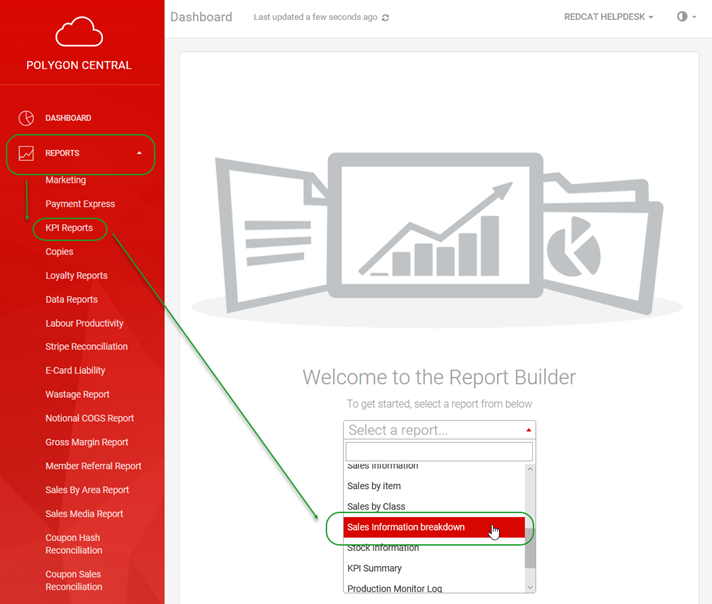
To obtain a report of sales broken down by POS User from Polygon Central:
- Log in to Polygon Central.
- From the Reports menu, choose KPI Reports.
- From the Select A Report dropdown, choose the Sales Information breakdown report option.
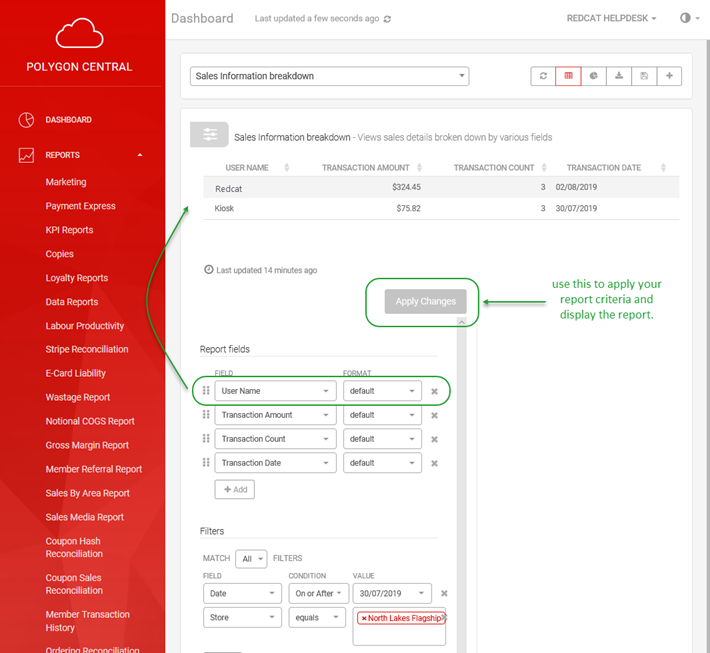
- Now ensure that the User Name field is included in the Report Fields. (You can choose the other fields as desired – the option shown below will provide the User name, the $value of the sales by each user name, the number of sales by each user name, and the date of the sales).
- Use the Apply Changes button to save your report criteria and display the report
Article Change Log
| Date | Record of Changes | Author |
|
Jan 2023 |
Screenshots updated with documentation review using 0.0.142. |
S Black |
|
May 2025 |
Member Scan section updated to reflect that unregistered members are recognised at scan and loyalty accrual will occur for the sale. This is in line with current functionality at POS. |
S Black |