Summary
Product tagging is a function within Menu Management allowing for the creation of tags that can then be assigned to menu items, and displayed to customers to advise of:
- Allergens (gluten, nuts, milk, fish etc)
- Dietary Requirements (gluten-free, vegetarian, vegan etc)
- Custom Tags (perhaps to detail mild, medium, hot etc)
The Product Overview article for Menu Information Manager is here
How to Access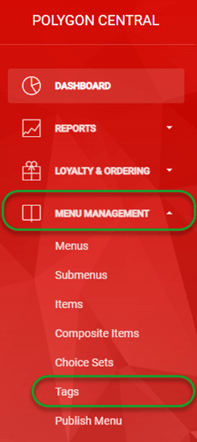
To access Tags:
- Login to Polygon Central
- Choose Menu Management from the menu
- Choose Tags from the sub-menu options.
Note: A Polygon Central user must be assigned a user Role with the following privileges in order to create and manage Tags.
MIM - Tags (view)
MIM - Tags (update)
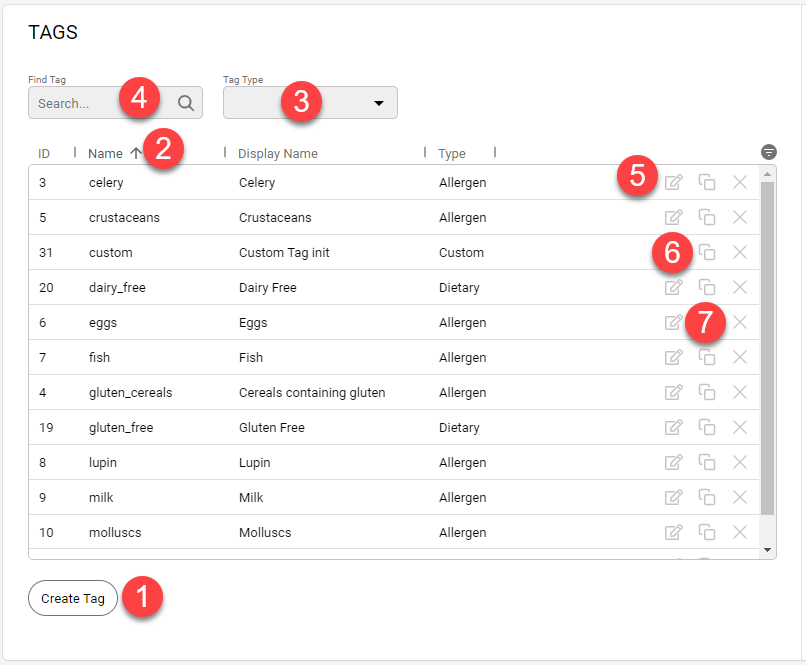
Navigating Tags
As Tags are added, they can be accessed and maintained as follows:
- Use the Create Tag button to program a new Tag record.
- Click on any column heading to sort by any column, an arrow will indicate if the current sort is ascending or descending. Click on the column heading again to reverse the sort order.
- To filter the list by tag type, select the desired type(s) in the Tag Type drop-down list.
- Use the Search field to search the list by Name.
- Use the edit icon to open a tag and view or modify the details.
- Use the copy icon to use the details in the current record as a starting point for a new tag.
- Use the delete icon to remove a tag from the system.
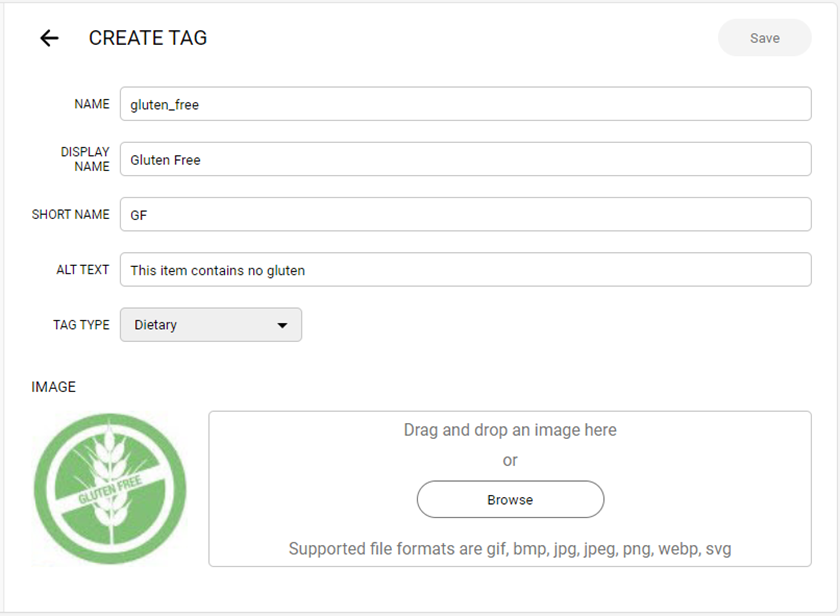
Creating a Tag
To add a new tag:
- Use the Create Tag button and complete the form:
- Name: This is the internal name for the tag
- Display Name: This is the customer-facing name for the tag
- Short Name: If there is no image uploaded for this tag, the text entered here will be used as the display icon for customers. eg. VG would be displayed in a circle in place of an image.
- Alt Text: This text will be displayed if the customer hovers over the image.
- Tag Type: select the relevant tag type
- Allergen
- Dietary
- Custom (allows you to create a set of tags for your own purpose) - Add an image to dietary or custom tags if required. You can drag and drop images onto the form, or use the browse button to navigate to and select the image. File formats for images supported are gif, bmp, jpg, jpeg, webp and SVG.
The recommended specification for tag images is 48px x 48px.
Images are not supported for allergen tags - only text will be displayed so as to avoid any possible confusion.
- Use the Save button to record the tag.
Creating a new Tag from an existing Tag record
- Decide which Tag to use as the base and choose the Copy icon
 at the right of that Tag.
 - The Tag form will be opened with all details from the original Tag shown.
Make your changes as required.
When replacing the image, hover over the existing image and click the X to remove it.

Editing a Tag
If you need to make changes to a Tag:
- Use the edit icon
 at the right of the tag to open the record
 - Make the required changes
- Use the Save button to save the amended Tag record.
Deleting a Tag
If you need to delete at a Tag:
- Use the delete icon
 at the right of the tag
 - Use the Confirm button on the confirmation of deletion message to permanently remove the Tag.
Related Articles
Further information can be found in the following articles.
Menu Management - Composite Items
Menu Management - Publish Menu
MIM - How to: Create a Family Pack with multiple mains and sides.
Article Change Log
| Date | Record of Changes | Author |
|
June 2023 |
First publication of this article. |
S Black |
|
August 2023 |
Added image specification 48px x 48px |
S Black |
|
August 2025 |
Added links to the How To articles in the Related Articles section. |
S Black |