Summary
The PLU Ingredients table can be used to define a set list of items, available for a POS user to select from when selling this PLU. This process also takes into consideration the build order for the item.
Contents
Replicating Conversational Ordering list across like PLUs
Advanced Programming – Using PLU Modifiers
How to access
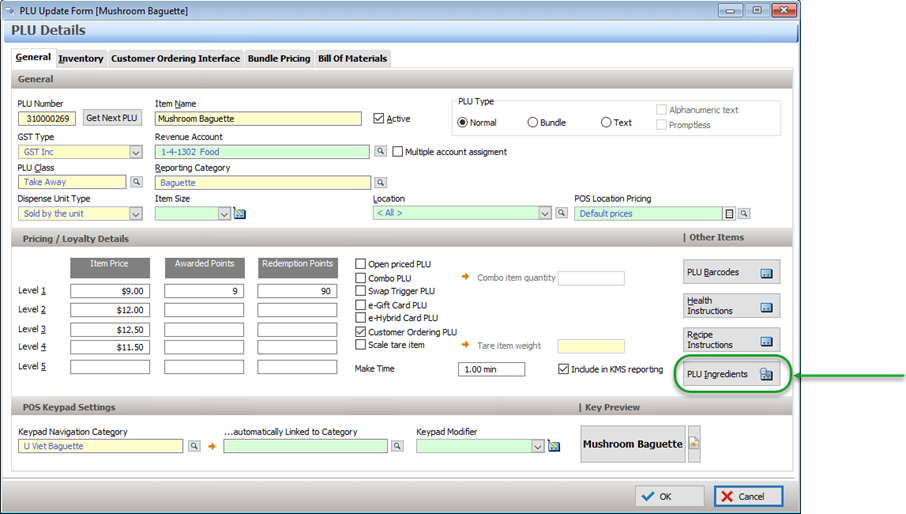
- Highlight the Parent PLU and click on the Change button
- Click on the PLU Ingredients button to access the PLU Ingredients Update Form
Conversational Ordering
Now you need to define the list of ingredients that form the possible selections for this item.
- Choose the Conversational Ordering tab
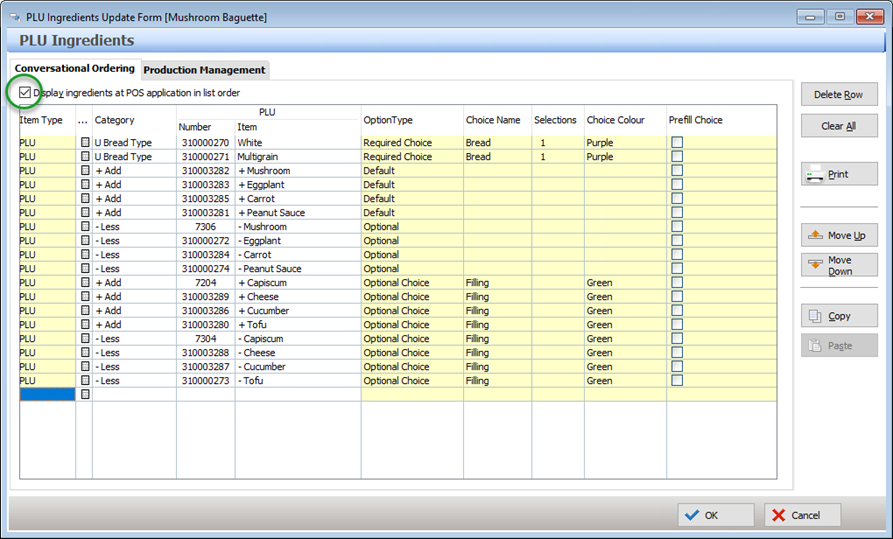
- Decide if you want to control the order that items are listed at the POS, or if you are happy to have the POS automatically list in the items in each Option Type | Choice Name in alphabetical order.
If you want the items to display in the programmed order, ensure the Display ingredients at POS application in list order setting at the top of the window is turned on. - All ingredients that can be used on this particular Parent PLU now need to be selected and added to the table (ie. This will include every possible Add and every Subtract Ingredient PLU). To do this, choose either PLU or Category from the drop down Item Type
Choosing PLU will display the PLU File and multiple items can be selected from the list and added simultaneously.
Choosing Category will display the Keypad Categories File where you can choose to add a single category to the list. Remember, ALL PLUs that exist within that category will be available at the POS.
For example, the list configured below with 5 records at BOH, expands out to show 14 PLU records at the POS.
- Now all the available ingredients have been selected, you can determine the Build Order –
 this refers to the sequence in which the ingredients will be displayed or printed for production purposes. In other words, the order in which ingredients will be used to produce the item.
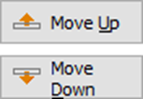
The Move Up and Move Down buttons can be used to alter the build order. - The next step is to define the Option Types There are five different types:
- Default
This is a required ingredient of the standard recipe for the Parent PLU. The price of any ingredients defined as default will be overridden to zero. For example, ingredients such as Cheese and Ham might be considered default ingredients for a pizza.
-
Optional
This ingredient is not part of the standard recipe for the Parent PLU, but can be added as desired by the customer. The price of any ingredients defined as optional will be added to the cost of the item (if applicable). For example, ingredients such as Anchovies and Scallops could be set as optional ingredients as while they are not in the standard recipe of the pizza, they are available to be added if the customer desires. -
Optional Choice
This ingredient is part of a group of ingredients from which the customer can choose to select but is not forced to select when ordering this Parent PLU. For example, ingredients such as Garlic, Mixed Herbs and Chilli Flakes are set as optional choices with a Choice Name of Seasoning. The customer does not have to choose any of these ingredients, but if they do they can only choose one ingredient in the group (assuming the number of selections is set at 1). -
Required Choice
This ingredient is part of a group of ingredients from which the customer must select at least one when ordering this Parent PLU (assuming the number of selections is set to 1). For example, ingredients such as Tomato Base and Napoli Base could be defined as Required Choices with a Choice Name of Base, if the Parent PLU was a pizza. The price of any ingredients defined as required choices will be overridden to zero. -
Required Choice $
These ingredients have the same behaviour as Required Choices with the exception that any $ value assigned to them will be added to sale and will NOT be overwritten to zero.
- Default
This is an example of a completed PLU Ingredients Update Form for a Hawaiian Pizza:
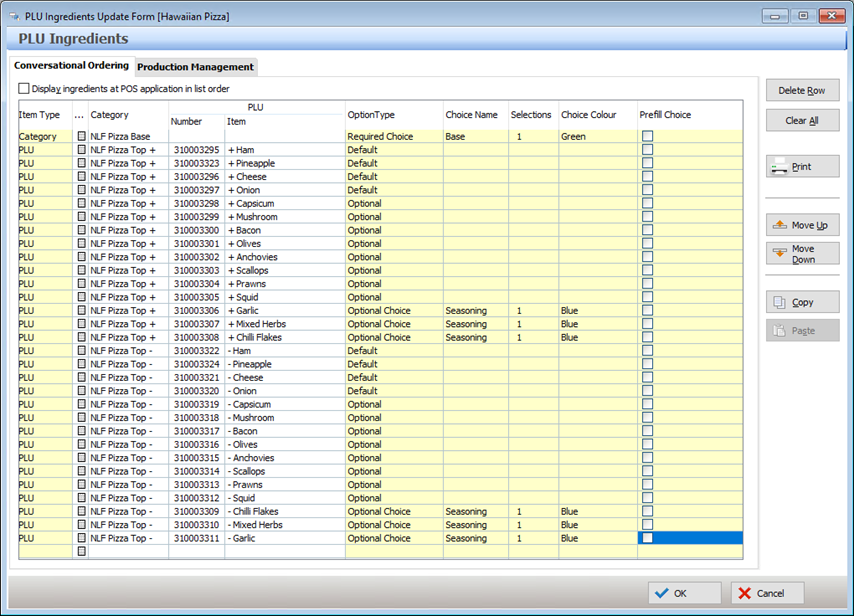
If the Option Type selected is Optional Choice, Required Choice or Required Choice $ further details are required.
Choice Name
This is the name assigned to a group of ingredients that have been defined as either Optional Choice, Required Choice or Required Choice $.
Selections
This refers to the number of ingredients that can be selected from this group of choices (ie. Choice Name). For example, if the ‘Seasoning’ choice was changed to ‘2’ selections, this would mean that the customer could select up to two of these ingredients.
Choice Colour
This refers to the colour that the ingredients in this choice group (choice name) will be displayed in QSO mode on the POS Terminal.
Prefill Choice
If there is an ingredient included in an Option Type that would be considered the ‘usual’ selection, placing a tick in the Prefill Choice box will have this item automatically included at the POS. Staff are still able to quickly swap it out for something else if required. For example, the Double Beef Burger Combo comes with a double beef burger, chips and a coke. The choice name Drink can include all available soft drinks, with the coke ticked as a prefill choice. This means that when selling the combo at the POS, the coke is already the selected choice but can be easily changed for fanta if the customer desires.
- Once all ingredients have been entered and the build order is correct, press OK to save the PLU ingredients for a Parent PLU.
Notes when using Item Type – Category
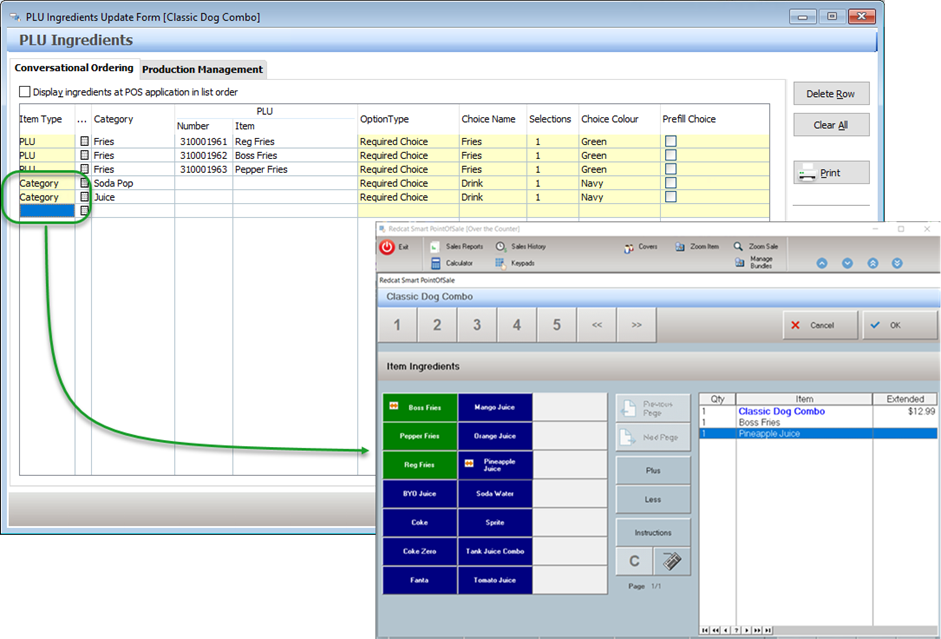
The major advantage of configuring the list using Category records is that adding a new PLU to the Category will in turn make this new PLU available in the QSO screen. The user will no longer need to manually add the new item to each PLU Ingredients list(s) where it is required. For users with a large range of menu items using the same list of Ingredients, this can be a major time saver for database maintenance.
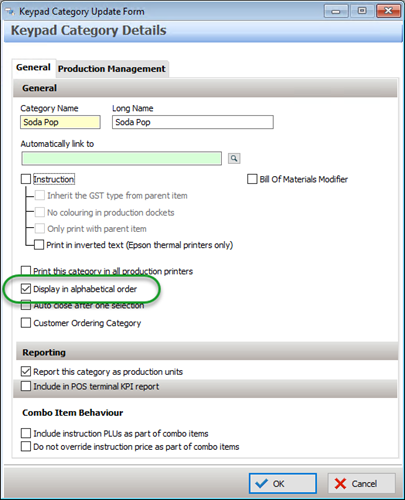
The user no longer has the opportunity to set the list order for items within a Category, so at POS these will display in the QSO screen according to this ‘Display in alphabetical order’ category setting:
Multiple categories may be configured into the same Choice group. The Choice Name does not need to match the Category Name.
Ensure that all users who have access to manage PLUs are aware of which Categories are being used as part of QSO lists, and that they understand the effect of adding new PLUs to these Categories.
Production Management
The Production Management tab enables the assignment of the Production Ingredient PLUs that will substitute on production dockets or KMS devices.
Note that this can be configured for all PLUs regardless of if they're using QSO for item entry or not.
Quick Service Ordering: Programming Production Ingredients
Replicating Conversational Ordering list across like PLUs
PLU Ingredient lists can be long and complicated and once one is successfully created it is often best to copy and paste the completed list to the next PLU with similar requirements. This can minimise programming time significantly and any changes to default ingredients or build order can then be adjusted.
The copy and paste function is available for the Conversational Ordering tab or the Conversational Ordering and Production Management tabs.
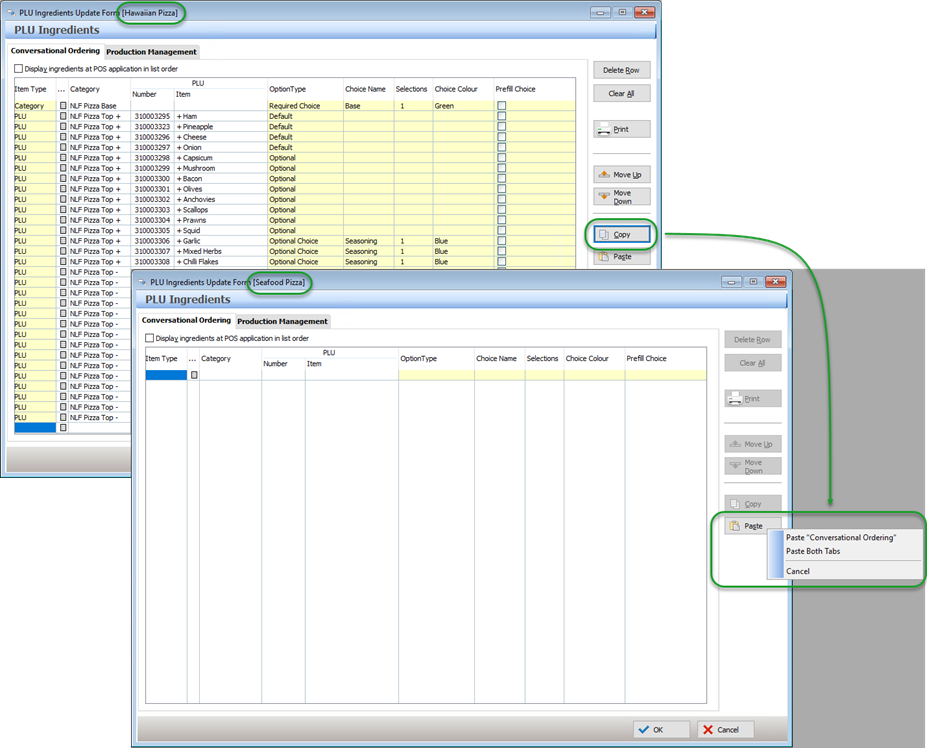
- Click on the Copy button in PLU Ingredients Update Form of the target Parent PLU.
- Click on the Paste button in PLU Ingredients Update Form of the destination Parent PLU.
- Choose to Paste “Conversional Ordering” or Paste Both Tabs.
In the example below, the Ingredient List programmed for Hawaiian Pizza is to be copied into the Seafood Pizza PLU.
Advanced Programming – Using PLU Modifiers
NOTE: This is only required if you are using Legacy POS. This is no longer a requirement when using Polygon POS
If your products come in more than one size, PLU Modifiers can be used to switch from one size to another quickly and easily in QSO Mode. However, care needs to be taken when assigning modifiers to both Parent and Ingredient PLU’s and also when programming PLU ingredients.
For more information on PLU Modifiers (refer to the online helpfile section on Setting up PLU’s).
- Parent PLU’s must be programmed with PLU Modifiers as per usual.
For example, if the PLU Modifiers were defined as ‘Sml’ and ‘Lrg’ then Parent PLU’s for Hawaiian Pizza need be named - ‘Sml Hawaiian and ‘Lrg Hawaiian or ‘Hawaiian Sml’ and ‘Hawaiian Lrg’. The modifier name must be included in the name of the Parent PLU. - Ingredient PLU’s need to be created for each size (PLU modifier).
This means for every ingredient that is to be used on a Parent PLU (that is using PLU Modifiers) an Ingredient PLU needs to be created for every PLU modifier defined.
For example, for the ingredient of Ham the following Ingredient PLU’s would need to be created:
- + Ham (with the ‘Sml’ PLU Modifier defined)
- + Ham (with the ‘Lrg’ PLU Modifier defined)
- – Ham (with the ‘Sml’ PLU Modifier defined)
- – Ham (with the ‘Lrg’ PLU Modifier defined).
In short, you need an Add and Subtract Ingredient PLU for every different PLU Modifier defined.
Program the appropriate PLU Ingredients to the appropriate Parent PLU’s. For example, all Ingredient PLU’s with the ‘Sml’ PLU modifier defined would need to be programmed in the Parent PLU that also has the ‘Sml’ PLU Modifier defined. Likewise, the Parent PLU’s and Ingredient PLU’s with the ‘Lrg’ PLU Modifier defined would need to be used together.