This article provides instructions on using Tyro Pay@Table with POS.
Tyro pinpad model
You will need to have one of the Tyro pinpads which operates via WiFi to utilise the Pay@Table functionality.
- Yoximo 3G; or
- Xentissimo
If you currently have a countertop or non-WiFi enabled Tyro pinpad, please contact Tyro Customer Support Team on 1300 966 639.
Enable Pay@Table with Tyro
Please check with the Tyro Support Team (1300 966 639) that your pinpad has been enabled for Pay@Table.
You may need to provide:
- The serial number from the pinpad
- The MID and TID from the pinpad
- The static IP address of the Redcat POS master terminal as the ‘server.IP.address’
- The Passphrase – Redcat123.
Finalising Sales using Pay@Table
To finalise a sale using Pay@Table:
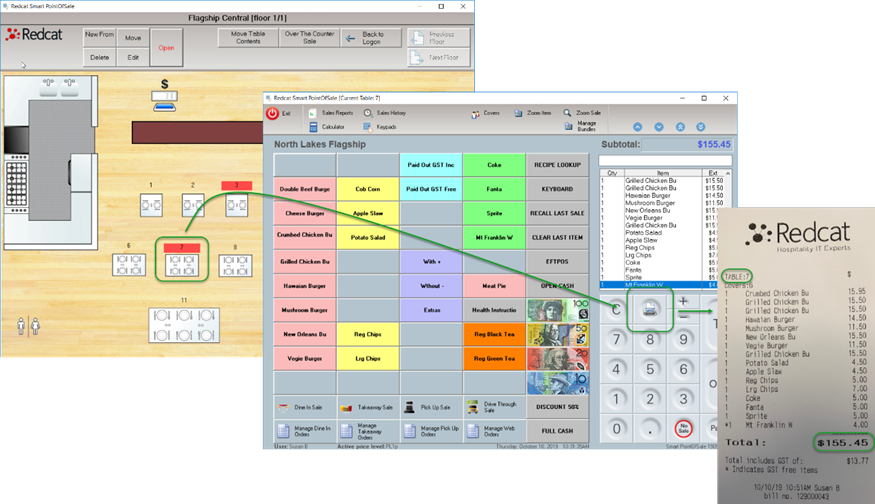
- When the customer requests the bill, recall the table at the POS, use the printer icon to print the itemised account and save the table again.
- Present the bill to the customer.
Paying in Full
- The tyro pinpad will display ‘Enter Operator ID’ – enter your POS Staff PIN number and choose OK.
- Enter the customer Table Number and choose OK.
- The pinpad will display the total outstanding on the table – pass the pinpad to the customer and ask them to choose the Full
- The pinpad will display the total amount outstanding and offer the customer the option to leave a tip. Customer chooses either the No Tip or Yes
- If applicable, the customer is prompted to enter the Tip Amount and press OK.
- Pinpad now displays the total amount to be charged to the customer card (total outstanding plus tip if applicable) and prompts the customer to Insert, Swipe or Tap their card.
- Payment is processed and the pinpad displays Approved. Customer can choose to print a customer copy if desired.
- Pinpad displays Payment Complete and prompts the customer to return the pinpad to the staff member.

Pay@Table communicates the payment information to the POS and the sale is finalised. If the finalised sale is recalled, the payment screen will show:
- The subtotal of the sale has been increased accordingly.
- The total charged to the customer card
- The amount of any tip added at the pinpad by the customer.

A printed Tax Receipt will also include surcharge, total charged and tip.
Split Bill Payments
Pay@Table will allow the customers to split the bill amongst themselves easily:
- When the pinpad displays the total outstanding on the table – pass the pinpad to the first customer where they can choose the Split
- The pinpad prompts the customer to Enter your share of the bill, and press
- The pinpad will display the amount of the purchase and offer the customer the option to leave a tip. Customer chooses either the No Tip or Yes
- If applicable, the customer is prompted to enter the Tip Amount and press OK.
- Pinpad now displays the total amount to be charged to the customer card (split bill amount plus tip if applicable) and prompts the customer to Insert, Swipe or Tap their card.
- Payment is processed and the pinpad displays Approved. Customer can choose to print a customer copy if desired.
- Pinpad now displays the total of the bill outstanding, and again prompts the customer to choose either the Full or Split
- The remaining customers repeat the process each pay their share, tipping as desired.
- Pinpad displays Payment Complete and prompts the customer to return the pinpad to the staff member.

For split bills, the POS will recognise each separate payment and will include multiple surcharges as appropriate.
Any tips that the customers have added will also be recorded separately against each payment, and sum to the Total Tips amount shown for the table.

Processing a Partial Payment
If one person at the table wishes to pay and leave before the remainder of the diners, you will still follow the process listed above for Split Bill Payments and the customer will process a payment for the desired amount including any tip they wish to add.
When the amount remaining on the table is displayed, rather than processing the remaining payments simply use the red STOP button on the pinpad.
This will indicate that the payment process is finished and return the pinpad to ‘ready’ status. It also indicates to the POS Terminal that the table is now able to be accessed if desired.
Refunding payments made through Pay@Table.
If a refund is required for a payment that has been made using Pay@Table, the refund will need to be processed at the POS Terminal using an integrated EFTPOS pinpad.
To do this:
- Enter the Sales History and choose the transaction to be refunded.
- Use the Edit button to recall the sale.

- On the Pay Screen, highlight the eftpos media payment
- Choose the C (Clear) button.
- The system will advise that an EFT reversal must be issued. Choose Yes to process the reversal.

- The POS Terminal may prompt for your POS User Password.
- The Tyro integrated EFTPOS pinpad may prompt for the entry of the supervisor or refund password.
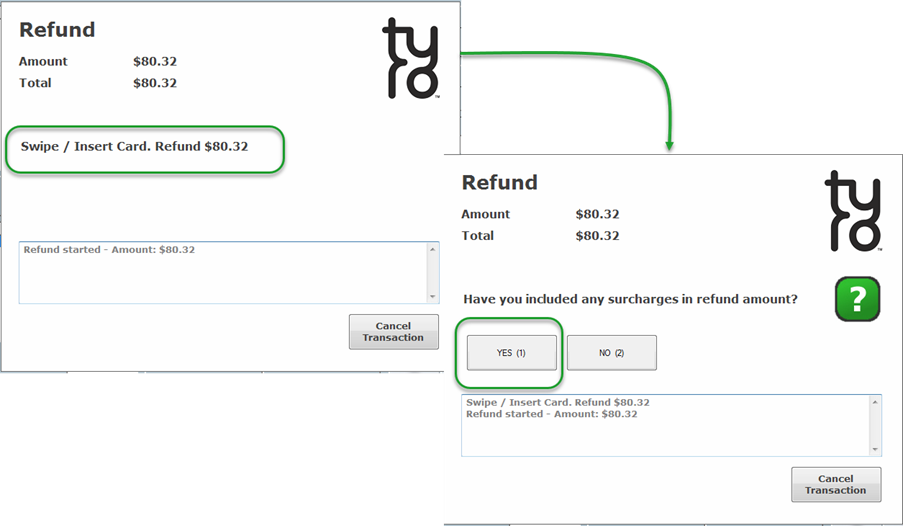
- The POS Terminal will then display the Tyro refund screen. Ask the customer to insert or swipe their card.
- The amount that the POS sends to the pinpad for refund is INCLUSIVE of any tips and surcharges. Choose Yes to the Have you included any surcharges in the refund amount?
- The processing of the refund is finalised, and the pinpad will display Approved.
Note: You must now either clear the sale, or enter another payment to finalise it.
Record Locks
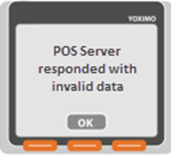
While the POS Terminal has a table open, the Pay@Table pinpad cannot process payments for that table. Similarly, while the Pay@Table pinpad is processing payments for a table, the POS Terminal cannot access that table.
- While the Pay@Table pinpad is processing payments for a table, this message is displayed if the POS Terminal tries to access the table.
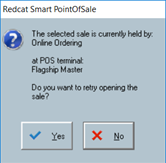
- While the Pos Terminal has a table open, this message is displayed if the Pay@Table Pay@Table pinpad asks for the record for that table.
Releasing a Locked Record
If a request from the Pay@Table pinpad is cancelled using the STOP button (either before any payment is processed, or after a partial payment using the split bill method) the ‘lock’ record is removed and the table made available for use.
It may be possible in particular circumstances - for example, the Pay@Table pinpad battery dies after requesting the table record – for the table record to remain locked at the POS Terminal.
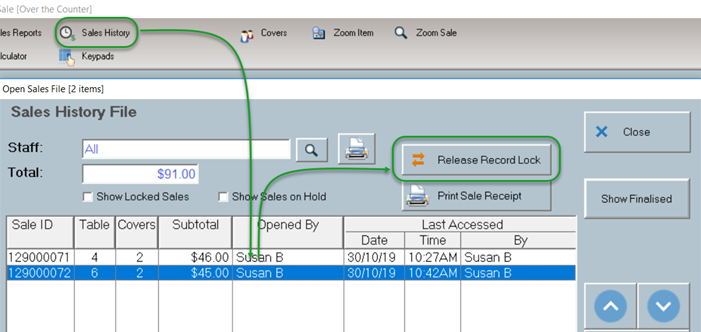
To release the record lock:
- Access the Sales History File using the Sales History button on the toolbar.
- Highlight the relevant table record.
- Use the Release Record Lock button to release the table.
POS Staff Passwords
The Pay@Table pinpad will not accept POS Staff Passwords which have leading zeros (eg: 0068). Staff with passwords that have leading zeros should request a password change from management.
Article Change Log
| Date | Record of Changes | Author |
|
September 2023 |
Migration of article first published October 2019 |
STB |
